Car Swap Project part 8: Olympia cars and liquid rust techniques: In this installment of the Car Swap series, David explains how he completed the HO scale Olympia cars for Seth and Gerry’s layouts. Starting with a few of his own decaling tips, David explains how he weathered the cars using various paints, his airbrush, and a technique he likes to call, “liquid rust.”
David: Gerry and Seth, you guys did a great job finishing your cars.
Seth: Thank you. I liked Gerry’s work as well.
Gerry: Thanks! So did you guys. I can’t wait to get the new cars on my layout!
David: And I’m also surprised that by the time we got to my part, I still had some techniques to share that are different from those you both did.
Gerry: What can I say? It’s a big hobby!
Seth: You said it.
Gerry: I guess I can say that after all, can’t I?
David: Decaling the cars went pretty much as expected. I gloss-coated the cars using Testors spray lacquer. Gerry was correct, in that the ALPS printer ink being like wax, I had to handle the decals carefully. A couple times in the process of applying the decals, I wound up with floating bits of white ink that had separated from the decal.
Gerry: Did the entire decal fall apart?
David: Not at all. In fact, even when I lost a layer of white along one of the edges of the oval herald, there was enough left underneath it to still make the decal usable.
Gerry: Most times using only a single layer of white isn’t enough because, as I mentioned in Part 4, it’s translucent enough that the color beneath it shows through. I actually did three passes of white on these decals. So, the top pass must’ve come off.
David: I will say that the oval, a neat feature of the 1950s Olympia logo, proved to be easier to cut out with scissors than using a hobby knife.
Seth: It makes sense. The scissors would give you better cutting the decal paper around curves.
David: Exactly.
Gerry: Not X-Acto?
David: Nope. I used a cotton swab to collect the floating bits of ALPS ink to keep them from getting into the wrong places.
Gerry: I see you laid out the 1950s car a bit different than we’d originally mapped out.
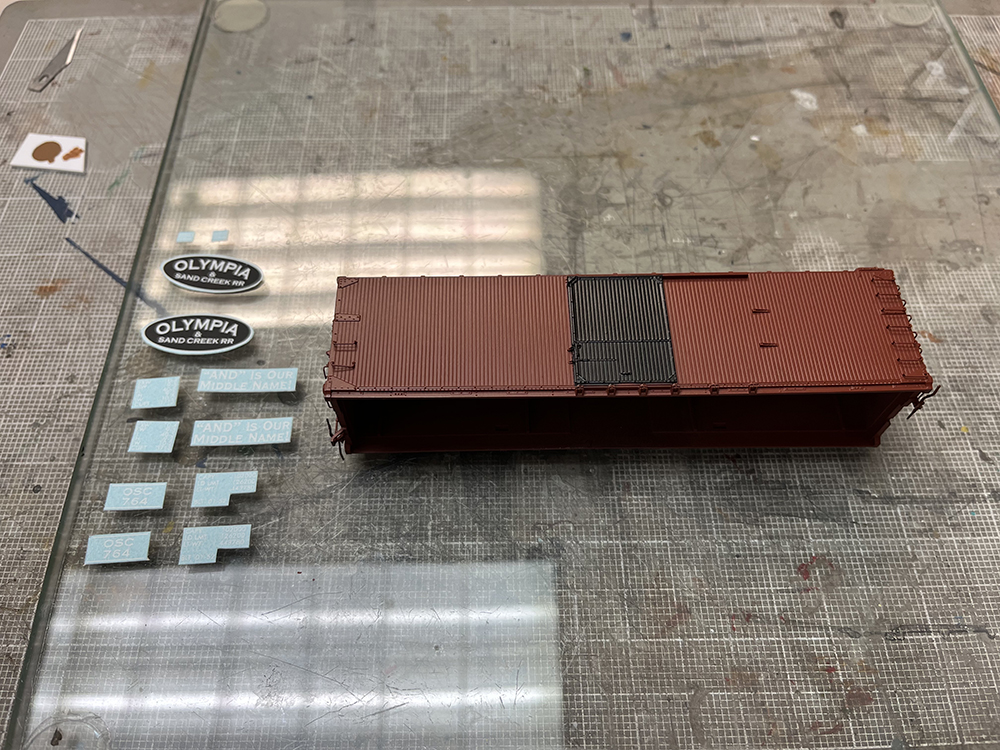
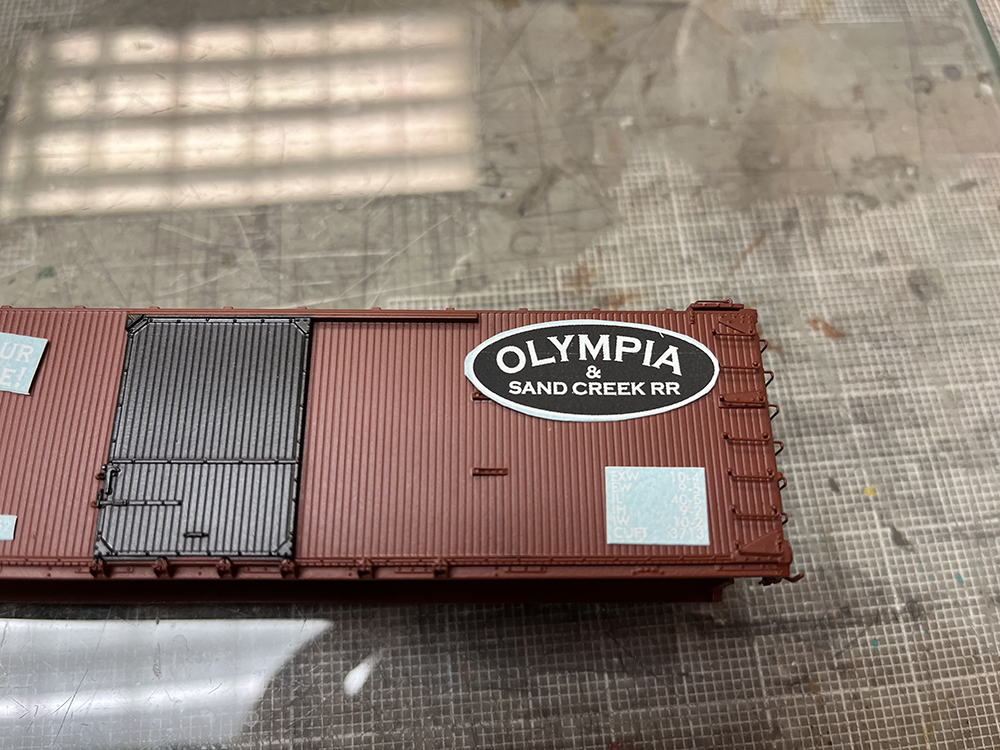
David: Yes. One thing I like to do before decaling a car is to lay the dry decals on the model to make sure things will line up properly. In doing so, I discovered the oval herald, originally set for the right side of the car, was going to lay over one of the molded-on doorstops. It’s a highly detailed piece, and it would’ve been a lot of work to get the decal to lay down properly over it.
Gerry: So, you swapped sides?
David: Yes, the left side of the car was wide open. The “And is our middle name” slogan was narrower and easily fit above the door stop, so it was a simple switch.
Seth: I see from the photos, you work on a sheet of glass.
David: I’ve used a piece of plate glass for decaling work for years. It makes a great surface for cutting the decals with a sharp knife. I don’t like to cut decals on a self-healing mat, as it tends to curl the edges along the cut, which can cause problems when trying to get the decal to lay flat on the model. The glass fully supports the decal sheet when cutting, eliminating the curling effect.
Gerry: Did you have any trouble getting the film to lay flat on the car over the details?
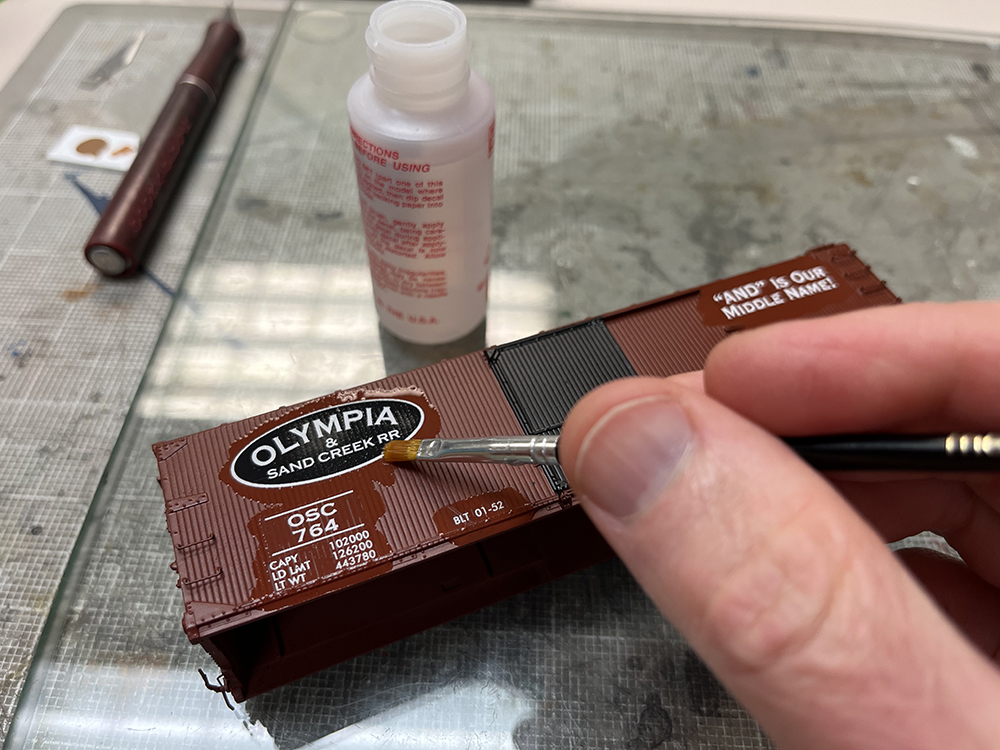
David: The film we used on these (Kadee decal film) is thicker than Micro-Scale decals, and at first I thought that might be a problem. But after poking the trapped air spaces with a sharp hobby knife and applying two coats of Micro-Sol decal solution, they snugged down over the model well.
David: I did learn something important from Gerry in this project:
Seth: Oh no, I’m never going to hear the end of this!
Gerry: You betcha!
David: For years I’d applied a matte finish directly over the decals to seal them and also help hide the decal film, but it didn’t always hide it well. Gerry told me to apply a gloss coat first before the flat.
Gerry: And it worked?
David: Like a champ! The gloss made the sheen on the surface of decal film and the car side match. I then applied the matte coat of lacquer, and it did a great job of blending the edges of the film to the car. You can still see them when you hold the car at certain angles in the light, but the finished model may be the best results I’ve ever had from a full-car decaling project.
Gerry: And I get to have “the best results I’ve ever had from a full-car decaling project” on my layout!
Seth: And so do I!
David: See? Everybody wins!
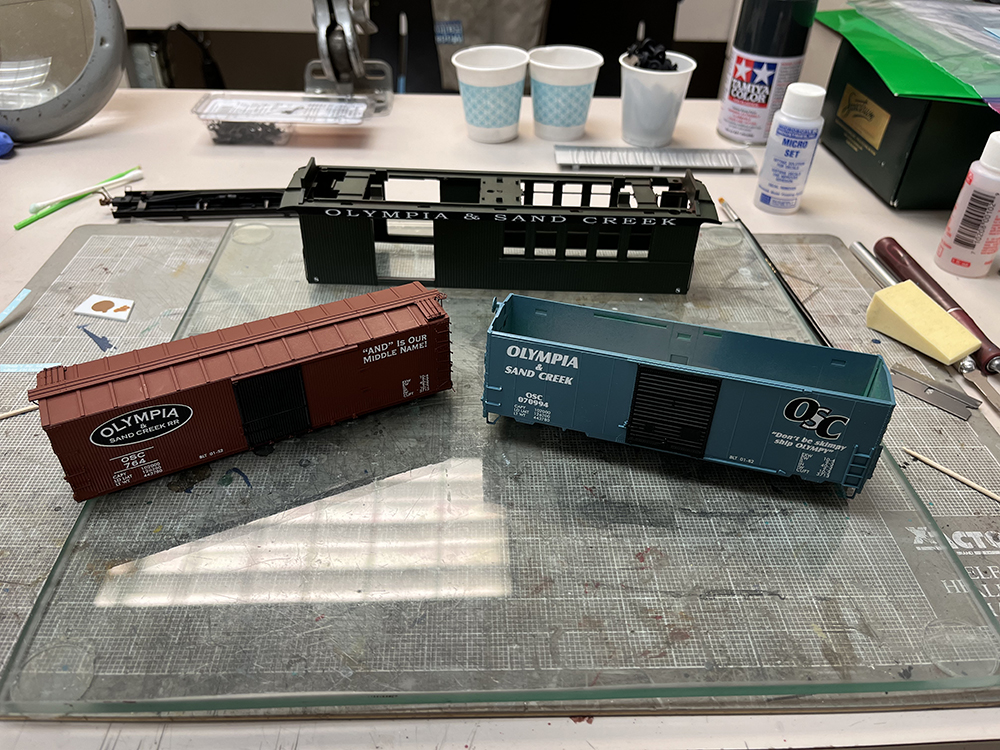
David: I’d finished my cars a couple days before you both did, and I had no idea how much weathering you were going to do.
Seth: The dirtier the better on my railroad.
David: I was so pleased with how the decals and paint turned out, I decided to use just some base road grime. (I usually use heavy weathering to cover decal problems.) I used my airbrush almost exclusively for this, starting with a coat of thinned Vallejo Model Air Black Gray (71.055). I sprayed this along the underside of the car and over the trucks. It’s very similar in color to the Tamiya Rubber Black (TS-82) that I used to paint them. Next, I used Vallejo Light Gray (71.298), thinned with 3-parts Vallejo Airbrush Thinner (71.361). I spray this along the bottom of the car, as well as on the trucks. This really makes the detail on the trucks stand out.
Gerry: You’ll have to do that to the trucks on the BV car for your layout. I always forget.
David: The trucks are so far under the On30 boxcar, you hardly can see them anyway, so no worries! As for the dust, I also spray it along the edges of the roof and then streak it down the sides of the car in various places to simulate where dirt runs off when it rains. The lighting in the photo isn’t great, so you’ll have to trust me that it’s there. Finally, I apply Vallejo Black (71.057), mixed with 5-parts thinner. I apply this to the entire car as a control coat, which blends all of the weathering together and dulls some of the brightness of the white lettering. I also apply it along the center of the car’s roof to simulate grime. For a steam era railroad, I apply a lot of it to the roof to simulate soot. Once I’d cleaned up the airbrush, I brush painted the wheelsets and the couplers with Vallejo US Flat Brown (71.026) which is a good muddy rust color. A green microbrush works perfect for this process.
Gerry: Remember to keep the paint off the axle tips!
Seth: Yes, we want free-rolling cars on the PBL.
David: Not to worry, I always keep the paint off the axle tips and the wheel treads.
Gerry: I see the finished photos of Seth’s car show a pretty ratty looking roof.
Seth: Yes, he asked if I minded a little rust, and I told him it was essential for my layout.
David: The rusty roof was probably the easiest part of the entire project. Once I’d finished with airbrush weathering the car, I sprayed it with Testors Dullcote. One fun property of Dullcote is that when you apply alcohol to it, such as used in a stain or a wash, it causes the lacquer to haze, which isn’t always welcomed on a finished model.
Seth: You know you can fix that by applying another round of Dullcote.
David: Yes, that works great to remove the haze. But, you can also use the haze as a weathering effect, and it works particularly well in conjunction with powdered pastels for rust. I’ve been using a product from Monroe Models (monroemodels.us) for several years now called weathering washes. These are solutions of powdered pastel mixed with rubbing alcohol. When applied to the dried Dullcote, the weathering washes haze the surface and produce very convincing gritty rust effects.

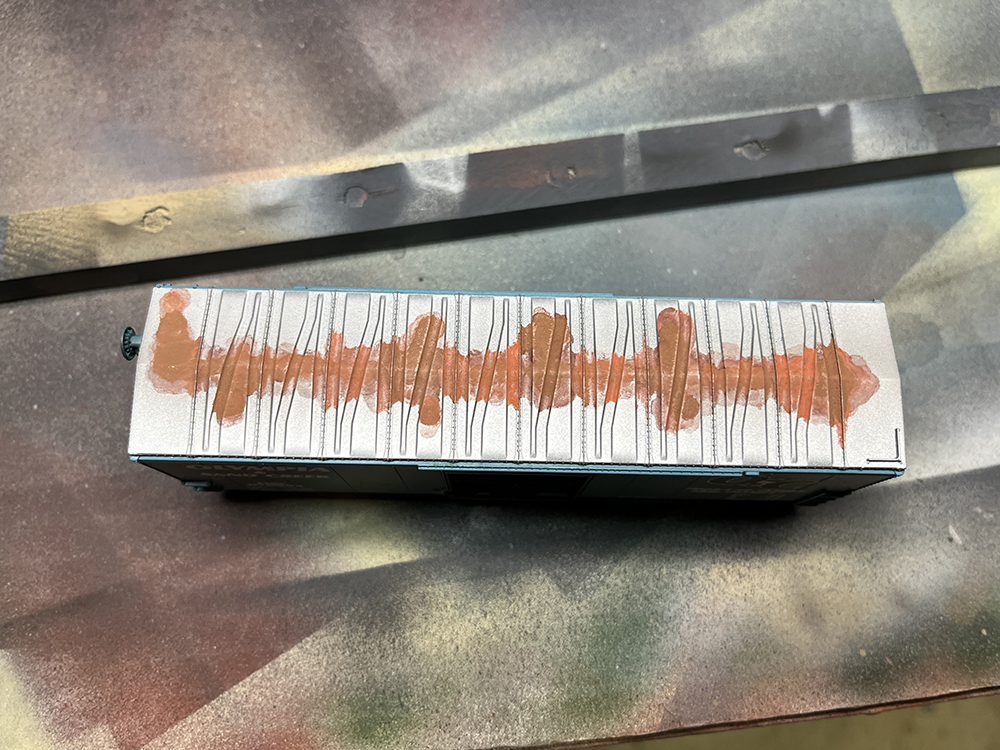
David: To rust the roof on Seth’s car, I applied the Dark Rust wash first, blotting it onto the car with a microbrush and letting the solution flow outward from the center of the roof. When the first application had dried, I applied successive washes of Real Rust, followed by Rusty Brown.
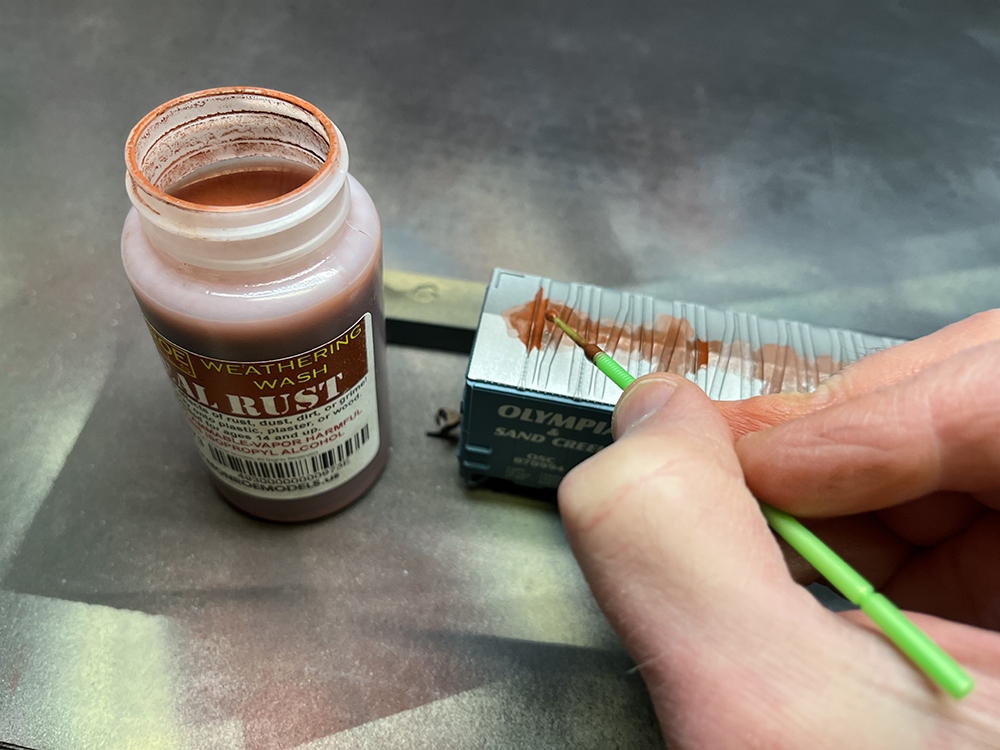
David: Rust works from the center out on a steel car, with the darkest rust in the center being the oldest and the brightest rust at the edges being the newest. Keeping that in mind, I applied the brighter, Real Rust to the edges and the Rusty Brown just in the center of the rust patches.
Seth: Can you use that on the sides of the car too?
David: Absolutely, however, the rust wash is somewhat translucent, so the effect looks best on lighter-colored surfaces.
Gerry: So, how do you keep the powdered pastels from coming off on everything?
David: I spray it with more Dullcote.
Seth: Won’t another coat of Dullcote remove the haze effect?
David: It removes some. But just a light dusting is enough to seal the powders sufficiently, and not remove all of the haze. The important thing is to not overly handle the finished model.
Gerry: Makes sense.
Seth: So, besides Gerry’s tip on sealing decals with a clear gloss coat first, did you learn anything else with this project.
David: Yes, I did, and so did the both of you. We’ll cover that and take a final look at the finished cars on the appropriate layouts in the next installment.
Gerry: Just as soon as you get them in the mail!
Follow the links below to read the previous installment in the Car Swap Project series!
Car Swap Project Part 1: Trading models
Car Swap Project Part 2: Stripping lettering from models
Car Swap Project Part 3: Painting plastic models
Car Swap Project Part 4: Railroad herald design class
Car Swap Project part 5: Printing decals with an ALPS printer