


How to change a locomotive brake shoe: Probably the most important mechanical devices in railroading are the brakes. Whether they be on locomotives, freight cars or passenger cars, properly maintained brakes are a critical component for safe operations.
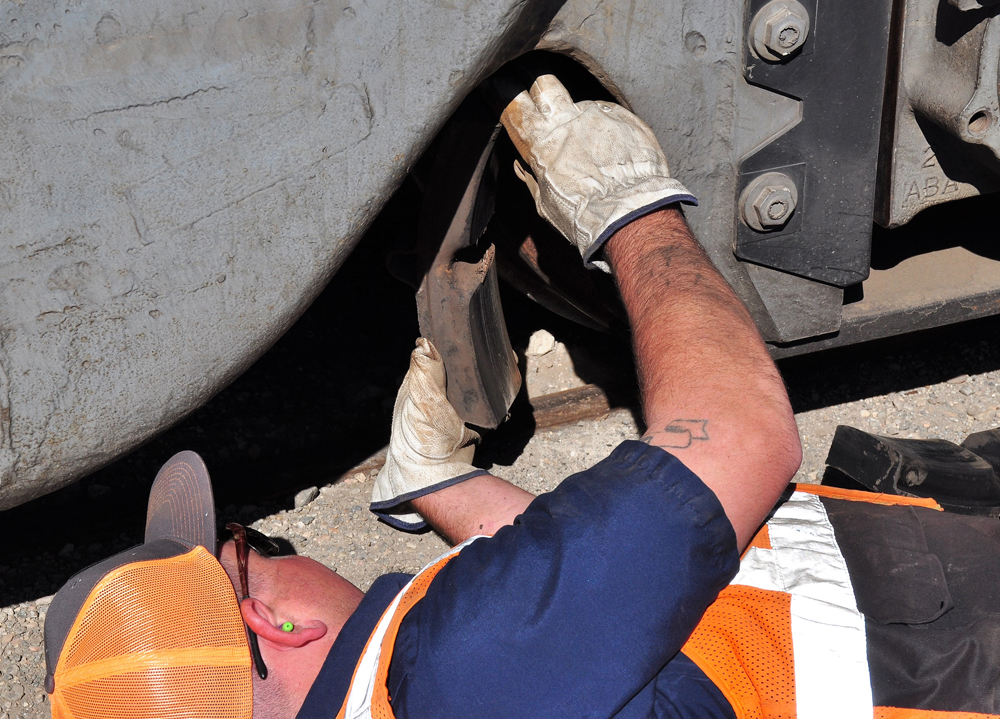
Just like the brakes on your personal vehicle, the material composition on brake shoes wear out and have to be regularly replaced.
Let’s look at how a railroad mechanic goes about swapping out a worn-out brake shoe for a new one.
“The first consideration is safety,” says Gerald Riley, Mechanical Supervisor for Sierra Northern Railway’s Ventura Division. “Whatever piece of equipment you’re preparing to work on, it and the track it is on should be blue-flagged, indicating it is not to be moved.”
In this case, Riley will be working on a running locomotive, so the first thing he does is isolate the truck so, if for some reason the brake system goes into emergency, the brakes won’t activate. He doesn’t want to lose any fingers.
There are many railroad brake shoe models, so the next step is to compare them to ensure they’re compatible.
Now it’s time to reach in and remove the slack adjuster pin on the truck to give Riley more working space. Then he removes the slide pin that physically holds the brake shoe in place, tapping the bottom side of the pin and pushing it upwards. When it comes off, the pin gets pulled off and the brake shoe can be slid out, pulling it towards you at the same time.
Before installing the new shoe, the wheel is visually inspected to make sure there are no signs of wheel overheating, and flat spots as well as checking the brake rigging itself to make sure none of the pins are worn or broken. Riley will also inspect the brake head.
“Once I’m satisfied everything is in good working order, I’ll slide the new shoe in and reinstall the slide pin,” he says. “Then I’ll adjust the slack according to the data on the locomotive’s blue card. Those measurements can vary from one unit to another so it’s important to double check the information. I’ll also test it as I’m taking the measurements.”
Once the work has been completed, Riley will ensure everyone is in the clear and cut in the truck, set the brakes and measure piston travel.
If everything has gone according to plan, the entire job will have taken about 10 minutes.


I have never laid on the ground to change any brake shoe in 38 years working for the railroad. The old ones were cast iron and heavy. The newer ones are composite and are very light in comparison.
Looks like it might be more similar to changing shoes on a semi than automotive duty brakes, especially the part about checking and setting the slack adjusters. Don’t at least some passenger railcars have disk brakes? Wonder how hard those are to change. It generally takes me about an hour to do all four wheels on my disk brake pickup, somewhat less to do our car and lots more to do the old truck with drums on the rear. No blue flag needed.
Meanwhile, back at home, I’m still trying to find the floor jack handle and wheel chock. After one hour I give up and pay a mechanic $250 and lose my vehicle for 2 hours.