


Tony Koester’s “Trains of Thought” column in our May 2024 issue, about the Norfolk & Western (formerly Wabash) Detroit car float terminal, inspired me to sketch up a track plan for a rail-marine Free-Mo module. I’ve written before about the Free-Mo modular standard and designing a Free-Mo module, a variant of which became Freemont Mills, Model Railroader’s 2024 project layout. But I think there’s more to explore in this flexible modular railroad standard, so that’s the format I chose for this track plan.
To refresh my understanding of how car float terminals work, I reviewed chapter 5 of Bernard Kempinski’s book Waterfront Terminals and Operations (available in the Kalmbach Hobby Store). I was intrigued by the Harlem River pocket terminals, compact, self-contained systems that connected to other railroads only via car float or ferry. But I wanted to sketch another Free-Mo module, and the point of modules is that they connect to other modules. Pocket terminals don’t connect to anything, so I discarded that idea. Maybe I’ll visit it in a later column. (You can read more about pocket terminals in Model Railroad Planning 2007 and the March 2013 Model Railroader.)
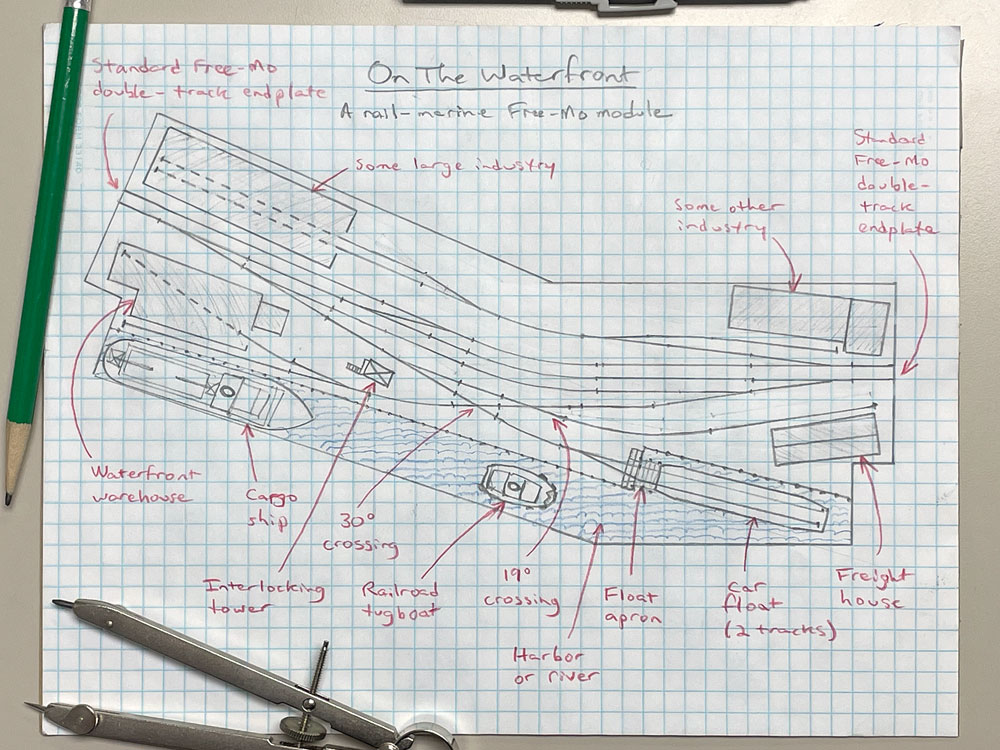
Car float terminals can be small or large. The only mandatory requirement is that there’s a car float apron, also called a transfer bridge, where car floats can be loaded and unloaded. But the photos and track plans in Bernard’s book showed other features that would increase the operating interest of my rail-marine Free-Mo module. These included a freight house, a wharf with a docked cargo ship, and a large freight warehouse. I also wanted to include a double-track main, a crossover between the two, a passing siding, and a couple of rail-served industries.
Designing a rail-marine Free-Mo module
The Free-Mo modular standard rigidly defines the shape and placement of the end plates where the modules connect. So my first step in designing any Free-Mo module is placing the end plates and connecting them with the main line. I decided to make the main double tracked for its full length, so I drew two 26″ wide double-track end plates. I extended the twin tracks straight until they intersected, then used a compass to draw the curves to connect them. (The Free-Mo standard dictates a minimum mainline curve radius of 42”, and my track-planning template only goes up to 36”.) Though that radius is rather broad for HO scale, I still had a good length of straight track left on both sides of the curves to insert turnouts.
Next, I added a crossover between the mains and a passing track that extends most of the length of the modules. Operators won’t want to have to use the main to run around their trains while working the waterfront.
At that point, I spent a long time pondering, drawing, erasing, and redrawing. It seemed obvious that the freight wharf would go at one end of the module and the car float at the other. But how to connect them to the passing track was less than obvious. Even though I had about 9½ feet of waterfront to place them along, the curve in the passing track meant that if I placed a turnout on either side of that curve, each spur could be only 2 or 3 feet long. If I tried to add additional spurs, they’d be so short they could hold only one or two cars apiece.
I decided to serve the two industries with separate spurs branching from opposite ends of the passing track and crossing in the middle. This lengthened the part of the spurs past the crossing to about 4 feet apiece — plenty of length.
I used turnout geometry from the Walthers code 83 track system, the same type we used on Freemont Mills. The curve I’d placed in the main and passing track meant that if I extended the tracks straight from the No. 8 turnouts at both ends, they would intersect at a 30-degree crossing. I drew a 12” deep bump-out on the bottom of the module to accommodate the waterfront and placed the car float on the right and the cargo wharf and warehouse on the left.
I ran into trouble again when placing the freight house. At first, I placed it on a switchback from the warehouse spur, which gave me room for two tracks there. But I realized this left no easy way to get cars from the car float to the freight house without several changes of direction. To simplify the maneuver, I complicated the trackwork. I added a 19-degree crossing to the warehouse spur and connected the freight house spur to the car float spur on the far side of the first crossing. (The angle of these crossings may not be exact, but since Walthers’ new track system doesn’t include crossings in these sizes, I figure they would have to be hand-laid anyway.) The curve doesn’t leave room for two freight house tracks like my first draft did, but I think the ability to shift cars directly from the float to the freight house spur without fouling the main is worth the sacrifice. Luckily, I had room to add a small interlocking tower to protect this complicated double crossing.
To me, the interesting part of the module is the waterfront operation; you can use the other side of the main however you like. If you want this module to be more of a stand-alone operation, you could fill it with a small classification yard, a team track, and a passenger station. Since those were all included on our Freemont Mills module, though, I felt I could safely leave them off this one, and drew in a switchback spur serving two generic industries just to fill the space.
A car float operation is, like an interchange or a team track, a universal industry that can ship and receive almost any kind of freight car. You can fiddle cars on and off the layout via this connection as often as you need to fit your layout’s operating scheme. And intricate, fascinating models of cargo vessels and railroad tugboats will add a shipload of visual interest to your layout.


Nice sketch! I’ve been thinking about adding a car float to my layout. I like many of your ideas. Thank you!