


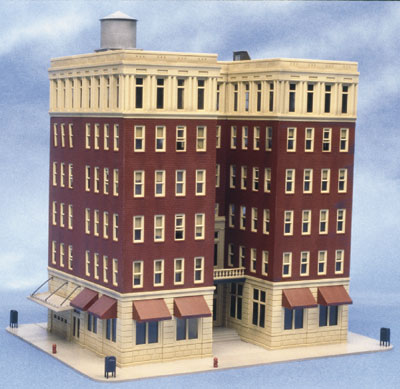

Modeling urban scenery has become increasingly more popular in the last few years and this new kit fits right in. The model represents the kind of hotel once common in the downtown districts of medium-sized to large cities. These hotels were often the focal point of the downtown area and home to major conventions, receptions, and traveling dignitaries. The kit is representative of the kind of hotel that would feature an upscale restaurant, ballroom, and large lobby or concourse.
All of the parts (which are molded in appropriate colors) are well marked and the 19 pages (yes, 19) of instructions are fairly well organized. The first page of instructions recommends the use of a modeling knife, file, liquid glue, hobby brush, tweezers, and sandpaper, but I think it’s an absolute must to have a pair of sprue cutters for removing parts as well as a straightedge for cutting the sidewalk. I was able to build the kit easily enough following the instructions, but would have preferred diagrams with a bit more detail or perhaps some exploded views-especially when assembling the walls.
The first part of assembly requires installing the window castings. With the large number of window castings a sprue cutter came in handy. Be careful when removing the clear glazing from the sprue. It’s best to bend these pieces back and forth to loosen them. This will help prevent the “glass” from cracking. I built each wall according to the instructions and glued the window castings using liquid cement.
I must admit when I first saw how the clear glazing was to be fastened
to the window castings I was more than a little puzzled. There are squares holes in the glass that allow you press fit the windows over a round peg. I feared that if I pressed too hard I would shatter or crack the glazing. I did in fact crack a couple of pieces, but generally most of the glass was installed without much problem. For some of the windows I couldn’t get the round peg to fit into the square hole. For these I filed or sanded the pegs to a slightly smaller size, which worked fine and the glass snapped in place as intended.
After the walls were finished I assembled them according to the instructions without much problem. I did encounter some trouble with the roof and had to trim it a bit to get it to fit. There were a few small gaps around the edge of the roof so I trimmed it out with scale 2 x 12 strip styrene. This worked well and actually made the roof area much neater.
After the roof was completed, I started on the detail parts and accessory assemblies. The first step is to build the fire escape. I used a hobby knife to make sure all the locator holes were clear of flash, then test-fit the fire escape assemblies to make sure that the holes were clean and the fire escape would attach to the building easily. Only then did I add the glue. All of the other sub-assemblies were finished with no difficulties.
The only parts of the kit I was a little disappointed with were the sidewalk and decals. The instructions led one to believe that measuring and cutting weren’t going to be an issue, but the sidewalks are from the Walthers Street and Sidewalk System kits so a fair amount of exact measuring and straight cuts are required. You’ll need the proper tools for this.
Finally all that was left to do was apply the Microscale decals that were supplied with the kit. The only instructions are to apply them at your own discretion. I didn’t know if they should be applied to the windows, awnings, or just to the side of the building, and I really couldn’t tell where they would fit. The photo on the box didn’t show the placement of signs so I was at a loss to decide what the signs were for.
The photo on the box showed some windows of the hotel with blinds, but there was nothing in the instructions about them. I thought the blinds added a lot of character, so I added them by painting them on the back of the windows using Polly Scale Depot Buff (no. 414278).
Once the kit was finished it looked rather flat so I decided to add a little weathering using an airbrush and some thinned Floquil Grimy Black (no. 110013). This gave some additional character to the building.
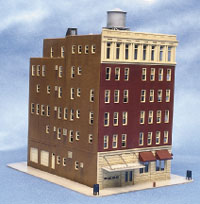
The Ambassador Hotel has a footprint of 7″ x 10″ and stands 10.5″ tall. It would be an ideal kit for kitbashing into a larger structure, but the price seems to make kitbashing a little impractical. To get as much mileage for the dollar as possible, I would strongly consider using this kit as a flat or background structure. The only problem with trying to stretch the kit along the background as a flat is the differing colors of the brick. As the photos show, two walls are molded in a brown color while the two front sides are more maroon, so some painting would be required.
All in all the Ambassador Hotel builds into an attractive structure.
Price: $80
Description:
Injection-molded styrene kit
no. 88002, Ambassador Hotel
Manufacturer:
Bachmann Industries
1400 E. Erie Ave.
Philadelphia, PA 19124
www.bachmanntrains.com


where can I find one of this kit????????