


Tricks with N scale track: You bought ’em, you can modify ’em
Some four decades ago I was looking at a John Allen photo taken on his fabulous HO scale Gorre & Daphetid. The subject was rail activity at his city of Port, and I was especially struck by how compact his trackwork was. In some places the points for one switch almost touched those of the next.
John had laid his track by hand, but I realized you can come close to doing the same thing with ready-made turnouts. It’s just a matter of screwing up the courage to nip off some rail.
At that time, it was quite the insight. I guess I believed that there were laws governing model railroading products, and chief among them was that they should never be modified. To do so would invite an unpleasant, late-night visit from the model railroading police.
Since that time I’ve been merrily modifying turnouts, and doing so has let me get tracks into some pretty tight spaces. After all, if you can save an inch in N scale, that’s a little over 13 scale feet!
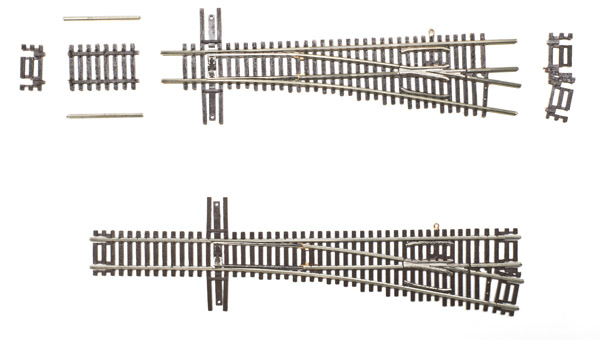
Here are some precautions to keep in mind, though. Right now I’m working with Atlas code 55 turnouts, which can be modified from the point end with no problems. Just cut the rail so you still have two or three ties remaining after you’ve removed several ties to make room for the rail joiners.
But I’ve learned the hard way not to mess with the rails at the frog end. Those rails are short to begin with, so you can’t gain much, plus it’s easy for those short pieces of diverging rail to roll and come loose from their moorings.
I’ve found two ways to fix that problem if it occurs. The first is to secure the short length of rail with cyanoacrylate adhesive. The better way is to extend the rail end of the adjoining track piece all the way to the frog, replacing that little piece altogether. This will give a neater, more permanent fix, and track that is much more likely to stay in gauge.
And as long as we’re cutting rail, my recommendation is you invest in a good set of rail nippers. Mine are by Xuron, and for many years they’d cut so cleanly the joiner would slip right on. But they’ve cut a heck of a lot of rail over the years, and now, about half the time I need to clean up the cut a bit with a flat needle file. (I could buy new nippers, but I’m almost finished with track laying – knock on plywood.)
If the rail joiner won’t slip on, don’t fight it. File and fix the rail ends. And once the joiner is on, look closely to make sure it really is. It’s easy for one end of the joiner to go under the rail instead of enclosing it. I’ve done this many times, and sometimes didn’t find the problem until considerably later. That’s why I always make sure to trim back the ties so that the rail joiner can be slid entirely onto one rail end or the other.
I don’t solder the joints on straight sections, as that makes removing a turnout for repair or replacement much more difficult. (I almost never have to remove a turnout, but if I soldered the joint, I’m convinced that would jinx me.)
I’m sure that nearly all of you already remove those awful-looking D-shaped combo ties at the ends of turnouts and sectional track pieces. A good way to remove them is to lay the track rail-side down on a hard surface and shear them off with a chisel-bladed hobby knife.
To fill the gaps between rail sections, I pull short lengths of tie strip from track scraps, trim off the spike heads with a hobby knife, and slide them under the rail ends. Usually a strip of three or four ties will do the job, and a dab of white glue will hold them in position until the track is ballasted. If you have trouble sliding them under the rails, thin them a tad by rubbing the bottom across a piece of medium-grit sandpaper.
Before laying any complex roadbed or track, get the track pieces you’ll be using and trial-fit the whole assembly.
Lately I’ve discovered Ribbonrail track gauges. I really like them. My minimum curve radius is 18″, and the gauge for that size catches me if I try to cheat. The company’s straight gauges likewise help me make sure the straight track really is straight.
Laying track well is essential. The payoff is smooth-running trains that never derail – and that’s the difference between a diorama and a model railroad.


Anyone know where I can find a ho track with n scale running over it orcossing it