


This simple method lets you scale up a track plan from a magazine or sketch onto your model train table
You’ve managed to find the perfect track plan in a book or magazine, or you’ve spent hours at the drawing table or computer carefully drafting a track plan. The next step is transferring the track plan to your layout table or benchwork.
If you’ve never done this before, the first thing you’ll probably learn is that – regardless of how carefully you’ve measured – track will almost always take up more room on the layout than it did on paper. It is important to take your time and be precise, as any miscalculation will hinder tracklaying.
Tools and tricks
Photo by Jeff Wilson
One of the fist steps in track planning is drawing a grid on the plywood (or whatever surface your layout top happens to be). As fig. 1 shows, a drywall T-square with 4-foot arm is invaluable for this. A 12″ grid is usually sufficient, but for complex plans you might want to add grid lines at the 6″ marks as well. It’s also important to draw grid lines on the track plan to match those on your layout surface.
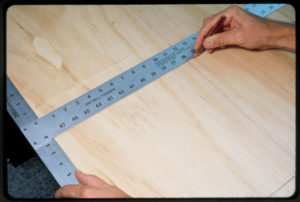
Photo by Jeff Wilson
Once the basic grid is drawn on the layout and track plan, the next step is to mark out the radii of curves. Figure 2 shows how to find and mark the center of the radii on the track plan. Transfer the center point to the layout table, then use a compass to transfer the curve to the table.
You can make a large compass by using an old wood yardstick. Holes in the yardstick at 1″ intervals make handy guides for a pencil.
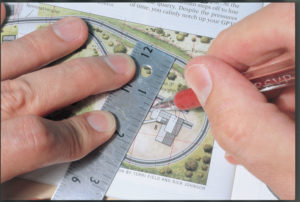
Photo by Jeff Wilson
However, some curves are too broad to easily use a yardstick, or the center of the curve may be well off the layout table. In this case curve templates work well (see fig. 3).
My curve templates are about 40″ long and made from large pieces of .060″ styrene that I had on hand. You can also make them from hardboard (such as Masonite) or thin plywood. Cardboard will work, but it is not as durable as hardboard. I made my templates in 2″ intervals from 18″ to 44″, and as the photo shows, there is different radius on each side of the template.
Planning turnouts
Probably the most difficult part of track planning is leaving enough room for turnouts. They always seem to take up more space than originally figured, and every manufacturer’s turnouts vary slightly in size and shape. Because of this, complex trackwork in published plans often doesn’t fit the same way on a layout.
To remove the guesswork, make several paper turnout templates by placing turnouts on a photocopier, then running off as many copies as you need. Be sure to label them with the brand name and size.
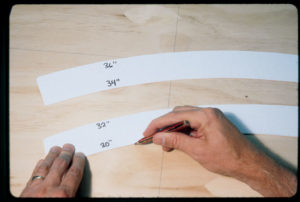
Photo by Jeff Wilson
As you use templates, tape them in place, as shown in fig. 4. Alignment is the important thing – remember that you can trim turnouts to fit tighter areas as long as you maintain proper alignment and track center spacing.
From paper to benchwork
Large rolls of newsprint or brown craft (or wrapping) paper work well for laying out full-size plans. You can do this even before starting benchwork by laying the paper on the floor where the layout will go.
Getting your track plan to the benchwork is a fun step in visualizing what your finished layout will look like. Work carefully and take your time, as the process is vital in getting track to fit properly, which will enhance operations and enjoyment.


I do not believe the figure numbers match the text. Example: Figure 2 shows a drywall T square while the text describes the picture as showing how to measure the radii on a track plan. This mismatch contiues in rest of article.