


Modelers David Popp, Brian Schmidt, and Bryson Sleppy begin the scenery process on their T-TRAK modules by looking at photos of the Colorado plains. T-TRAK is a modular N scale railroading system that uses foot-wide boxes plugged together to build tabletop layouts. In this fifth installment, the three modelers explain how to build hills and valleys on the otherwise flat modules using foam, plaster, cork strips, and more.

Brian: With the modules built and the wiring finished, at long last it’s finally time for the most interesting part — the scenery!
Bryson: Yes, and while the plains of Colorado are still fairly flat, they do have more interest to them than our bare-wood modules do at the moment.
Brian: Why is it that we’re modeling Colorado again?
Bryson: Both David and I have taken trips on the California Zephyr — that’s David’s model of the train in the photo, in fact.
Brian: Ok, I get that. But the best part of the scenery on that trip is in the Rocky Mountains, isn’t it?
Bryson: True, but this is T-TRAK after all, and without some significant amount of work, the Rocky Mountains aren’t going to translate very well here — although I did see some people make mountain modules when I was at the NMRA convention this summer.
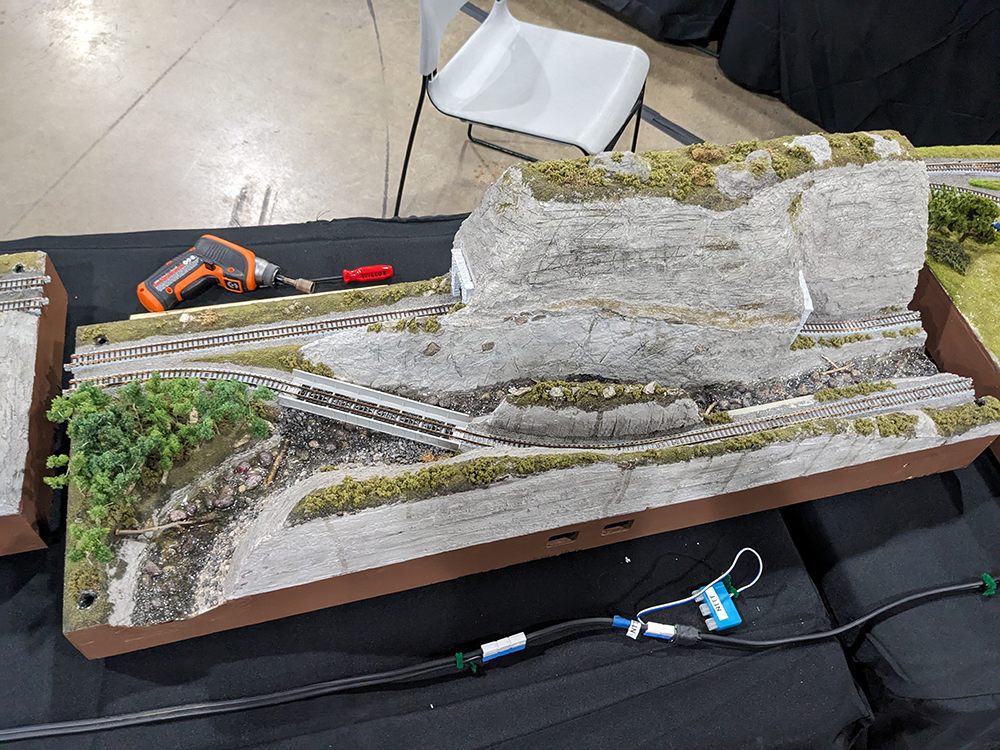
Brian: Yeah, looking at the mountain module in the photo, I get your point. To make it look right, we’d have to completely change our track arrangement. Railroads rarely get much straight track in the mountains. And I also think David learned his lesson about building mountain scenery on the Canadian Canyons project.
Bryson: I heard about that.
Brian: Three solid months of modeling rocks. I think he say “never again” more than once since then.
Bryson: Besides, I believe David got off the California Zephyr in Denver and didn’t take it into the Rockies.
Brian: Speaking of David, where is he?
David: I’m here. I was just unpacking a box.
Brian: Oh no, another module?
David: Yup! Another manufacturer of T-TRAK products, in fact. My friend Mike Vivion contacted me with info about modules offered by Klawndyke.com. Since you and Bryson bought more modules, I decided to order something from Klawndyke that we didn’t have yet — an inside corner.
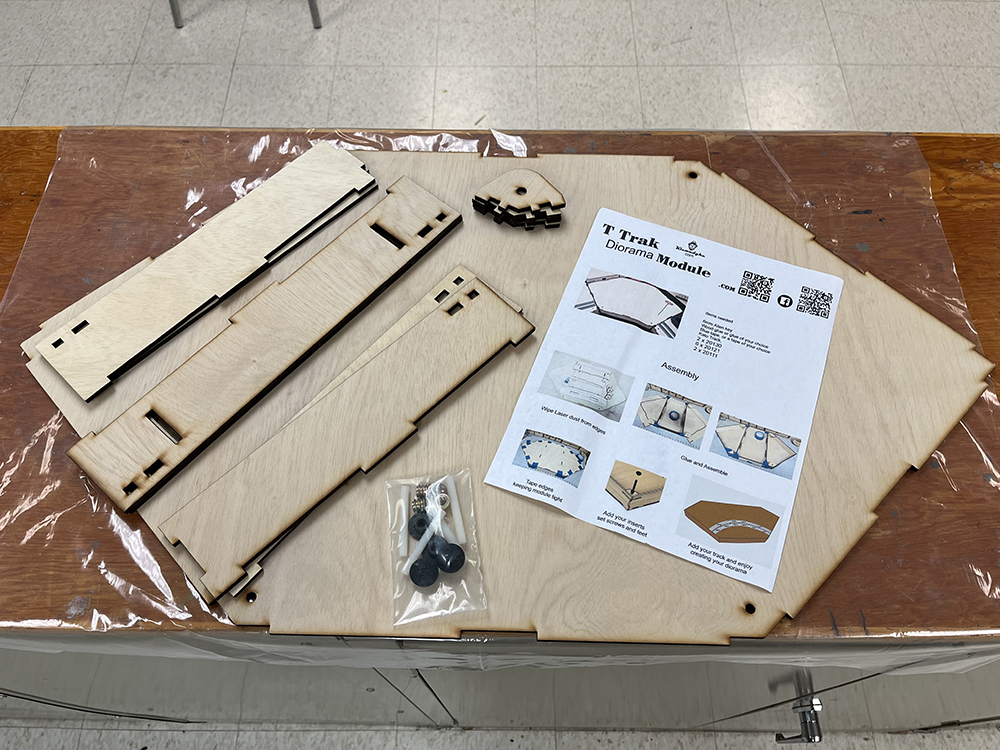
Brian: Oh, that’s cool! We can now make an L-shaped layout if we want to. We can use my spare corner from the previous T-TRAK series to make the matching outside curve.
Bryson: What are the little black plastic pieces in the kit?
David: Feet! Klawndyke sells 3D-printed feet that screw on the ends of the nylon leveling pegs used with this and the RS Laser T-TRAK kits. I bought some extras to try on our modules as well.
Brian: The feet should make the modules more stable. But please tell me we’re really going to work on scenery today and not build more modules, yes?
David: Not to worry, Brian, I’ll build this in my spare time. We’re really starting the scenery today.
Bryson: I’ve got some photos we can use from my trip, and I know David has a bunch as well.
David: I took some from the train as well as a lot of video. This was the view I had when waking up in the morning. It’s one of my favorites. As you can see, it features gently rolling landscape and a lot of prairie grass.
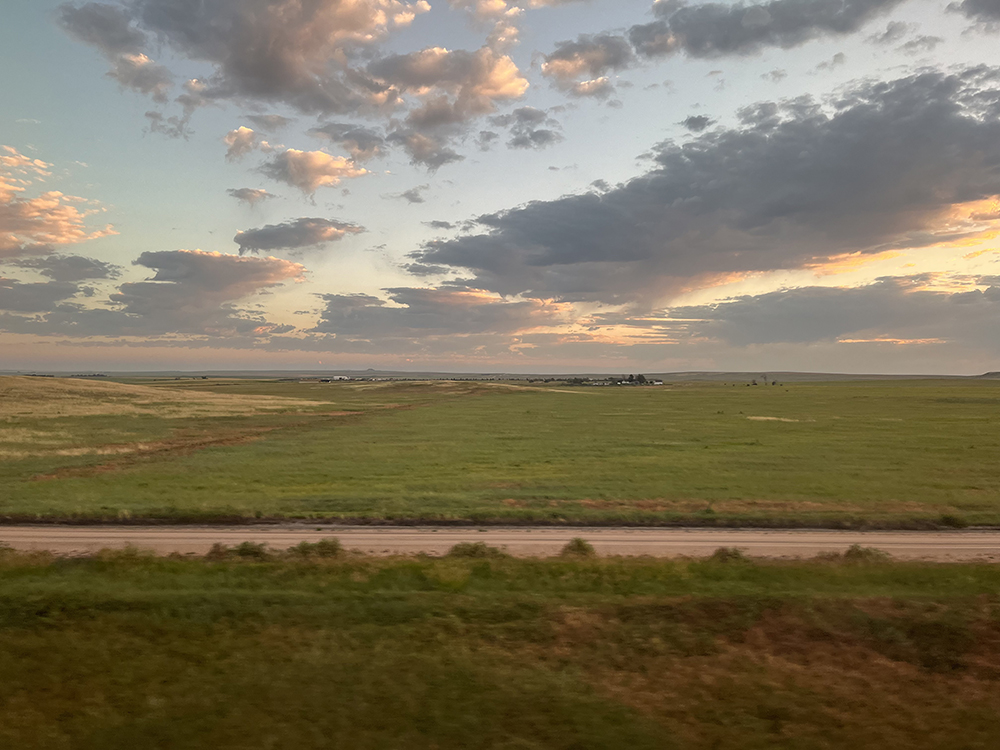
Brian: Even though its Colorado, my Milwaukee Road equipment will look good rolling through it too. It’s sort of like some of the prairie in Milwaukee’s western territory.
Bryson: That will look great! My shot is from around Denver’s airport. The grass, while still prominent, is somewhat sparser the closer you get to the Front Range. It has a lot of exposed sandy soil.
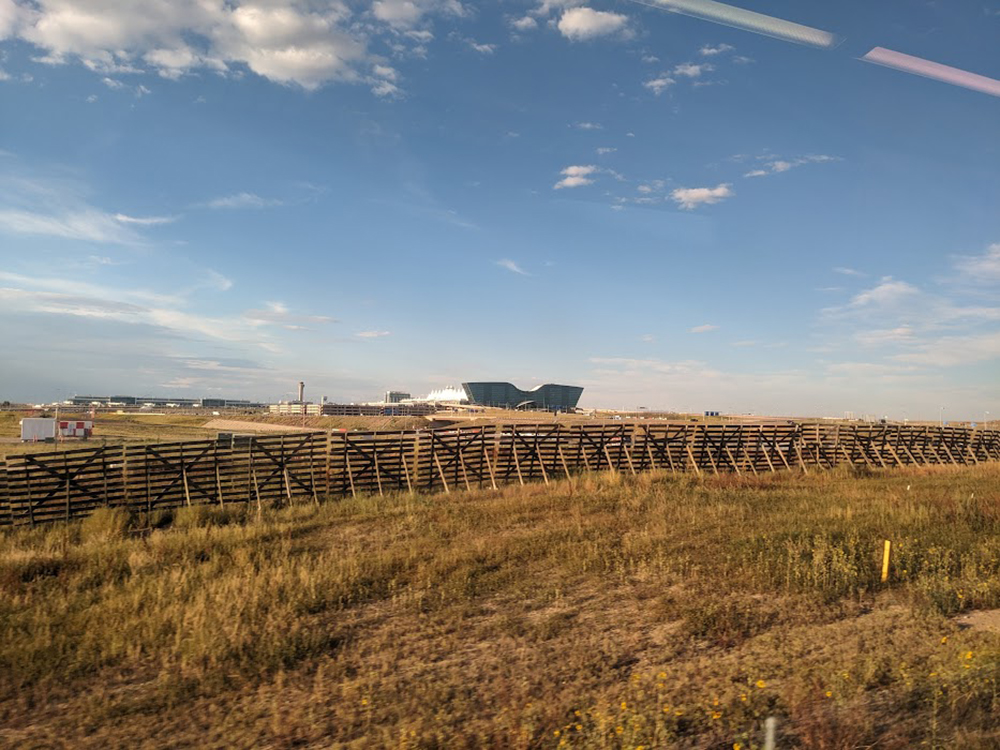
David: It’s like that around my youngest brother’s house in Castle Rock as well — which was why we got off in Denver and didn’t continue on to California.
Brian: Since the T-TRAK modules are flat to begin with, this should be fairly straight forward.
Bryson: Yes, but it would be nice to have some topographical features. And both you and David have modules that can make scenery below track grade.
Brian: Subtle changes will likely look best, particularly since this is N scale. I’ve got a culvert I want to put under part of my track. And since some of my modules have a foam base, it seems like foam will be a good starting point for the rest of the scenery too.
David: Yes, I’ve already got some of my modules started, using a few scraps of ½” foamboard left over from other projects.
Bryson: I saw you were working on the river module a couple of weeks ago on MR Afterhours – and for those who don’t know what that is, it’s our live program broadcast on Trains.com and Facebook once a month on a Thursday evening at 7 PM CST.
David: Bryson has been on the program several times as well, and for the next couple of months yet we’ll be working on our T-TRAK modules for MR Afterhours.
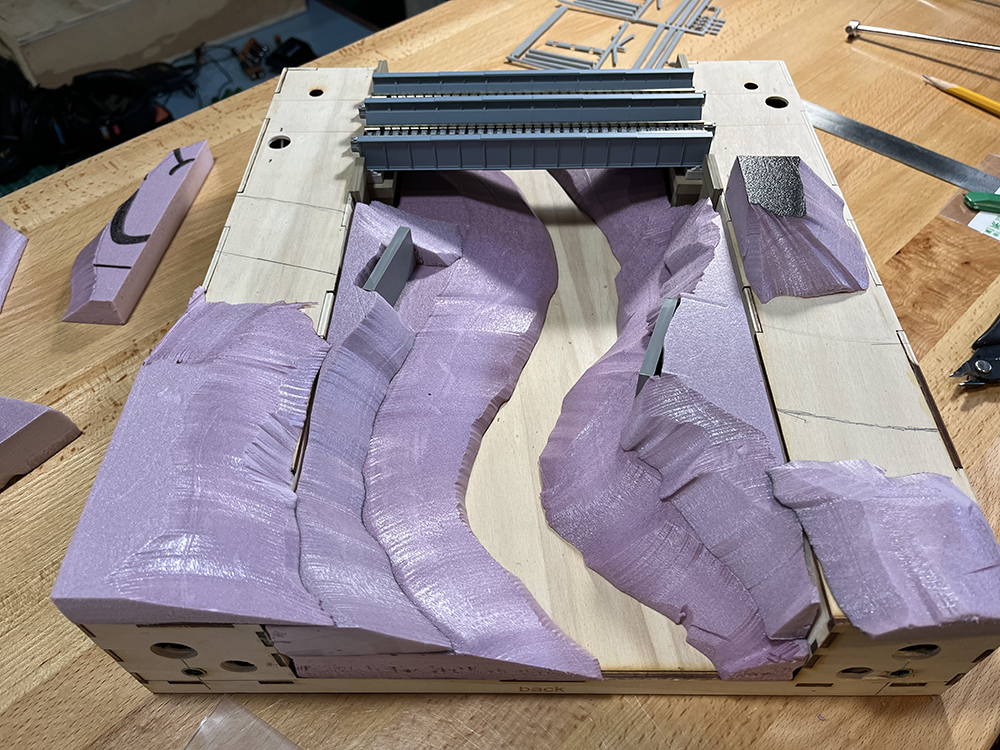
Bryson: The canyon looks great. How did you cut the contours?
David: I used a Woodland Scenics’ hot wire foam cutter. It’s a great tool for this kind of work as it cuts curves and angles easily. I also used it to thin some of the ½” foam and make shallower hills. For straight cuts, I used knife with a long, thin blade, like the kind they use for wallpaper.
Brian: Olfa is one brand of those knives. What I really like is that since the modules are all being built to form a complete scene, we can extend the hills across them as well. I see you’ve done that between the bridge module and the end corner. I’m planning to do that across my three modules as well.
Bryson: I’m doing the same with my grain elevator scene.
David: Yes, I took the bridge module and connected it scenically with the station module and the two corner modules on one end. The modules are all still separate, making them easy to store and transport, but when clicked together, they form a complete scene.
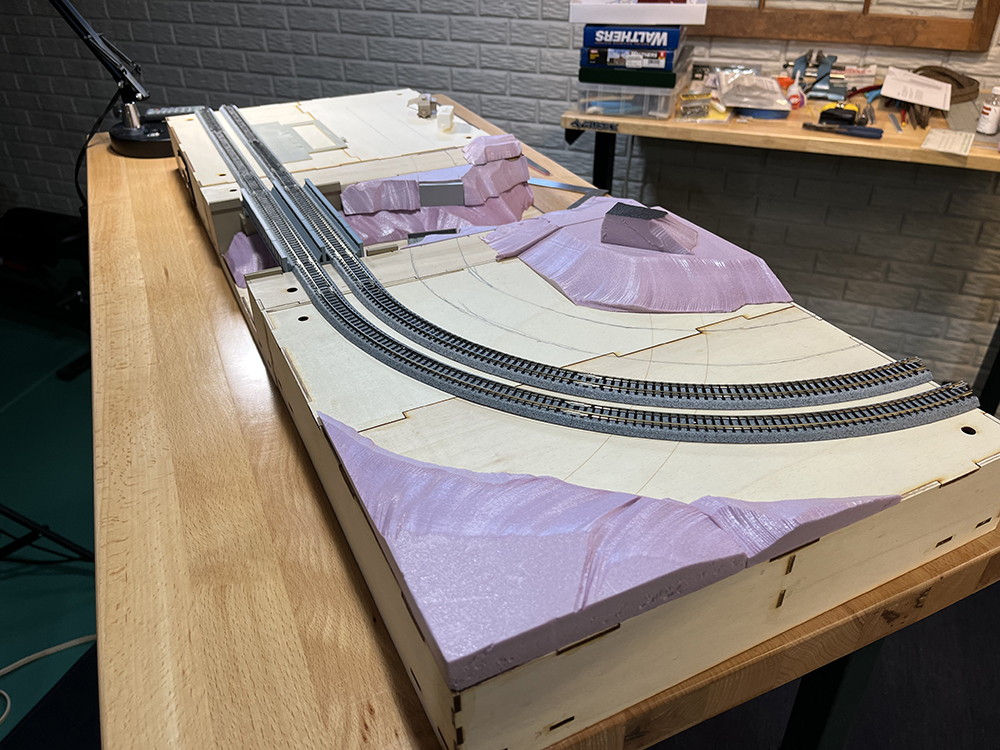
Bryson: One thing we did when all the modules were still at the office was to also mark out the roads and structure locations.
Brian: That will be a big help as we work on them on our own at home. And if we all use the same scenery materials, then the terrain should match when we put them back together.
Bryson: Since the grain elevator is going to take up a lot of my scene, I don’t really need foam hills. I was planning on using some cork pads and Sculptamold for most of surface area.
David: Speaking of cork, I used that to build the base for the roads on my modules.
Brian: N scale cork strips?
David: Yes, the strips work well for making the tighter curves we’ll need for N scale roads. I used 4 strips across to form the base of the road. I glued them to the modules with wood glue.
Brian: I see from the photos you had to use a lot of T-pins to hold the cork to the curves. I’m going to guess that they were pretty easy to insert into the soft plywood used for the T-TRAK modules.
David: The pins helped a lot. After the glue dried, I removed the pins, then filled in the surrounding scenery and formed the ditches using Sculptamold.
Bryson: For those who might not know, Sculptamold is an art modeling compound composed of paper fibers and plaster. It’s made by AMACO.
Brian: That’s A-M-A-C-O, as in the American Art And Clay Co. Not A-M-O-C-O, the people who make gasoline.
Bryson: Aren’t they part of British Petroleum?
Brian: Yes, they merged in 1998 — were you even born in 1998, Bryson?
Bryson: I’m not answering that question.
David: Good for you, Bryson. I do remember the merger, which has nothing to do with our story.
Brian: Ah, but you are modeling roads, which require cars, which use gasoline…
Bryson: Feel free to put an AMOCO station on your modules, Brian.
Brian: I might.
Bryson: You used cork on the State Line layout to make roads as well, didn’t you? But you covered those with styrene to make the road’s surface.
David: Yes, that system worked well, but it was really labor intensive and Cody and I almost went mad trying to use decals to do all the stripes. This time I used Woodland Scenics Smooth-It, which was much faster.

Bryson: Were you afraid that the plaster would chip and crack on the lightweight modules.
David: That is a possibility. I tinted the Smooth-It with Woodland Scenics C1220 Black liquid pigment. It turned the plaster a uniform light gray color, which when chipped, still looks gray.
Brian: The Smooth-It kind of goes everywhere when you apply it. How did you get the road’s width to look uniform?
David: On my bridge module, I’d installed a Rix bridge kit, which includes road material that measures a scale 24-feet across, so I used that as my guide. After the Smooth-It had set up, but was still somewhat green, I used my scale ruler and a pencil to mark the 24-foot width on the roadway and cut in the edge with a hobby knife. I followed up using a chisel blade to chip away the unwanted material. This is much easier to do before the plaster hardens completely.
Brian: Ok, that looks a lot better. And good tip on doing it before the material has hardened.
David: I have done some of them after the plaster set, and while not impossible, it was a lot easier to do it before.
Bryson: I’m assuming you sanded the surface to get rid of the imperfections.
David: After the plaster had dried completely, I used a fine-grit sanding sponge to sand the surface of the road. I left a few of the dips, as potholes exist everywhere. I’ll cover painting the roads and applying the stripes in the next installment, along with the base scenery.
Brian: Ok, so Bryson and I now have some catching up to do.
Bryson: speak for yourself — I did make one modification to my modules already.
David: The extender, right?
Bryson: Yes, the extender. It turned out that my double module was an inch shallower than the others. And since we eventually want to put a unified backdrop on all of them, I needed to extend the depth of my module to match. David was nice enough to cut a 1 x 2 down to 1” on his table saw. I then glued it to the back of my module, holding it tight with clamps until the glue dried.
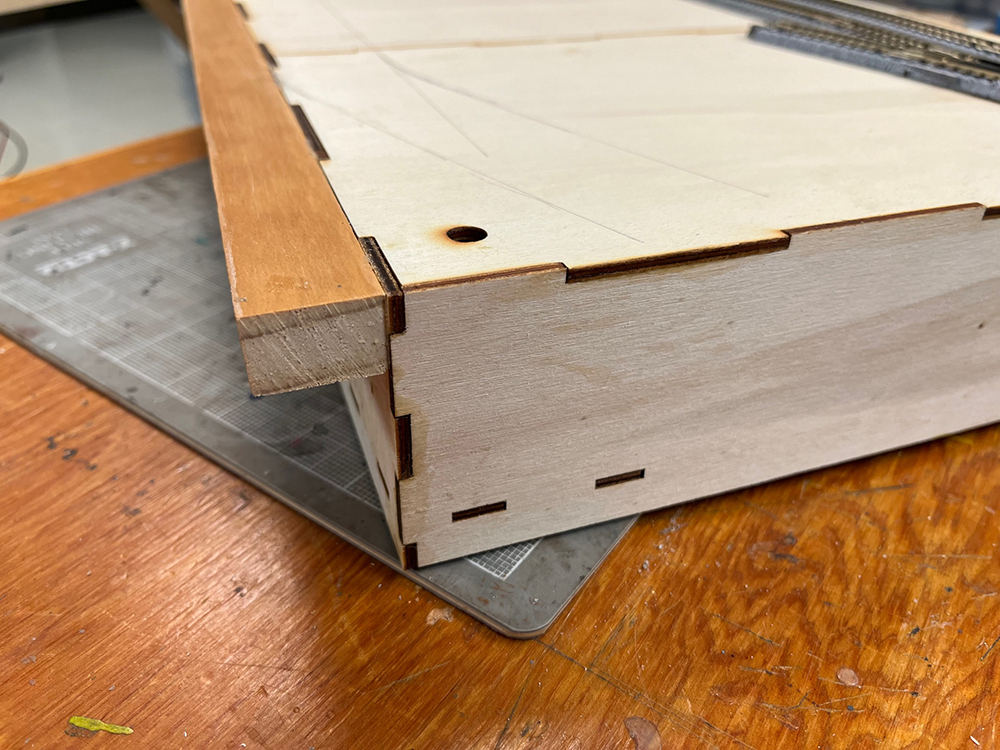
David: That will work great since you’re extending your double module with another single to complete the scene.
Bryson: I really wanted them to match. So, I guess that wraps things up for this installment.
Brian: Want to know my favorite part?
Bryson: What was that?
Brian: David didn’t mention his new book once!
Click here to read the next installment of the T-Trak project series!
Click here to read the previous installment of the T-Trak project series!


Haha – I enjoyed the end-cap where you ignored the pre-sketched track lines and put the modules together the opposite way in Figure 1.
It would be useful if you had a summary of bill of materials use in the segment before signing off. But thanks for the fun!
I’m enjoying these progress reports. Keep up the good work.