


Click on the link below to download the plans for this project.
Alain Kap
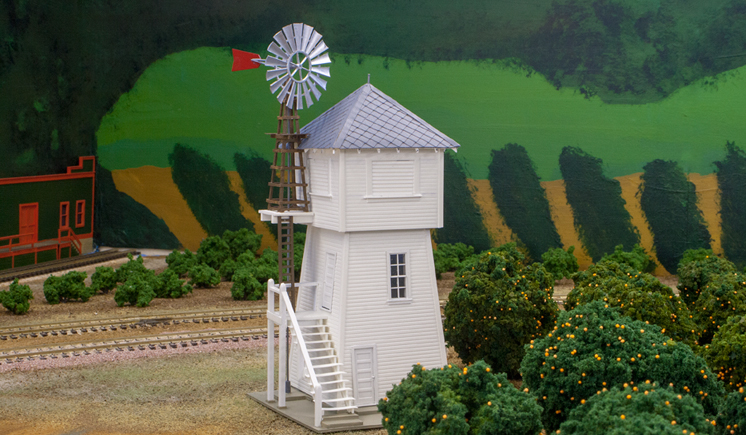
In the September 2018 Model Railroader, Alain Kap describes how he scratchbuilt one of these distinctive tank houses from styrene for his HO scale Atchison, Topeka & Santa Fe Surf Line layout. Featuring a windmill these structures were once common in California citrus groves.


I just finished my N scale version of the tank house last week. One of those projects that I really could only do when I had the weekend off-you know work a little here and there. Anyway, after 3-4 weekends working on it, the project came out great.
I decided to build this as earlier this year (around Memorial Day weekend) my wife and I were up in Fort Bragg CA, which is up on the California north coast. If you drive about 10 miles south from Fort Bragg to the town of Mendocino, you can see a bunch of these tank houses in town. In fact, I shot a photo panorama of the town from from across the bay/inlet. In that photo you can see 9 (yes.. 9) of these tank houses in the single panorama. All of them are of different designs, so if you wanted to make more of these for a layout, you don’t have to build the same design again and again.
As I am working on a citrus themed N scale layout, this tank house really fit in. Now I working on a barn as well as re-doing a farm house for the scene. Sorry, I can’t supply a photo, but when I figure out how to do it, I’ll upload it.
Thanks,
Jeff
Well I finished my model and I am very happy with it.
I changed a couple of things. First I extended the braces holding the windmill so that I would not have cut out the roof. That may not be 100% prototypical, but it made completion of the completed model much easier without sacrificing the look.
I glued the shingles onto the styrene roof panels using canopy glue. I found that using double sided tape was more trouble than it was worth. This shows that there is more than one way to successfully complete a project. Putting the shingles on the roof was more time consuming than I thought it would be. I painted the roof the recommended color, but for the lighting on my layout, the roof did not seem dark enough, so I used a darker shade of gray paint.
Instead of using brass wire for the pipe that goes through the windmill, I used a round piece of styrene. This worked well. I did not use brass wire to attach the stairs, etc., I merely glued my stairs (made out of stripwood) to the styrene wall using CA adhesive.
Now the citrus grove on my layout has a new source of water. This was a really fun project. Because of the complex angles, I would not recommend building this for first time scratch builders, but if you have a couple of scratch built structures (or craftsman kits) under your belt, this is wonderful project for hobbyists with intermediate scratch building skills. If I could post a picture of my completed model, I would.
I am almost done with my model. I have gotten fairly busy and probably will not get a chance to finish it for another couple of weeks. I cannot remember when I had more fun building a model. Constructing the roof has some interesting challenges that added to the fun.
I made the staircase out of strip wood rather than styrene. I stained the wood with Mircromark brown stain which matches the Vallejo paint color almost perfectly. I plan to extend the ladder from the Walthers windmill kit (part #7 in the kit) so that it goes all the way up to the small platform (part #6 in the kit) at the top of the windmill. That appears to be closer to the prototype photos.
I also carefully looked at the prototype photos and added windows to the elevations not shown in the MR article. Instead of laminating the walls to .6 mm styrene cut from a sheet, I braced the walls at the edges/corners with .125″ square styrene. That approach made it easier to add the doors and windows such that they are perpendicular to the ground. It was little bit tricky cutting the narrow walls at the side of the doors/windows. But after a couple of failed attempts, I got the hang of it. I was unable to find the Grandt line doors and windows called for in the materials list, so I used Tichy products instead. I had to install the door frames backwards to accommodate for the doors not being flush with the walls, but rather perpendicular to the ground.
The prototype photos for the elevations not shown in the MR article also show some piping near a first floor window that goes around a corner to the rear of the structure. I am considering bending a thin brass rod and adding it to the structure. I am not sure what the pipe is for on the prototype.
As to the difference between ones and sevens, I can easily see how that happened. I have spent a considerable amount of time with my family in the Netherlands and their ones look like our sevens.
Thanks again for writing such a wonderful article that inspired me to build a fun model that will fit right in next to the siding that serves the citrus industry on my layout.
I really enjoyed the article, especially all the photos to explain the steps in building the structure. As a side note, these were found outside the citrus regions of California. I saw a number of them around my home growing up in Northern California. I liked the prototype Alain chose with the windmill attached to the structure, I never saw one like that. Might have to build a tank house one of these days, thanks for the inspiration.
For me – the materials list link appears right below the plans link.
DLC
Valley of the Sun, AZ
Hi James,
You are right. I attached the doors and windows to the outside walls instead of insetting them like on the prototype.I noticed this error when it was too late.
Concerning the Vallejo number typo error might come from the fact that in Europe we write a “1” similar to your “7”.
For the windows and doors I always measure the actual part and cut the openings accordingly. Some castings my differ a bit from one manufacturer to the other against the real size.
I am happy that my article inspired you to build one yourself.
Happy modeling
Alain Kap, MMR
Saarburg, Germany
I just wanted to mention that there is a typo on the parts list. The correct number for Vallejo Signal Red paint is 71070 not 70010. Also, I was unable to locate the Vallejo Grey Primer # 71097. However, I did find Vallejo Grey Surface Primer # 70601, which will work well for priming the model.
So far, this is proving to be a fun model to build. Because of the sloping sides, it is a little more complex than most models, so you really have to measure the styrene wall cuts carefully. (I learned this the hard way!) The trick to getting the proper slopes is to draw a vertical center line on each wall section and CAREFULLY measure the both the bottom width and top width of each wall. The top of the wall needs to be perfectly centered in relation to the bottom. Even a slight error can distort the slope of the styrene cuts and the bottom part of the tank will not go together properly.
Also, the magazine article says that the drawing plans are 100% for HO scale. However, when I used my HO scale ruler, it turns out that the plans are only 93.75% of HO scale. The only time this becomes an issue is when you are working with the doors and windows which end up being 6.667% larger than what is depicted in the scale drawings. If you have a copier machine that can expand the size of the copy, set the copy to 107% of the original and your copy will be fine for HO scale.
This is an extremely well written article that lays out the steps in a clear, concise manner that is easy to follow.
For some more prototype pictures see: https://www.loc.gov/resource/hhh.ca0977.photos/?sp=2
This is a great article. I plan on building one. One question I have is that it appears that the doors and windows are not perpendicular to the ground as they are on the prototype. Based one plans and the discussion in the article itself, the windows and doors are merely attached to the walls of the first two floors of the tower which are not perpendicular to the ground. I plan to modify the model by mounting the doors and windows in a perpendicular manner rather than follow the plans as shown. While that will entail some extra work, I don’t see it as being particularly difficult.
The article in MR magazine indicated that the materials list is available on-line. Would someone please direct me to where I can find the materials list? Thank you.
The materials list has been added as a downloadable file. Thanks!
Where is the materials lists