


I’ve had a fondness for narrow gauge modeling since I was a teenager reading Model Railroader stories by John Olsen and Malcolm Furlow in the early 1980s. So when it came time to build my first real layout, it’s no surprise that I chose HOn3 scale. It’s also no surprise I chose a freelanced route, calling my railroad the Alistair Road. As I envisioned it, the railroad covered territory in California and carried a variety of traffic, including gold ore, timber, livestock, and other freight.
I packed a lot into the layout design: two loops separated vertically with a yard in front and two towns on each of the loops. The model railroad kept me busy for years, laying track; building the cars, locomotives and structures; and operating. However, everything runs its course, and eventually I decided the time had come to move on from this layout.
I noted a few issues with the old layout. For one, it didn’t operate as well as I wanted; the sharp curves and steep grades presented some difficulties, particularly for lighter cars. Most of the switching areas were well back from the operating panel, too far to see clearly and too far to reach without having to walk around the layout. The numerous tunnels and hidden track made it hard to keep the track clean, especially since I didn’t operate all that often. I found that I preferred a layout I could work on and look at, but not necessarily operate regularly.
A narrow gauge shelf layout design
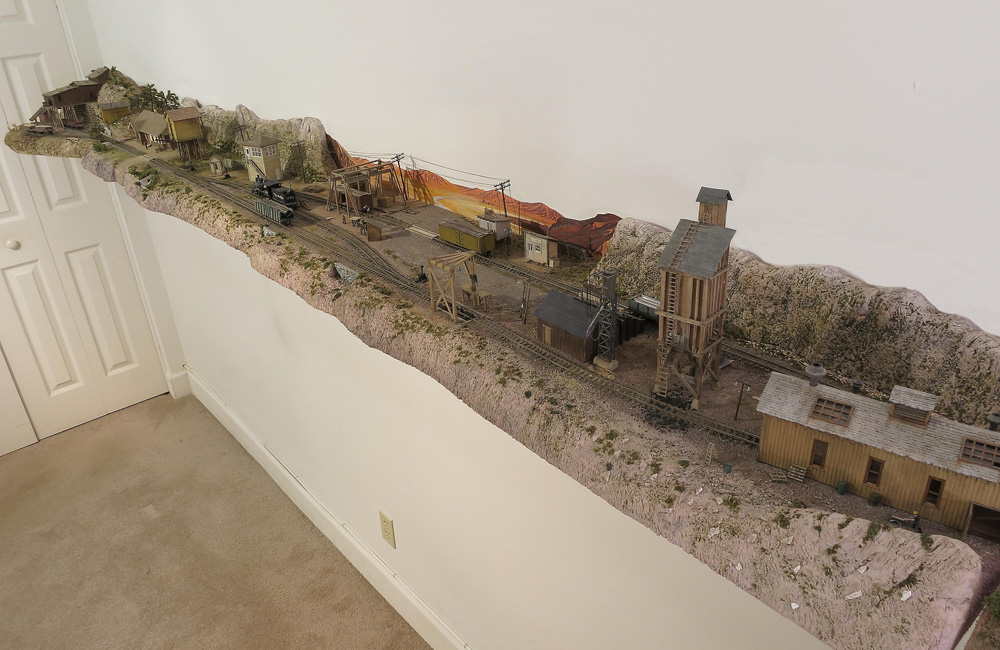
I decided to reconstruct the layout as a narrow gauge shelf layout to minimize its flaws and maximize my preferences. Given that I can see a move on the horizon, I decided to forgo loops and go with a compact modular design.
I reused the track, structures, and rolling stock from the original layout, and simplified the track plan to include no grades, minimal curves, and no hidden track. To keep the sections light and portable, I built them from extruded-foam insulation board. I’ve come to appreciate the versatility of foam, both as a base and for developing scenic landforms.
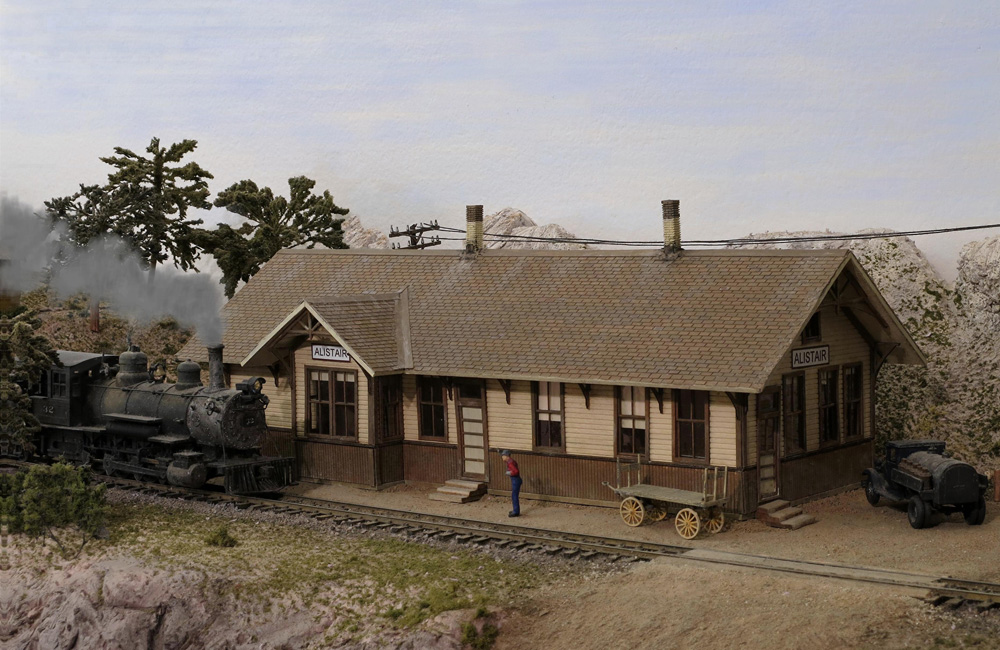
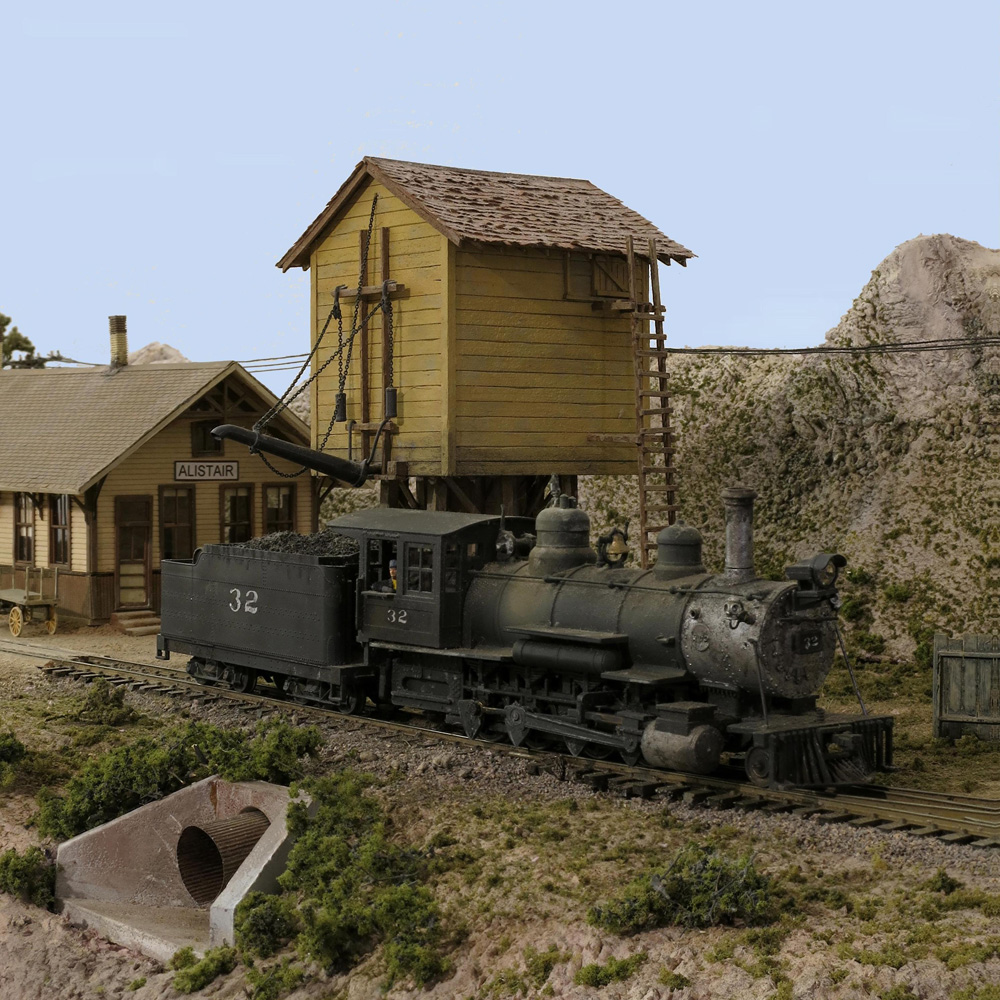
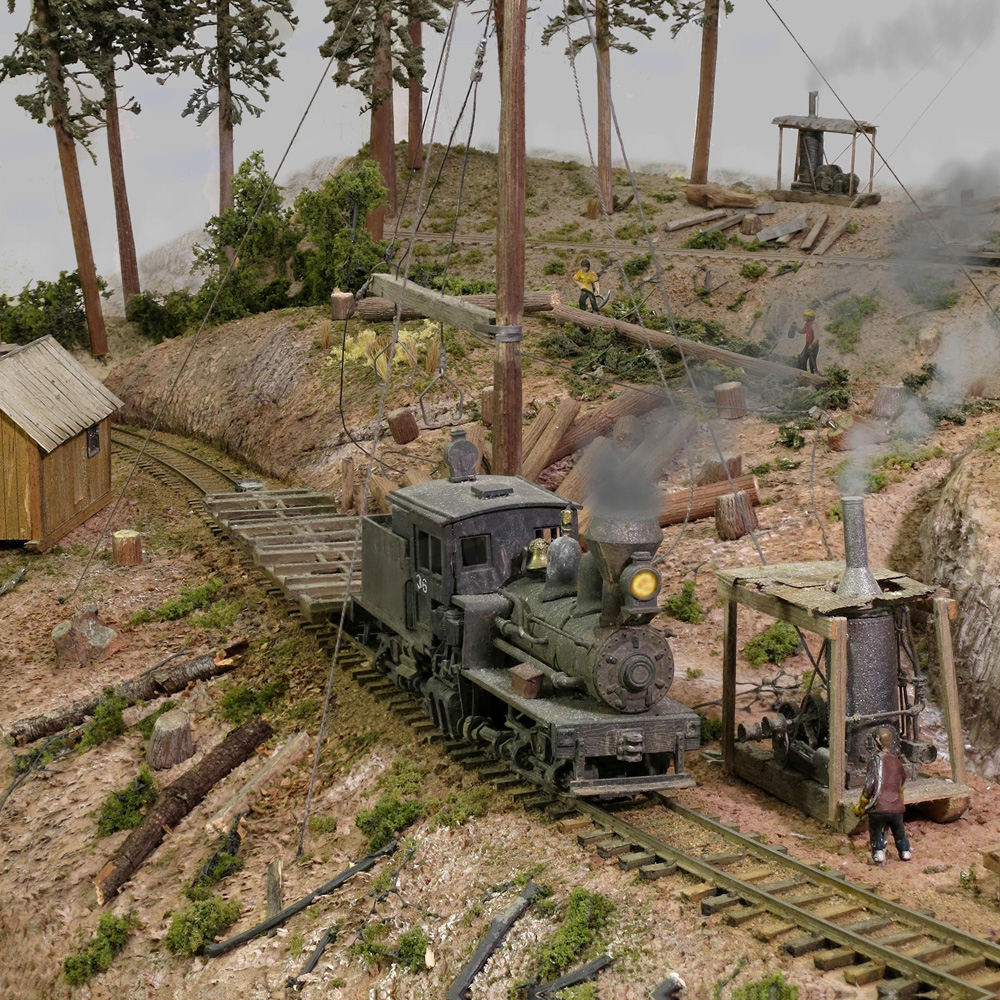
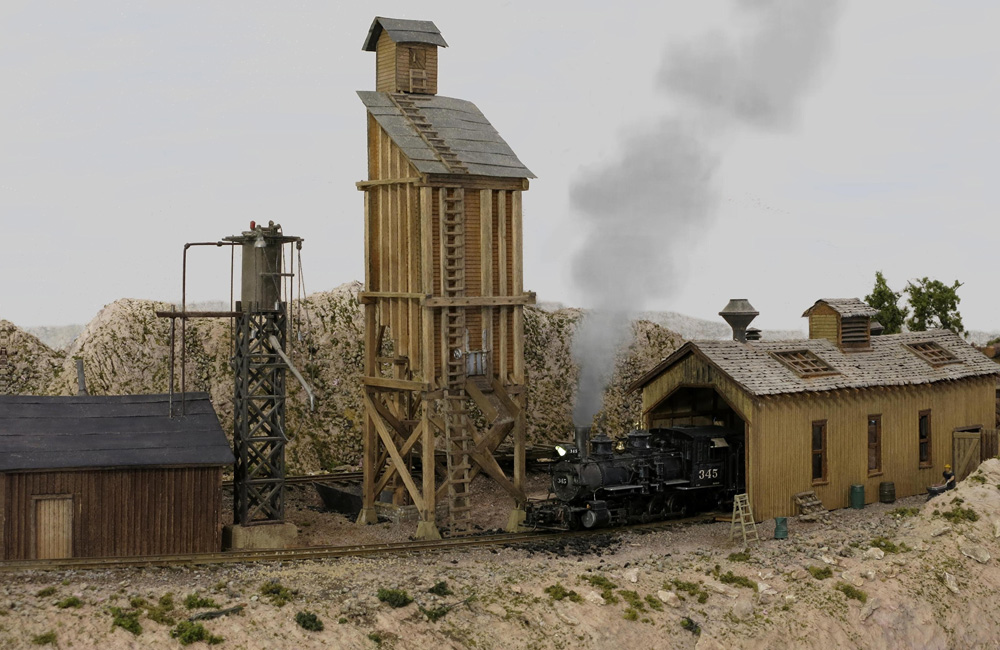
So far, I’ve built three sections of the new layout: Alistair Yard, the Aurora mine, and the Timber Ridge logging spur. Alistair is the longest section, at 7 feet (it might have been 8 feet, but the foam wouldn’t fit in my car). It models a basic junction with engine service facilities and a depot. The junction track also doubles as a service supply track.
I spent time designing the layout to provide balance and clear sight lines when viewed at eye level. I think narrow shelf layouts, especially when attached to a wall above other furniture, lend themselves to eye-level viewing. I also think they lend themselves to narrow gauge modeling, as the prototype equipment was smaller and could fit into more compact areas.
Alistair Yard
I took the opportunity to build a new station for Alistair as I didn’t have room for one on the previous layout. During the coronavirus pandemic, I looked for possible models until I came across a picture of a small Union Pacific depot in the Winter 2014 Classic Trains. This particular station was at St. Vrain, Colo., along UP’s Denton branch. It was quite the adventure — if not ordeal — obtaining this kit (from American Model Builders), but it was worth it in the end. A nice touch to this depot is its loading dock, which provides another destination for boxcars and flatcars.
Alistair can be operated as a standalone unit, switching cars among the various spots, or as one end of a larger system. I’ve expanded in both directions (albeit just a few feet), with Aurora to the west and Timber Ridge to the east. Any number of modules could be inserted between Alistair and the end modules to lengthen the run between them. I have plans for a few more that I may build in the near future.
Building the modules
The actual construction of each module can be simple or more complex, depending on the scenic elements you wish to incorporate. The simplest module would consist of a 12” wide shelf of 2” thick foam painted brown, upon which track is glued down sparingly with tacky glue. Notches can be readily carved into the foam beneath the track to accept uncoupling magnets, if desired. Power wires can be threaded through small holes drilled by hand into the foam and attached to the underside using tape. Ballast and ground cover may be applied and fixed in place with diluted white glue. Shrubs and trees may be glued down or inserted into the foam. Structures and other models may then be placed.
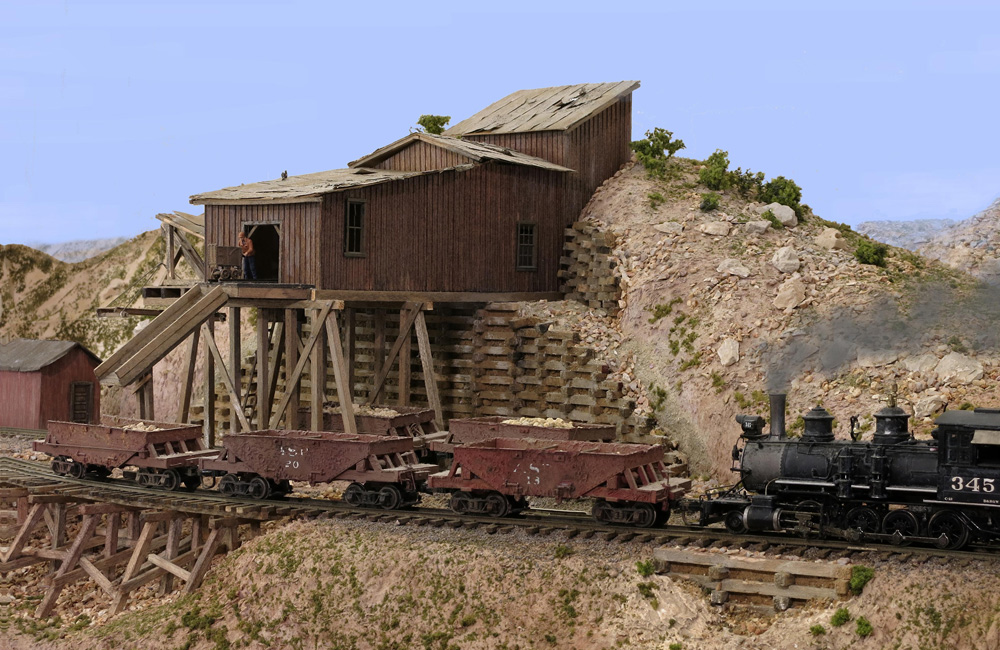
Hills, rocks, mountains, and streams can be added, as well, by layering and shaping foam above and below the base layer. I used a small jigsaw and Surform tool, along with a sharp-pointed hobby knife, to shape and carve the foam. Any models you wish to incorporate (e.g., the Aurora mine or Timber Ridge spar tree) may be part of the shaping process so that the finished scene looks organic and natural.
I used washes of earth-colored craft paints to color the hills and rocks. I carved notches below the track to model ash and coal pits — nice touches for a yard area. Other features, like retaining walls, culverts, and ditches, are also easy to add. It’s amazing how much you can do with the foam to make it look like a natural scene.
There are other advantages to foam construction. It makes for easy transport — not just to relocate the layout, but also to work on it, display it at shows or conventions, or show it to friends or family. It also makes taking photos much easier; you can take sections outside or set them up among different backgrounds, including other modules, for the best lighting and viewing angles. When you’re done, you simply slide the section back into place along the wall and your layout is complete again.
I supported the modules using 8 x 10 inch brackets screwed directly into the wall. Minimal support is needed, given the light weight of the modules. There is some bowing to the Alistair section (this can happen with the longer lengths of foam), so I inserted cardboard spacers to fill in the gaps. The most important thing is to make sure the ends line up for smooth track transitions between modules. The shelf height is nominally 55” off the floor, which is a good viewing height for me.
Operating on a narrow gauge shelf layout
I have a selection of freight cars for use on the layout, including models from Grandt Line (now San Juan Details), Rail Line, Durango Press, and Clear Creek, among others. I place and remove them manually before and after switching.
As far as locomotives go, I have a few old DC-powered Model Die Casting (Roundhouse) 2-8-0 engines and a newer DCC-equipped Blackstone C-19. It’s easy to switch between DC and DCC simply by connecting the track power leads to either a DC or DCC base station. I generally use the Blackstone engine, as it operates more smoothly at slow speeds and is equipped with lights and sound.
I operate when the mood strikes. I like powering up the engine, turning on its light, then slowly bringing it out of the enginehouse, pausing for coal and sand, then moving along to take on water (there’s a sound effect for that, too). I like the close-up view of the wheels turning, engaged by the rods, and hearing the associated clinks and chuffs.
I typically switch cars in the yard, at the mine, and at the logging spur before stopping at the ash pit and returning the engine to the enginehouse. It’s a pleasant time, enjoying my own little slice of the narrow gauge life and dreaming how it might have been all those years ago.
Compared to my last layout, the new shelf layout really opens up the living area. It isn’t so much physically present as visually present. In fact, to me it’s like a piece of art you hang on your wall. The only difference is this piece of art happens to be operational, as well.
Meet Peter Vassallo


Awesome layout. Highly detailed.
I couldn’t tell if yours
continued straight or was it an L shape..
But, very nice.
I’m doing something very similar along a garage wall in ON30…
scratch build as much
as I can…
Michael
Really nice layout. Well done. I particularly like the depot and the surrounding scene.