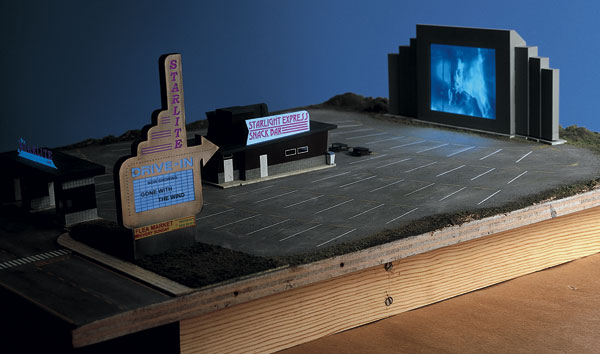
With the addition of a videocassette player, any VHS recording, from home movies to the latest video rental, can be shown on the theater’s “big screen.” The HO model I built uses a liquid crystal display (LCD) with a 5.6″ screen while the N and Z scale versions are appropriately smaller.
The kit contains two packets of well-illustrated instructions, including many exploded views and diagrams. The components include two large photo-etched stainless-steel sheets which assemble into the theater’s four major structures. Laser-cut plastic sidewalks and bases are provided for these structures along with fiber optic marquee chase lights, electroluminescent signs, and interior lighting, which turns this kit into a very lively and impressive finished scene.
The structures are easy to assemble, as the parts are well engineered and fit together perfectly. Thin CA is the primary adhesive, and accelerator is helpful. After separating the stainless pieces from their frets, the parts fold into the structures like Japanese origami. A new single-edge razor is an effective cutting device, but be careful of the sharp edges which are left on the frets and parts. They’re easily corralled with masking tape and a small fine file to dress down the edges. This filing is a bit time consuming, but it’s time well spent.
The electroluminescent lighting is also simple to install, though some parts are quite delicate. The backs of some signs are meant to be painted, and this must be done carefully.
It takes more effort to assemble the marquee, which is a marvel of lighting and animation. The builder must form about 100 “light bulbs” by briefly heating the tips of the individual fiber optic strands near a candle flame. The strands are threaded through tiny holes in the marquee, bundled, and joined to a circuit that makes the lights dance around the changeable movie sign. This takes a fair amount of close work, but the result is well worth it. Unfortunately, the tiny chase lights don’t show up very well in the photos.
The electroluminescent (EL) lamps are paper-thin and elegantly re-create appropriate neon and other illuminated signs for the drive-in entrance as well as interior lighting for the snack bar. The EL signs are powered by three AA batteries. These signs deliver a soft, neon-like glow, produce almost no heat, are flexible, do not burn out, and can be alternately powered by any 4.5 volt DC source. They can be cut with scissors, are easy to install, and trouble-free.
The LCD screen and marquee chase lights are powered by an adapter that plugs into a 110-volt AC outlet. The video signal can be from a TV, VCR, cable, DVD, satellite, or camcorder. Controls for brightness, contrast, and color balance are beneath the base. The screen image is very sharp and clear from the front, but there’s a loss of clarity when it’s viewed from an angle.
Some basic soldering skills are helpful for wiring this kit, but not essential. The battery holders, circuit boards, EL signs, switches, and transformers must be connected, but it’s all straightforward wiring and well documented.
The model requires a 24″ x 30″ base, which I built out of ¾” plywood with a simple frame underneath to protect the wiring and electronics. The LCD screen doesn’t sit flush on the base, but rests within a cutout in the surface. Keep in mind that access to the underside is necessary when you install the theater.
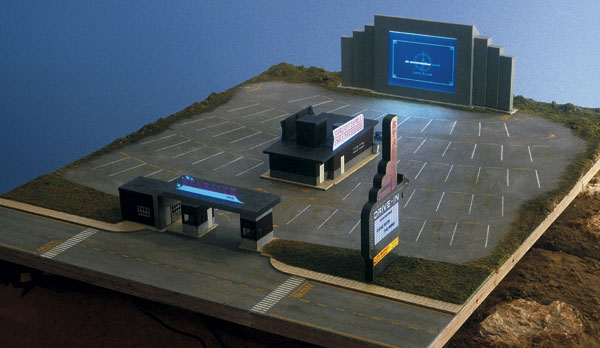
A set of very well-designed stencils and actual-size floor plans make placing the components and airbrushing the parking spaces lines a pleasure. Coating the backs of the stencils wit spray adhesive, as explained in the instructions, is a great idea as they must lie flat on the pavement for crisp results.
When you have completed the electrical connections, switched on the marquee, and parked a dozen autos in the theater, pop a favorite video into your VCR, lower the lights, and grab a bowl of popcorn.
Price: HO $699.95, N $429.95,
Z $525.95
Manufacturer:
Miller Engineering LLC
P. O. Box 282
New Canaan, CT 06840
203-595-0619
www.microstru.com
Description:
Etched stainless-steel craftsman kit
Features:
Electroluminescent signs
Etched stainless steel structures with lighted interiors and signs
Illuminated snack bar and entrance
Illuminated stainless-steel marquee with chase lights
Operating LCD video “movie” screen
Waste receptacles and picnic tables