


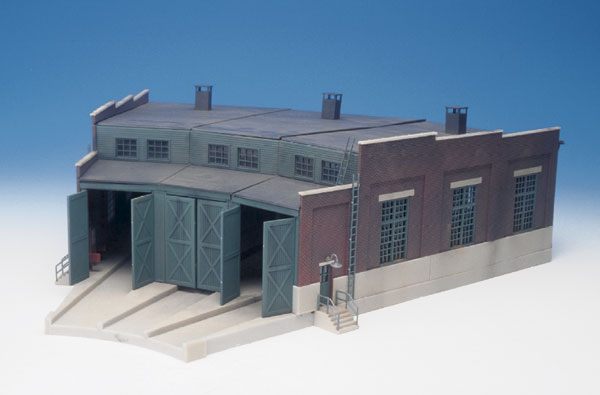
This kit is based on a number of Delaware & Hudson prototypes, although it looks like any one of hundreds of roundhouses built during the golden age of steam. With its concrete trim and foundation and brick walls, the building looks like a small Class 1 roundhouse, not something used by a rinky dink short line.
Although the model nicely captures the flavor of the prototype it certainly isn’t a true scale model of the D&H house that inspired it. It’s been shortened considerably and the stall angles have been adjusted to match the Atlas 9″ turntable.
The kit is typical of most plastic structure kits and can be easily assembled in a long evening using some basic modeling tools. I used a pair of sprue nippers, a hobby knife, needle files, and liquid styrene cement applied with a small brush.
Since the parts are precolored, painting is technically optional but will add greatly to the appearance. I airbrushed my model with Polly Scale paints prior to assembly. The brick walls are Boxcar Red, the concrete parts are Aged Concrete, and the wood components (doors, trim, windows) are Dark Green. I then painted the roof sections Grimy Black.
After the paint dried I assembled the model. The instructions do a great job of walking the modeler through the assembly sequence, and I didn’t encounter any problems.
I chose to use the three box vent hoods instead of the round exhaust blower housing since I wanted my model to represent a steam-era roundhouse. If you’re modeling the diesel era you can substitute the blower housing. Also, although I glued the smaller front roof sections in place I left the larger sections loose so I could access the interior.
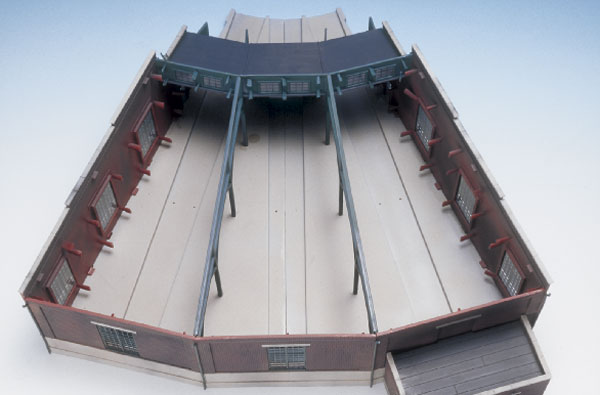
The model has a large foundation with slots for installing standard Atlas sectional track or flextrack. Since most roundhouses had the area between the rails flush with the rest of the floor this would be a nice detail and an easy-to-add one using plain sheet styrene cut to fit between the rails.
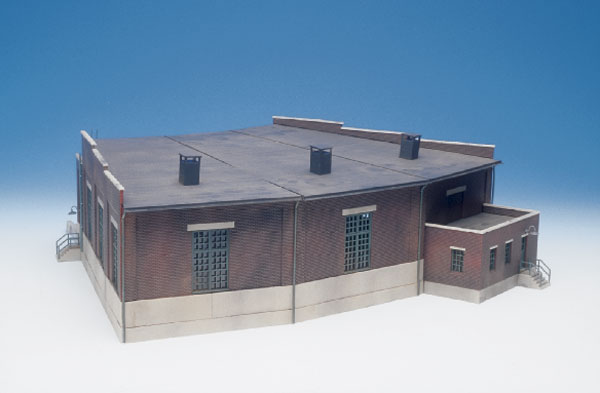
Adding the separate office section at the rear, as well as the smaller details like steps, handrails, and ladders, completed assembly.
I weathered my roundhouse with powdered black and brown chalks. I added the most weathering to the roof because it’s the most visible part of the model.
The finished structure, while by no means huge, is still a respectable size requiring a 14″ x 16″ footprint (including the office, which can be placed in various positions). The interior length of the stall tracks is 8″.
This model’s biggest strength is that it’s made to match the Atlas turntable. Ironically, that’s also its biggest weakness, though it’s possible that with some clever cutting and fitting the basic building could be altered to accommodate a different turntable.
This kit is a winner simply because so many model railroaders would like to have a roundhouse and because so many of those Atlas turntables have already found places on layouts over the years. I’m sure this very convincing and well-made roundhouse will find a home on many model railroads.
Price: $24.95
Manufacturer:
Atlas Model Railroad Co.
378 Florence Ave.
Hillside, N. J. 07205
www.atlasrr.com
Description:
Injection-molded plastic structure kit no. 709


I've finally gotten around to building the Atlas roundhouse kits I bought a number of years ago. The model itself is first-class, but contrary to Marty McGuirk's staff review, the instructions are sub-par on some points. Overall, the kit is very easy to build. Experienced plastic-kit builders will get through it fine if they closely examine the actual parts before starting construction, and note some subtle but important differences between similar-looking parts. But neophytes may wind up in a bit of trouble. This review is intended to flag the difficulties, for the benefit of future buyers of this fine kit.
First, the positives: I enthusiastically agree with the favorable comments in the staff review on the overall design and appearance, and would add that both the tooling and the injection-molding are very well done. Everything is carefully designed to fit together as neatly as possible, and does so (with the one exception noted below). I combined three of the 3-stall kits, producing a visually massive model occupying a 135-degree arc (almost 40% of a complete circle) but still fitting within an 18"-radius turnback curve — while still leaving room for a couple of servicing tracks opposite the roundhouse coming off the turntable lead. The stalls are long enough to accommodate virtually any diesel locomotive, as well as small-to-medium-sized steam locomotives. (The controlling dimension here is the inexpensive but reliable Atlas turntable that this roundhouse is meant to serve, which in turn is designed to fit into Atlas's Snap-Track system in place of a 9" piece of straight track and therefore is limited to locomotives with a wheelbase (not overall length) of 9" or less. But this is enough to accommodate even E8/9 diesels, I was surprised to find.)
Now for the problems with the instructions:
1. Although neither the packaging nor the instructions mentions this (nor did Marty McGuirk's staff review), the wide slots in the base sections where the stall tracks are laid evidently are designed to receive code 83 track, not code 100. If you use code 100 track, the rail height is too high to permit the stall doors to close fully. (Naturally,I didn't discover this until installing the doors, but that's OK with me because I intend to run locomotives in and out of the stalls and therefore have no need to close the doors. In fact, if the packaging had stated that the kits are designed for code 83 track, I might well not have bought them, which would have been my loss. And one could always file or sand down the door bottom edges to clear the rail, but one would have to be very careful not to damage the protruding vertical pivot pin on each door that goes into a hole in the base)
2. In the instructions, the upper front wall sections containing the clerestory windows (erroneously called "skylights") over the stall doors are shown upside down — or else those upper front wall sections on the built-up model in the photo on the packaging were installed upside down. Your choice, I guess.
3. The pieces of coping that cap each section of each side wall are differently numbered on the sprue than in the instructions. Part #34 ("Coping 'A'") is identified in the instructions as #32, and Part #33 ("Coping 'D'") as #37. Test-fit each piece in its intended place before cementing (always a good idea anyway).
4. the illustrations in the instructions for Part ## 50 and 51 ("Vent Base" and "Vent Cap") bear only a limited resemblance to the parts themselves, which in any case don't fit together as apparently intended. I managed to cement them, but the surfaces that meet are very, very small.
5. For no apparent reason, the relevant sprue includes an extra Part #35 (office front wall interior brick facing), but no extra Part #30 (office side wall interior brick facing).
6 The instructions say that there are 6 pieces of Part #40 ("Foundation Rear"), but on the sprue there are four of a #40A and two of a #40B. I suspect the difference is in the beveling of the ends, but the instructions don't say which goes where, or even acknowledge that there are two sub-numbers. I imagine the two #40B's are intended to be used where the rear walls meet the side walls, but when combining multiple kits as I did, the difference between the two variations necessarily is ignored. None of this is addressed in the instructions.
7. The illustrations in the instructions include a footnote "parts 58 and 59 are used when combining kits to make a large structure," but nowhere do the instructions say what those parts are or where they should be placed. The instructions do state that "long flat strips that match the roof color are included to cover the joint between roof sections on the top and lower roofs," which one can assume refers to the three medium-length dark grey strips designated on the sprue as Part #59. But one of the joints that would need to be covered is half the length of these strips, and one is twice as long, which makes the strips of dubious aesthetic value. And the role and purpose of Part #58, a single green plastic strip, are nowhere explained.
Notwithstanding these shortcomings in the instructions, don't hesitate to buy this kit. Just pay close attention to the parts themselves when putting the thing together.
The Atlas roundhouse is designed with 15-degree track angles to match the Atlas turntable, the geneva movement of which is set to 15-degree angles. One could cut the rear walls, roof sections, and modify or replace the floor to be adjusted to 10 degrees.
The table to door distance will be reduced if using any larger table. The distance from table to door is 4 1/16 inches, of which 3 1/2 inches is on the roundhouse foundation.
While the "bumpers" built into the floor are oversized, their position is reasonable. If these “bumpers” are removed, scale-sized stops (or wires) in the same location are recommended whether or not the original floor is retained.
If one intends to build a number of stalls other than three, six, nine, etc., then the original floor must be modified or replaced, as it is constructed in two segments that bisect the center trackbed.
Corrections to the review: The track bed built into the Atlas roundhouse places 9 5/16 inches of track between the closed doors and the end of the track, the "interior length of the stall track." To the rear wall, the measurement is 10 7/16 inches. The side wall exterior is10 3/4 inches. Each rear wall exterior is 5 inches.
Between the closed doors and the built in "bumper," there are 10 inches of free space before the coupler (glad hand) impacts the "bumper." (As such, the Walthers Proto 2000 USRA 0-8-0 will fit into the roundhouse with modest room to spare.)
MSRP has increased to $38.50 (2011).
Very nice kit. I have a walthers turntable,can they be used together?
Thanks Doug Allen