What was your first train set (or locomotive)?
I was four or five when I got my first train set, which included a wooden steam locomotive with four or five cars that ran on wooden track. When I was nine, I got my first HO electric Snap-Track set with a Varney F3 diesel and a nice array of cars and buildings. At first, I ran the train around in a circle as the set was designed, but after about six months, I started running it point-to-point across my bedroom floor. I ran it from my model castle to some other make-believe place, which gave me the feeling of operating a real railroad. Within six more months, I was using my HO set to build my first layout on plywood and using plaster.
Describe your model railroading philosophy in 6 words.
Recreating a historical place and operations.
What has been your biggest modeling success?
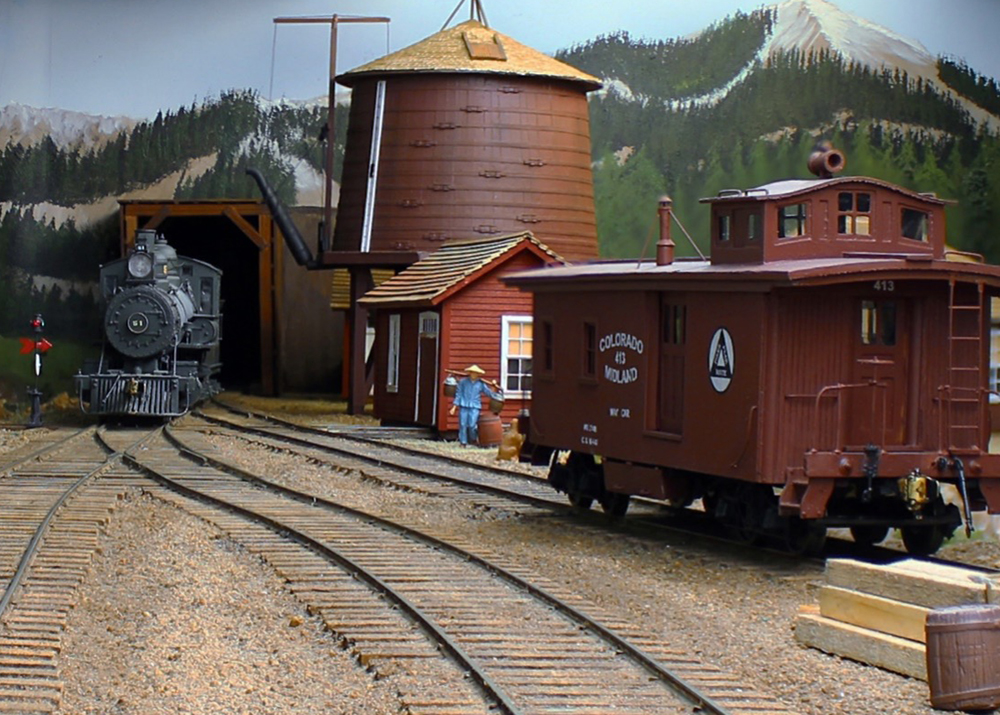
My greatest success was recreating two prototype 19th century Colorado railroads. I had fumbled around with modeling several layouts without attention to details, ill-defined modeling skills, and failing to do some simple, basic research. There are plenty of books on almost any railroad subject and the modeler can get additional support and information through historical societies.
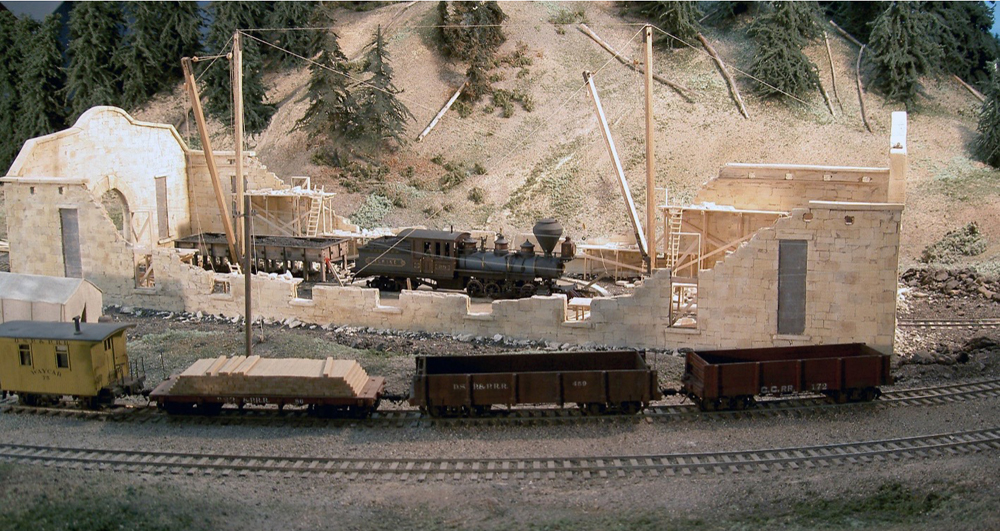
Whether one models prototype or freelance, it is better to know at least the basics of what you are recreating. In doing the Denver, South Park and Pacific in On3 and the Colorado Midland in O Scale Proto 48, I learned how to select places that would fit into my layout space and to recreate the historical operations, physical settings, and the atmosphere of the prototype. I did not jam too much in because I wanted to let the scenery have its place and be the stage for the trains. I gained a great satisfaction in building all my cars and locomotives, but my greatest pleasure was seeing history come to life while watching others move the correct locomotives and equipment from historical place to historical place.
Denver, South Park & Pacific Railroad video: https://www.youtube.com/watch?v=4EeLQE-ANRc
P48 Colorado Midland Railroad video: https://www.youtube.com/watch?v=D6M_S8Vnqzg
What was your biggest modeling mistake?
The improper attention to trackwork was my biggest mistakes in my early modeling efforts. My first real layout was a circle built on a sheet of plywood using my Snap-Track, which did not require any real knowledge of how to lay track, or deal with roadbed issues and grades.
My next three layouts were of the more traditional design with open-frame benchwork, using lumber for the roadbed, and the inclusion of grades. These three layouts proved to be bitter but valuable lessons in how not to do trackwork and general layout design issues. In doing the first of these three, I did not use a sub-roadbed and spiked the flex-track directly, and hard, into the 1 x 4 lumber. This created too many vertical misalignments because the ends of the lumber did not always match and provide a smooth transition. This caused the engines to derail. I also made the curves too sharp, which exacerbated the track laying issue.
The next two layout disasters centered on grades. On the first of these, I contorted the trackwork into a double loop with the lines crossing each other without the proper distance to allow a reasonable grade. Being a kid at the time, I fantasized that I could solve the problem by making a rack-system on the steepest grade. Eventually, I settled for using doubleheaders on a three or four car train.
I also learned a lesson about grades after building an HOn3 Rio Grande layout using “prototype” 4% grades. This is one area where prototype modeling does not work. The locomotives would have trouble pulling a train up the grade, but the worst was going down grade where the train would “runaway.” Even with first-class Swiss motors and gearboxes the locomotive will “buck” due to the slack in the motor and gearbox shafts. It is not nice to watch your train lurch along the track.
The lessoned learned was to keep the grades well below 3% for running the trains and also to keep the trackwork elevation in a reasonable range for your viewers and operators. When building my Colorado Midland, a lot of the track is near level, while other places it would go up to 2% plus but go back to level as it neared a station. Also be aware that when the spec sheets say the ruling grade is such and such a percent, that will not necessarily apply to the entire length of that section of the railroad. Whenever grades are included in the design, I found it essential to have easy transitions to have a well running layout.
What’s your least favorite modeling task?
In one word: Electrical.
I had an outdoor, live steam railroad with approximately a quarter mile of track plus yards and a branch line. One day a visitor asked me how I electrified the switches. I chuckled to myself, and said thank goodness I didn’t have to wire them because the engine runs on coal and water. No electricity required.
I enjoy the history, fabrication, and artistry involved in model railroading. Electrical work has none of these. Most of it is done under the layout having to look up while sitting on the floor. Necessary, but not much fun or satisfaction other than seeing the trains run on the layout, which is an absolute requirement unless you are going to pull your trains around with a string.
What project(s) have you been working on recently?
My latest, and most likely my last layout adventure, is converting my Colorado Midland layout, which modeled the railroad’s operations over the Continental Divide in 1898, to a Maine coastal railroad of the same time period. I wanted to include ships in the railroad operations, and most importantly to make the transition as simple as possible. After scratchbuilding 13 steam locomotives to Midland standards, I decided the best approach would be to freelance a railroad, which would allow me to simply change the herald on the tender. The new system would be converted from the Colorado Midland (C. M.) to the Central Maine (C. M.). Also, since there was only one island that met the requirements that could have supported a railroad, the placement of the rail line in the “real world” was made easier. I am modeling along the Maine coast from Belfast to Camden with ship service from Camden Junction to Stonington on Deer Island. The island offered the inclusion of rail operations involving fishing and canning concerns, a stone quarry that actually existed, lumber products, and “high class” resort tourist business. Creating a fictional line and applying historical and operational knowledge to the model layout has been a great adventure.
What advice would you give to a new hobbyist?
Model railroading is perhaps the greatest hobby because it incorporates almost every discipline into one adventure. It has something for everyone, but do not be put off if you are not good in all of them, because no one is.
Approach building a model empire by thinking of it as separate pieces. Just like a car engine is made of a whole lot of items that work together, break down the modeling projects into individual units that will come together to make a complete package. Baby steps.
Know your space. Select an area for the modeling project where the environment is controllable. Keep dust and dirt out as well as regulating the humidity. You will be working with different kinds of wood, metals, paper products, plastics, etc., which all expand and contract at dissimilar rates and react to water differently. Trackwork will not stay in alignment under adverse conditions, which will result in derailments and electrical issues. This will ruin your day and cause no end of frustrations.
Also select a modeling subject that will nicely fit your space. Do not try and jam too much into it. When attending a recent convention with a panel of modelers answering questions, one person asked how he could start to build a prototype railroad. Being a prototype modeler for more than 35 years, my answer would have been to select an operating area on your prototype railroad that will fit your space, which includes trackwork, industries, and buildings. In my experience, I modeled the Midland and thought about including the iconic station on the railroad at Leadville, Colorado. This couldn’t be because I had other things I wanted to include. The size of the station alone with its accompanying trackwork would have required a 40’ long section of almost straight track.
If you want to “finish” a layout, calibrate your ambitions with your allotted time. Consider both hours per week, how long you plan on living in a home, and how long you are going to probably live. For those who do not care about “finishing,” build what you want.
I could go on and on, but after all, the hobby is about having fun, which can come in a variety of ways. Enjoy.
See more by Andrew Dodge:
Planning the Colorado Midland
Scratchbuilt rotary snowplow video
Track plan of the Colorado Midland