


The case for body-mounted couplers: For 40 or so years N scalers have been debating – sometimes rather fiercely – the merits of body-mounted couplers versus the truck-mounted type that come on most rolling stock.
My position is simple. I think that for 90 percent of N scalers, converting to body-mounts wouldn’t be worth the effort and expense. I can think of only two reasons to do so: more realistic appearance and better operation. Let’s look at those two considerations.
My friend, the late John Coots, liked to argue that the couplers on our models ought to be body-mounted because that’s how they are on real cars. No argument there, but for me, the truck-mounted type always looked just fine. I’d get more bang for the buck putting my time into scenery, structures, and locomotives.
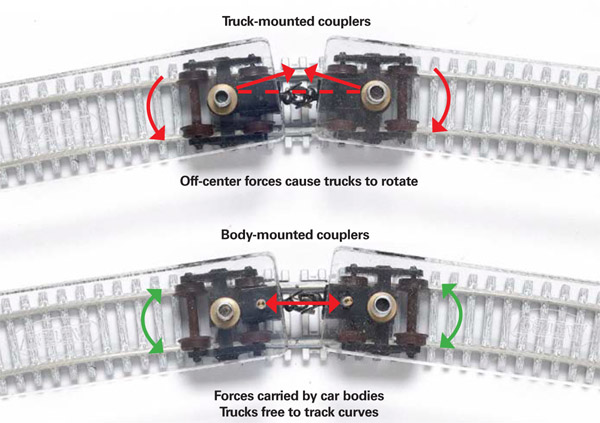
The improved operation argument, though, is a good one, especially if you want to back up long trains. If they’re shoved backward, trucks with integral couplers are subjected to sideways pressure that can cause them to skew. With body-mounted couplers, though, the force is transmitted through the train, and the trucks are free to rotate.
For the last several years I’ve made it a rule to couple a body-mounted car right behind the locomotive. This policy resulted from several hair-raising experiences where a train uncoupled right behind its engine halfway up my helix. This precaution lets me run a train continuously for hours wih no difficulty.
Running long trains on my layout is fun, but I want more than that. Operations will eventually include using mid-train helpers and perhaps pushers to get trains up the hill.
Last fall I decided the track and scenery were far enough along that I could focus for a while on operating. I got enough equipment together to make two long trains with mid-train helpers. Then I invited friends Andy Sperandeo and Gordy Spiering over for some test running. One would run the lead engine, the other the helpers.
For the first time I’d see the railroad do its thing. I figured there might be a glitch or two, but I was far from prepared for what ensued. Cars derailed all over the place. I’d like to have blamed the operators, but I knew better.
Reflecting on this disaster, it seemed I had two basic problems:
- Too much horsepower, resulting in too much conflict between the two sets of engines. Two or three engines were quite capable of pulling a train up the hill. The helpers really weren’t needed.
- All that pawing and bucking was too much for the truck-mounted couplers. The buffeting forced wheels to jump the rails.
The obvious solution was body-mounting all couplers. Unfortunately, that meant converting several hundred cars. Fortunately I had learned to body-mount Kadee couplers in the early ’70s, back when truck-mounted knuckle couplers hadn’t been introduced yet.
Almost all my cars have Micro-Trains trucks with couplers attached, so the first step is to cut the couplers off with a jeweler’s saw. This goes easily if you clamp the coupler box lightly in a vise.
For the sake of economy, I reuse the couplers I’ve cut off. First I enlarge the hole through the coupler box with a no. 60 bit to clear a 00-90 mounting screw. Then I tap the hole in the car floor to create screw threads and mount the coupler. If jeweler’s saws, pin vises, and taps are new to you, join the club. They were certainly new to me, and I suspect they are to most other N scale modelers, too.
I recommend starting with your Kadee and Micro-Trains cars, because they already have mounting holes in the underframe. Just make sure those holes are clear all the way through and tapping will be easy. I’ve discovered the tap won’t stick if you lubricate it with light oil.
Many cars from other makers also have holes, or at least dimples for locating them. Last come the cars with no locator holes. The hardest thing for me was getting the holes properly centered, a problem I at last solved by making jigs from brass angle. Some hopper cars and tank cars have no mounting platforms, so you’ll have to figure out how to add them, usually using strip styrene.
Six weeks after the colossal failure I described earlier, I invited Andy and Gordy back for a repeat trial. In the interim I had body-mounted some 50 cars, enough for two trains. This time I was thrilled – and that’s no exaggeration. The helper operation went perfectly. Now I know that someday, this railroad will operate as it was designed to.


Fortunately, TratnWorx has filled the void forAtlas and a number of other brands of hoppers by “inventing” a product that clips into place on hoppers providing a place to body mount MT and other similar couplers to hopper cars. I gave them a try and they worked so well that I went back for more, twice. Now I have body mounted couplers on all of my hopper cars from any manufacturer. Yes, they are not cheap, but the results are well worth the expense and time required to have body mounted couplers on all of your hopper cars. Walt