


The Internet is a great source of information. Unfortunately it’s also a source of misinformation, or what often seems worse, incomplete information.
I took them home and discovered they ran poorly. The wheel flanges rubbed against the bottom of the body. “What gives here?” I asked myself, and went on the Internet to find out.
On one of the discussion groups I follow there was a thread about the car that went on for probably 30 entries singing the car’s praises. I was beginning to think I was nuts until someone said, in essence, “Hey guys, there’s a pretty big problem here.”
And now for an example of Internet frustration, one from which the wounds are only freshly healed.
Recently I needed to install new decoders in five SD40-2s, three I’ve been running for years and two new ones. Why the three older engines needed new decoders I’d rather not say.
I sent the three fried decoders to Digitrax for repair and bought two new ones at a hobby shop. Following the directions carefully, I installed the first, tried to run the engine, and got nothing.
I tried a second decoder in a second engine and got the same result. Yet the model ran fine on direct current, and when I tested the decoder itself, it checked out fine, too.
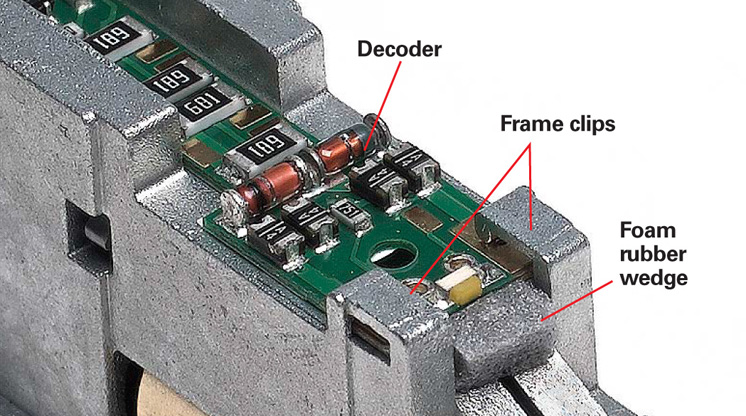
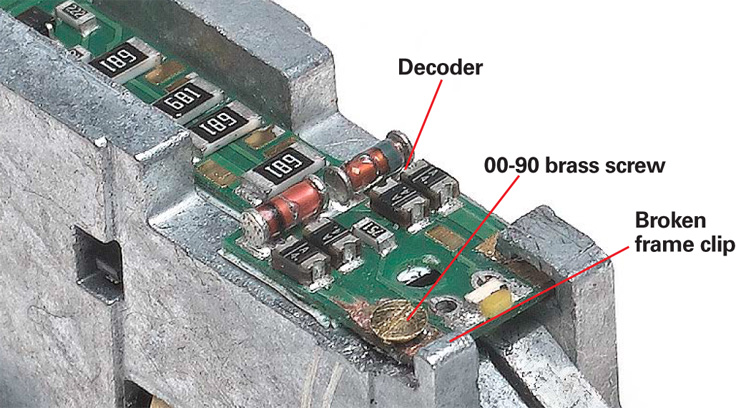
Finally I identified the problem. The electrical contacts on the decoder weren’t making firm contact with the slots in the frame because the decoder wasn’t thick enough. This was compounded by the fact that the decoder had only two such contacts. (The stock Kato lightboard used four.) No big deal, I thought, I’ll just go online and search for a solution.
I found and watched a half-dozen or so high-quality decoder installation videos. Invariably the presenter did exactly what I was doing, except that in his case, in less than two minutes his locomotive was running beautifully. I started to feel that I must be altogether inadequate to even attempt this hobby. Why’s it not happening for me?
Next I tried some manufacturer websites. TCS in particular has a fine site with lots of good info. It also makes a decoder to fit my situation, which judging by the photo, also has just the two contacts.
They offer two suggestions to solve my problem: One is to apply a droplet of solder to each contact to make it thicker. The other is to bend the tabs on the frame down to make the slot narrower. I tried both these solutions and they both worked, but only for a day or so. In the end I bent one of the tabs too much and broke it off. I solved the problem by drilling a hole through the decoder’s contact and into the frame, then tapping it for a 00-90 brass screw.
Several days later I got up at 3 a.m. and started plowing through more websites, looking for some kind of silver bullet. Finally I found it at N Scale Supply’s site. The suggestion is to cut a small chunk of the hard foam rubber packing from the box the engine comes in and wedge it between the frame and the decoder, pushing the contacts up against the frame tabs. Problem solved.
Eventually I might have found a solution without the Internet – maybe even in my own magazine. In the July 2014 DCC Corner column, Model Railroader staffer Eric White explains how to use plastic wedges or drops of solder to improve contact between an N scale decoder and locomotive frame.
My search had the benefit of giving me lots of other useful tidbits. N Scale Supply’s site showed a method for cutting traces on a manufacturer’s lightboard and hardwiring one of today’s small N scale decoders to it. I’d really like to give that one a shot.
This column originally appeared in the November 2014 issue of Model Railroader. – Ed.


I hear you Jim.Finding the cure in a back issue of Model Railroader.Sometimes the biggest problem of collecting information and data is collating it in a way that it can be found again.Can take about as muck time as the hobby itself.
My basement rr has been around going on over 20 years. With a hundred locos and old DC wired track, (and difficulty even running the DVD player), I have avoided trying the new enhanced electronic systems. Now I know why!
My decoder woes were the Atlas Classic GP 7.
I installed decoders in three of them. (drop in versions, not the split board soldered)
The first installation was flawless, the diesel ran smoothly and quietly.
The other two were installations were a nightmare.
Both ran much louder and not nearly as smooth after the installation. After checking and re checking my work, I improved their performance but neither one runs as well as the first one.
I've checked several websites looking for information on what I did wrong. But as you correctly pointed out, the net is a source of mis-information as well as information.
From now on I stick with Kato, or Atlas with DCC installed. I don't have the time to become an N scale diesel mechanic.