


Pat Lana’s N scale Cedar River & Iowa Central (Crandic) N scale model train layout is also featured in Great Model Railroads 2013.
Understanding the basics
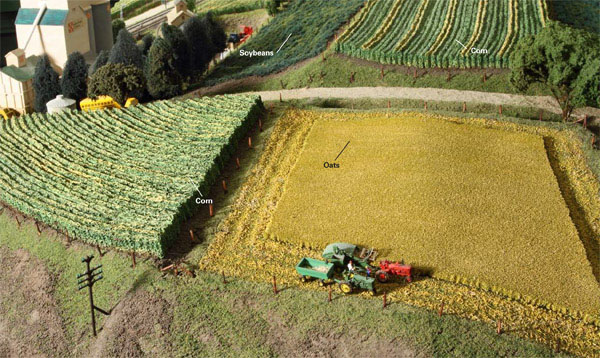
In the Midwest, most areas are plotted on a grid, so farm fields are typically big rectangles. When I started work on my N scale model railroad, I made the fields 42″ long, which looked too big. I now make the fields between 30″ and 36″.
I found that my fields look best with the long side running parallel to the contours of the hillside. Having the short side of the field run up the hill and away from the viewer adds depth to the layout.
A rule of thumb when laying out fields is to always have the rows follow the contour of the hills. I set the rows across the slope, or parallel, with the hillside rather than running perpendicular (up and down) the hill. On full-size farms, this is done to control topsoil erosion.
Planting corn
I wanted my N scale corn to have evenly formed rows, the yellow of the tassels showing, and some (but not too much) leaf texture. Using a cornfield photo as my guide, I first looked at commercial products available. Commercial corn stalks look good when painted correctly and bunched close together. According to my research, about 35 percent of the typical Iowa farm in 1961 was planted in corn. I translated this to my layout, and approximately 75 square feet of my model railroad would require cornfields. A stalk every ¼” on center equaled more than 172,800 cornstalks! I needed a quicker and easier method to represent cornfields.
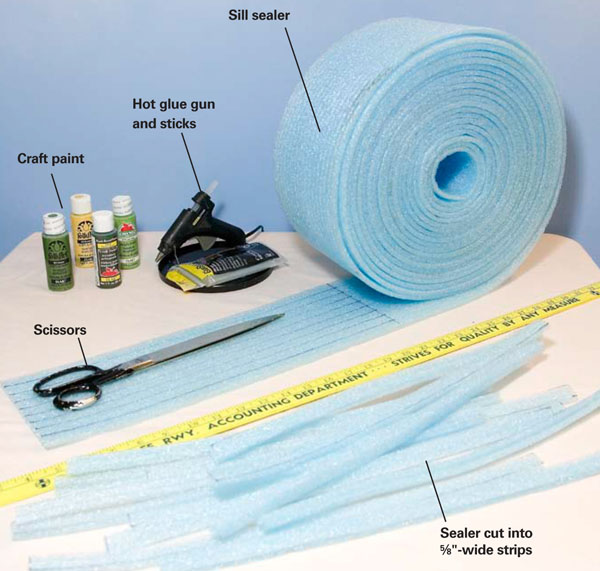
Once all of the foam strips were cut, I attached them to the paper bag with hot glue. I aligned the tops of the rows horizontally, as the bottoms will not be seen.
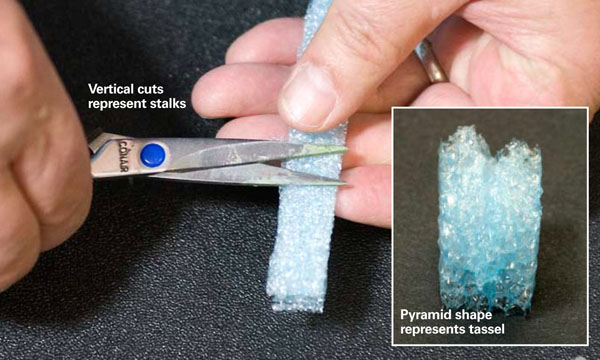
Before attaching the outside row, I removed the plastic skin on the foam with scissors to reveal the air pockets. I made vertical cuts across the foam to suggest individual cornstalks.
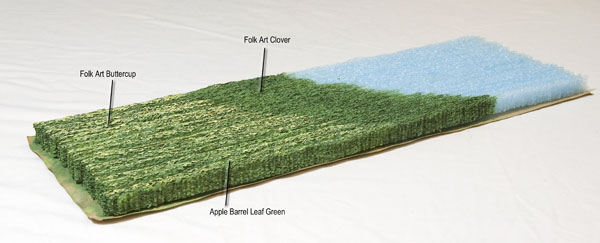
With the rows glued together, I mounted the field on the layout for painting (you can paint prior to installation if you prefer). I used Apple Barrel Leaf and Forest Green and Folk Art Clover acrylic craft paints. I used this color as a base coat, and it revealed any plastic skin that hadn’t been removed. The smooth skin ruins the field’s appearance, so make sure it’s removed.
Next, I painted the entire field with diluted Forest Green, flowing the paint into the air pockets. I made sure the paint was thin enough that it didn’t completely cover the Clover.
After painting, I used real Iowa dirt to cover the edge of the base and hide any gaps between the rows. The corn should look as though it’s growing from the dirt. I secured the dirt with a mixture of white glue, water, and liquid dish detergent.
To complete the cornfield, I added fence posts made from switchgrass stems. I then added some Woodland Scenics ground cover to the scenery around the field. I left some distance between the field and the fence line bare dirt. In the period I model, farmers applied herbicide between the edge of the field and the fence to control weeds.
Switching to soybeans
The second most prominent crop in the Midwest is soybeans. My goal was to capture the round form, leafy texture, and dark green color of soybeans.

Baling time
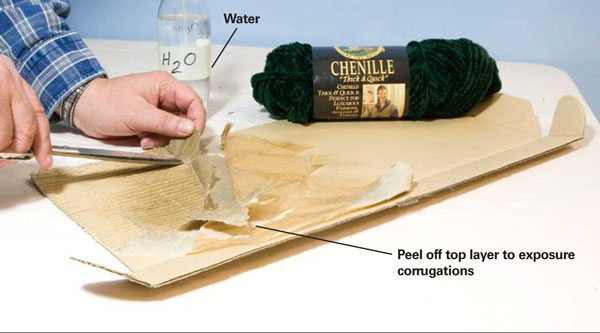
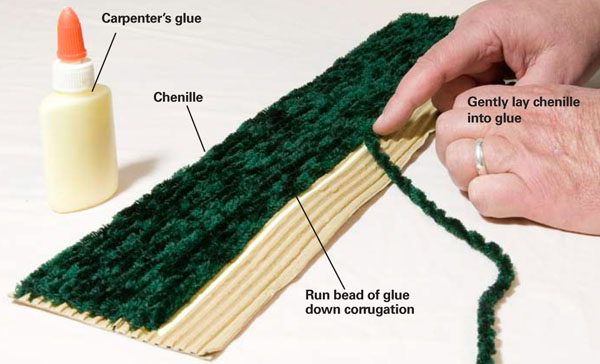
Since my first paying job was baling hay, I had to model a windrowed (row of cut hay or small grain) field of alfalfa. To get the right form I again used the corrugated cardboard as a base. However, this time I put a windrow down every fourth corrugation with chenille yarn.
After the glue had dried, I applied real dirt and Woodland Scenics blended yellow grass between the windrows to cover the cardboard. I then put a fine layer of the same firm’s weeds over the windrows. I also added yellow grass to represent the windrow trail that indicates the baler has already picked up the hay.
An oat field from foam
Real oats are about 3 feet tall. Once I determined the shape of my field, I cut a piece of 1⁄4″ thick packing foam from a computer keyboard carton to fit the space.
At the workbench, I painted the base a flat earth-toned brown. Then I drew dark guidelines around the perimeter to indicate where the combine drove while making each cutting pass.
In the middle of the field I added another layer of 1⁄4″-thick foam on top of the base layer. This represents the oats. I then made vertical cuts along the outside edge of the foam to suggest vertical oat stems. I painted the foam a straw color, moving the brush in one direction to get a realistic color pattern.
I drybrushed the mowed areas (where the combine has gone) a grass green color, not completely covering the ground color. Then I applied dried yellow chamomile tea grounds to simulate chaff dropped by the combine.
I attached the field to the layout with full-strength white glue and used weights to hold it down. I filled in gaps around the field with patching plaster.
Get farming
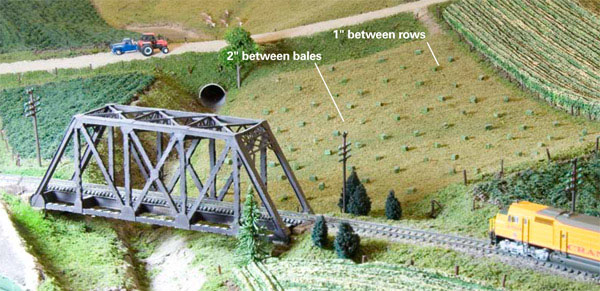
If you model the Midwest, crops are a great way to add scenic interest to your layout. The techniques shown here make it possible to cover large areas in a short amount of time.
Pat Lana lives in Lakewood, Colo., with his wife, Annette. He is a life member of the National Model Railroad Association.


This is one of the best articles on modeling midwest farm fields that I’ve seen. Any suggestion for scaling up to HO scale? The foam insulation for the corn field looks like a good idea for distant rows but what about the closer edges? Maybe using a commercial cornfield product for that would go a long way?
Using corrugated cardboard for fields is something I’ve know about for a long time. I believe many of the commercial products use that as a base anyway. I’ts good to know how to make your own and save money though.
Keep ’em rolling!
I’ve done HO hay bales, but used the square bales, not the modern round bales. cut wood pieces to size then drilled a small hole in the bottom. Coated the whole thing with glue and dipped them in the right color (tan with some light green) ground foam. The hole in the bottom was for a tooth pick to hold them in the glue. You will never see the bottom so it doesn’t get coverd with the ground foam.
Looks like a great idea. I’ve done strips of green construction paper cut with pinking shears about HO scale 5-6 feet and glued the strips down with Aleenes Tacky glue. For another project several years ago, I used small pieces of decorative craft brooms and cut the individual strand and glued them down for corn. They come a light tan color like corn is at harvest time. But plan on spending a lot of time at it.
For a wheat field from my early days on a Kansas Farm I took a pinch of hemp rope fibers and glued them down with the Tacky glue, in HO scale. Cut them about 3/8 to 1/2 inch height. did a field about 18″ by 40′” in 3 weeks. Complete with a replica of my dads Gleaner pull type combine and G model MM tractor.
Hay bales: I had tried the plastic bales, but could not get the color right…then I saw a guy on you tube in a larger scale where he used scotch tape , spread finely cut twine and rolled it up…looked good, but too tough for N, so I bought some 3/8 ” dowel, cut it, smothered each piece in white glue, and shook the pieces (a few at a timein a baggy filled with the cut up twine…had to pat it down a little, but seemed to work pretty well…your corn, tho…that is a terrific solution !
Realy like your ideas. Have you or know of anyone that has made ears of corn?
sounded very interesting, especially since I am a former farm owner. What about HO scale. What might be used?
now I know how to do it now thanks
the best scale fields i have ever seen were at a railroad show and were being demo'd by a vendor
they layed down a square of white glue then used one of those static grass applicators where you apply a ground pin to the corner of the glued area and then you lay down an evenly spaced group of coffee stirrers (depends on your scale) then you use the static grass applicator to apply whatever color/height grass matches your crop
in the demo it was like 3 or 4 mm yellow grass and when he was done laying down the grass and removed the coffee stirrer's the results was amazing and super quick to do
matthew
You solved a major problem for me! Thanks…modeling central Illinois (GM&O) in the early 70s.
Tim Scott, I've used carpet scaps for HO scale with great success. Pick a good short industrial carpet, spray paint it your base color then mist on any other color variations. For example I used a green base for corn and misted on tan and yellow for the ears. Look at some arial photos of crops and get your eyes right, you'll see it!
Absolutely awesome! On the other hand, I could use a tad more of an explanation as requested by Larry and John..
This is a great article. Great ideas for different crops.
Where do people find the creativity to come up with these ideas?!?! Amazing!!
The modeling genius never ceases to amaze! Beautifully done, very creative and the realism speaks for itself! Thanks for using WS landscape…you made us look great, Patrick and we're proud to be part of your layout!
Nice Article. How about someone showing how to do these crops in HO Scale.
Having driven often through this area on trips to my son's home in upstate Illinois from our home in Omaha, I think Pat has capture the scenery beautifully! Scaling is mostly about contextual perspective so I suspect the "view" is even more impressive in the broader layout. Well done, Pat and faithful companion!
I wish my real fields looked that good this year!
Nice!!!
I have the same questions as Larry. The instructions were unclear, at least to me.
I'm missing something about doing the 45 degree cuts….does the cut run the length of the 36" strip? I can't link the photos with the text.
And the "vetical cuts on the outside row (after removing the paper)"…how far apart? Did you use the scissors as a blade?