


As part of our 90th anniversary celebration, we’re featuring never-before-published articles from our archives on Trains.com. This story is from 1994. Products mentioned in the article may no longer be available.
I’ve had an active interest in model railroading for more than 45 years. My ultimate goal was to build a layout of my own design. As a member of the Royal Canadian Mounted Police, our family was subjected to transfers to 14 different locations throughout Canada. Despite these moves, I managed to construct two layouts. Unfortunately, both had to be torn down when we relocated. When my wife, Margaret, and I retired to Vernon, B.C., Canada in 1984 to pursue our hobbies of oil painting and model railroading, I began work on the 16 x 25-foot HO scale Alberta Pacific Ry.
A dedicated space
Our retirement home was designed to include a railroad room and a painting studio. The train room is 16 x 25 feet and free of support columns. I chose a freelance model railroad, which gave me freedom in track planning and equipment selection. The Alberta Pacific Ry. runs from the Canadian prairies to the mountainous terrain of British Columbia.
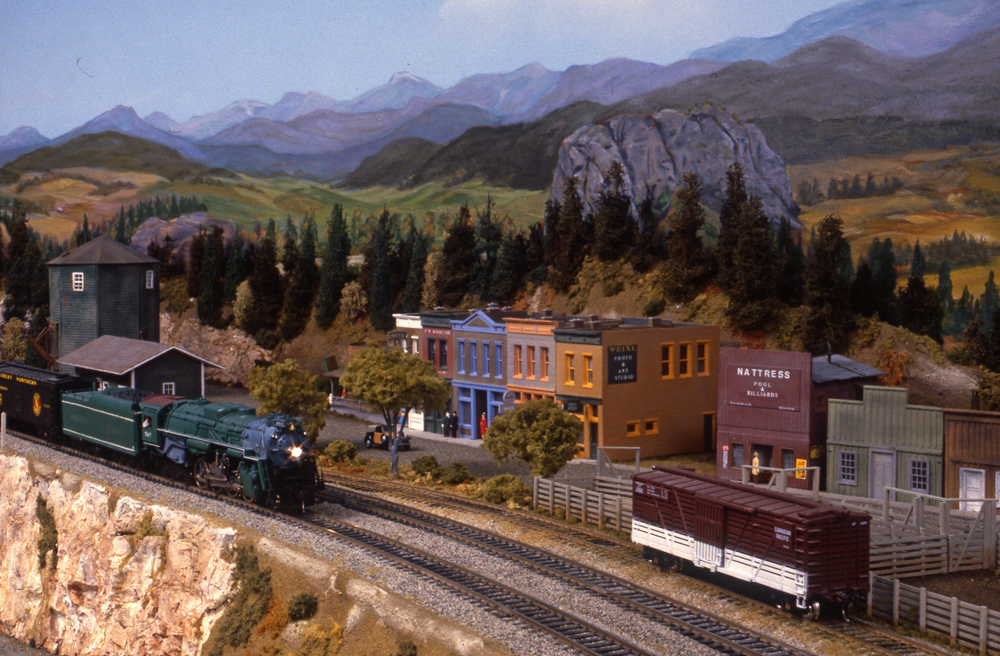
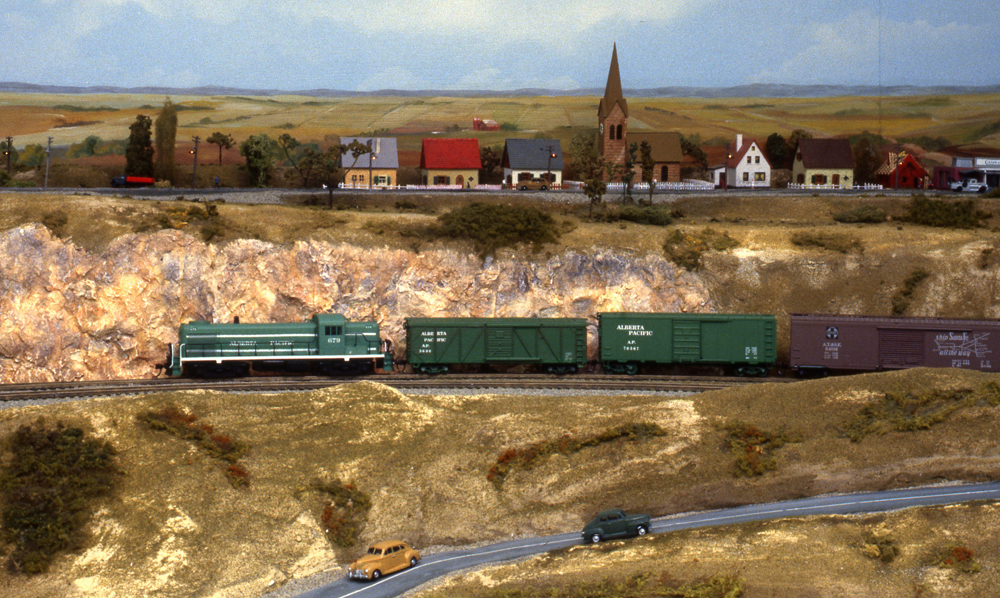
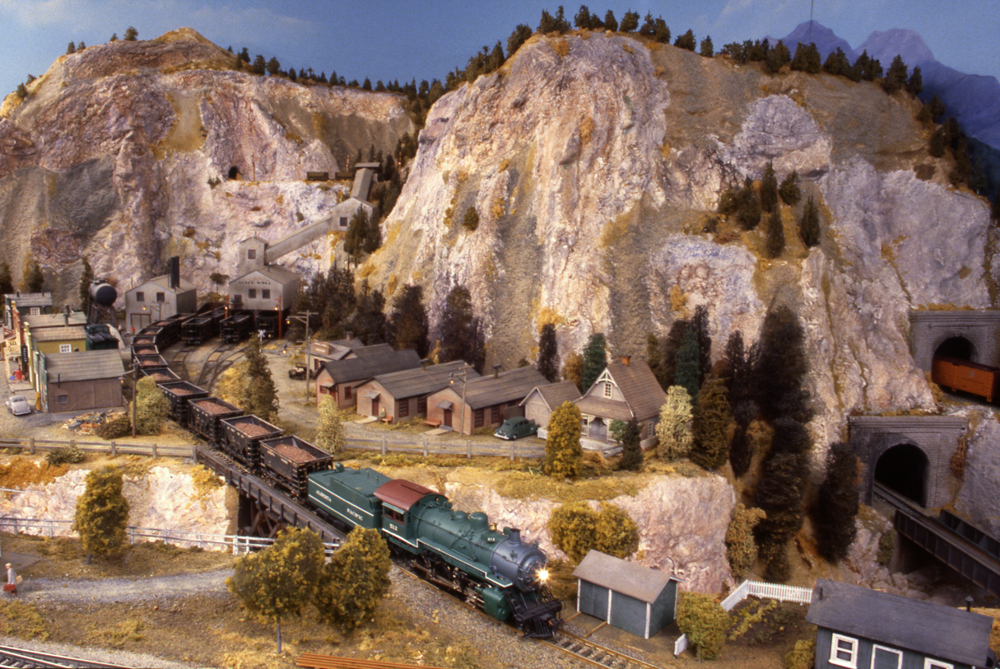
My aim was to create realistic scenes featuring small towns, trackside structures, and industries similar to those found in western Canada. Among the rail-served industries I selected were mining, logging, cattle, oil refining, and manufacturing.
The layout is set between the 1930s to 1956 and includes both steam and early diesels. All steam locomotives are brass, representing prototypes operated by railroads in Canada and the United States. The diesels are Alco RS3s and Electro-Motive Division F7s.
Track plan
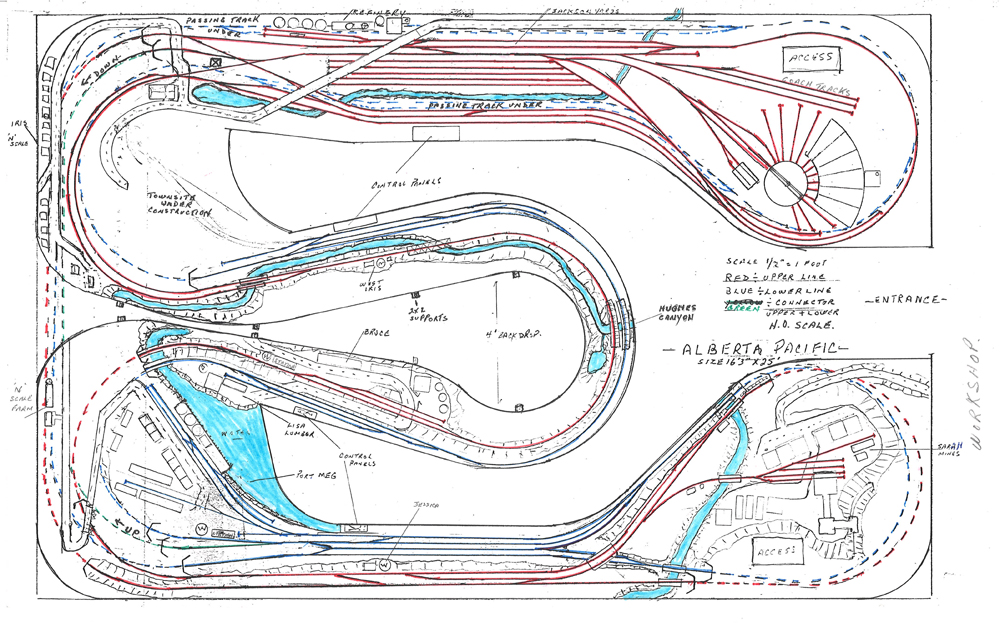
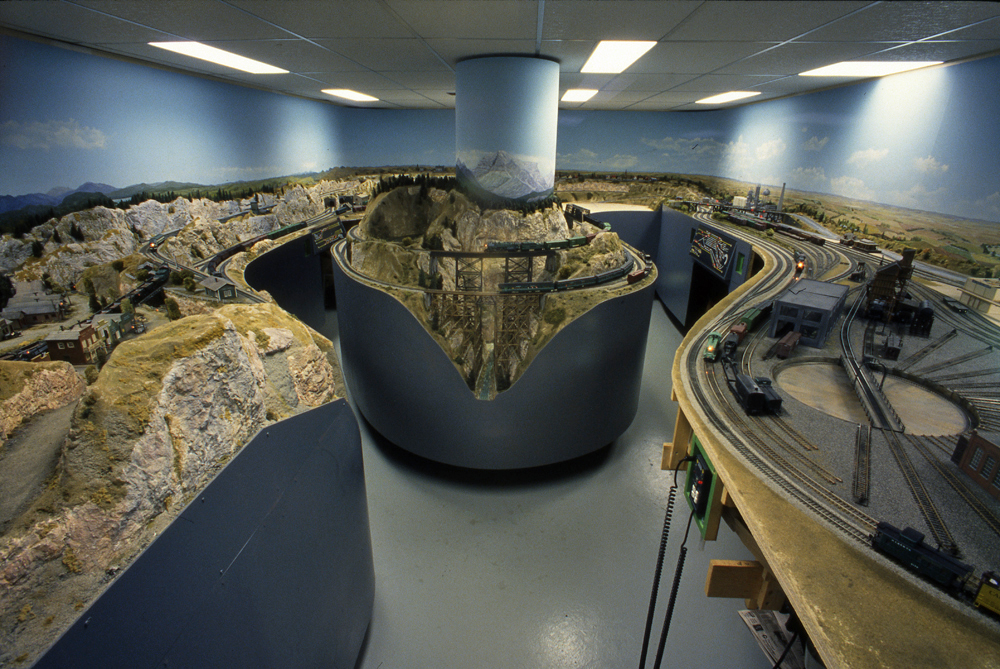
The track plan is a folded dogbone with a single track on two levels. Both lines allow continuous running with passing sidings and plenty of opportunity for switching. The lower track is 41” from the floor; the upper track is at 48”. The upper level runs east to west and the lower level runs north to south. The two levels are connected by a 2% grade, hidden at one end. Siding capacities support 14-car freight trains and nine-car passenger trains.
The main yard at Jackson features a roundhouse, a Diamond Scale Products 134-foot turntable, a coal tower, and a diesel engine shed. Towns, industries, stores, and shops are named after family, friends, and members of the North Okanagan Model Railroad Association (NOMRA).
Track and benchwork
I used Atlas and Peco code 100 flextrack on most of the layout but turned to code 83 track in a few locations. Peco turnouts have proven to be user friendly due to their built-in positive point action. In most locations I used large radius turnouts, but some industries required the company’s small radius turnouts. All of the turnouts are electric powered using a capacitor discharge system. At 35 scale mph, it takes 13-1/2 minutes for a train to traverse both levels.
The subroadbed is ½” plywood and cork roadbed. The main yards are sheets of ½” plywood covered with ½” Donnaconna board. This is a pressed paper material that’s easy to work with and landscape. For example, the ditches along the main line and the creek running beside the main yard were carved from the Donnaconna using a hobby knife. I sealed the areas that had been cut with paint before the water and landscaping materials were added.
The benchwork is L-girder as shown in Linn Westcott’s book How to Build Model Railroad Benchwork. It has proven to be strong and versatile. Risers and joists can be moved to accommodate switch machines, riverbeds, and other modifications. The entire layout is supported by six legs, one under each return loop and four under the peninsula. The remainder is supported by wall brackets lag bolted to the wall studs. This type of construction provides an uncluttered area beneath the layout.
Tempered hardboard backdrops

The backdrop along the walls is 4 x 8-foot sheets of 1/8” tempered hardboard, resting on 3” strips of 3/8” plywood, nailed to the studs. I placed a small cleat every foot to hold the bottom of the backdrop in place. Countersunk screws hold the top firm.
The backdrop on the peninsula consists of five 4 x 8-foot hardboard sheets spliced end-to-end. I glued a 4 foot by 8 inch strip on the back of each joint. Before the roadbed was installed, the 40-foot backdrop was hoisted into place with assistance from NOMRA members.
I covered the remaining walls with separate 4 x 8-foot hardboard sheets, which I painted with a roller. Then I added clouds using New London Industries stencils and white acrylic spray paint.
Structures and scenery
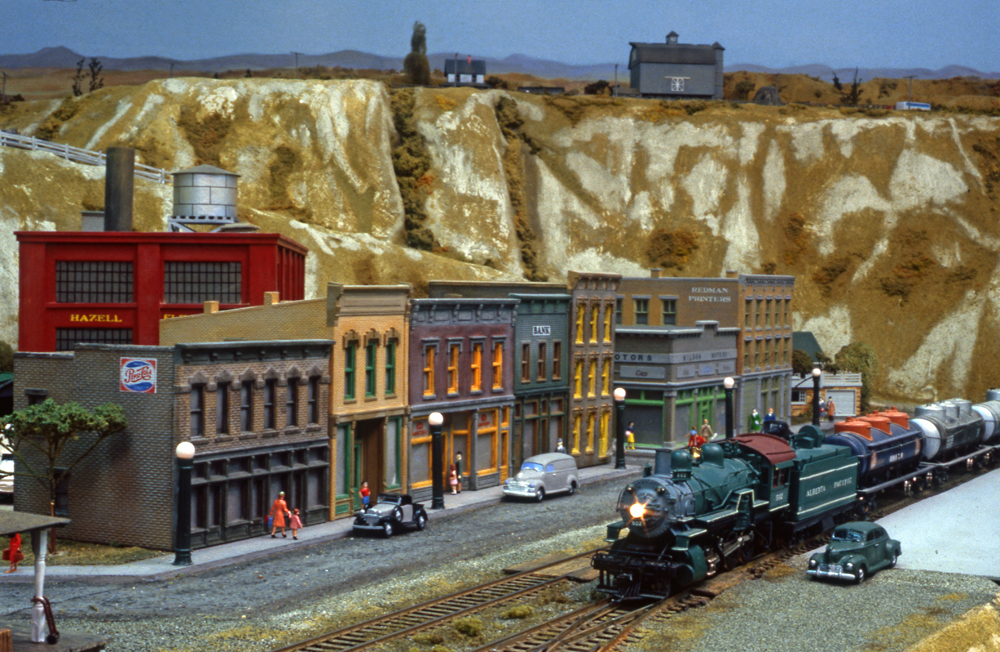
The structures on the layout are a mix of kit-built and scratchbuilt. I used commercial offerings from Atlas Model Railroad Co., Campbell Scale Models, Design Preservation Models, Kanamodel Products, Kibri, Suydam, and Wm. K. Walthers Inc. After I painted the buildings, I weathered them with ground artist’s chalks (earth tones and grays) applied with a shaving brush.
I added lights to the towns and buildings. Buildings have 12 volt bulbs; the street lights are 1.5V. All are powered by a 6V, 10A battery charger. I was able to create a realistic light intensity in the buildings by directly wiring the 12V lamps to the 6V power supply. The 6V power was reduced to 1.5V for the street lights following Bill DeFoe’s method outlined in “Diode lighting made easy” in the July 1991 Model Railroader.
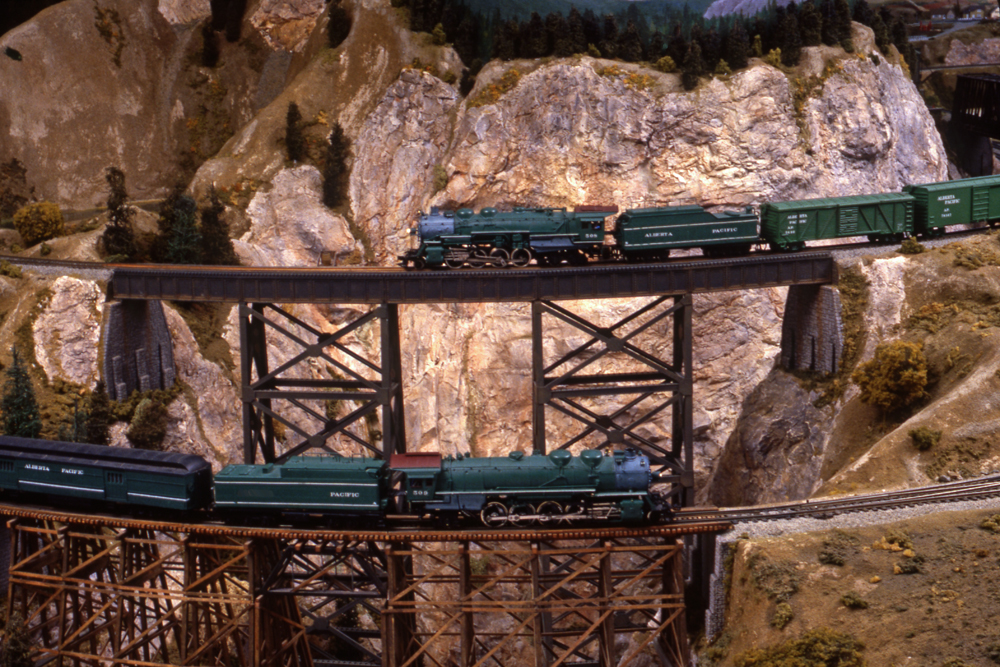
Thirteen bridges and trestles were needed to cross the three rivers on the layout. I scratchbuilt most of them. I built two using Juneco kits and kitbashed one from an Atlas kit. The high wood trestle was built by the late Gordon Hughes, a NOMRA club member. The canyon the bridge spans was named in his honor.
I used tried-and-true techniques for the basic landscape. I weaved cardboard strips into a web, securing the joints with hot glue. Then I covered the web with hand-sized squares of industrial paper towel dipped in plaster. In some locations I used foam board for the scenery foundation, but it proved to be messy and time consuming.
To model the rocky areas, I used commercial and homemade molds to make Hydrocal castings. After the castings were installed, I painted them with washes of acrylic artist’s paint. In areas not covered by rock castings, I used a brush to apply flat earth-toned latex paint. While the paint was still wet, I poured Woodland Scenics ground foam on a folded index card and carefully blew it onto the scenes.
I used several layers of gloss medium for the rivers and lakes. The vegetation, including deciduous trees, is assorted Woodland Scenics products. I modeled other trees using natural weeds and furnace filter material.
My wife, an artist, volunteered to paint the backdrop. Creating a 90-foot mural is a mammoth task. We chalked a horizon line 32” down from the top of the backdrop, around eye level. Over the last two years, Margaret has completed 80 feet of mural and has done a superb job.
Realistic roads

I modeled the highways on the layout using Hydrocal. I made forms from 1/8” strips of balsa secured with masking tape. After I poured Hydrocal in the forms, I used a 4” screen to smooth the material before it dried. The balsa forms pulled away easily.
After letting the Hydrocal dry for a day or two, I sanded it with fine-grit sandpaper. Then I painted the surface with Polly Scale grimy black. After the paint dried, I added pavement markings using automobile pinstripe tape. I sprayed the roads with Testor’s Dullcote to give them a uniform, flat finish. Finally, I applied a dusting of light gray chalk to give the pavement a weathered appearance.
I scratchbuilt the highway overpass spanning the yard at Jackson. I soldered brass laced girders end-to-end for the required length. I used Central Valley and Plastruct parts for the supports and cross bracing. The deck is picture matting, which I scribed plank detail into with a hobby knife.
I used a multiple connector to bring power from the yards, through hidden wire, to the underside of the deck. The bridge girders act as a common ground for the attached signal lights. The street lights use fine bare wire running the full length in parallel under the bridge. This bus wire goes to the multi-plug and 1.5V source. The bridge can be removed by unplugging the connector, which is hidden under a nearby shack.
Running trains
I’ve been using Keller OnBoard carrier control system with sound for eight years with good results. All steam locomotives are equipped with sound. Finding space for this equipment in smaller brass locomotives can be a challenge, but the realistic effect is worth the time and effort.
Carrier control allows for simplified wiring, as no insulated track blocks are necessary for independent, multi-train operation. The layout has four reverse loops with manual polarity switches. Four control panels allow for walkaround running and switching. All control panels and signal lights are equipped with light-emitting diodes to indicate turnout positions.
Just getting started
It has been nine years since I started the Alberta Pacific Ry., and it has been a rewarding experience. Changing steam engine gear boxes, installing can motors, wiring in throttles and sound systems, painting engines and rolling stock, and rebuilding 30 to 40 year old cars has kept me busy. Al Nattress, a fellow club member, is currently assisting in designing a new dispatching system which will enable me to hold regular operating sessions.
The 16 x 25-foot layout is by no means complete, but what model railroad is? Weathering engines and rolling stock is my next priority. Building new town sites, completing engine terminal facilities, and other projects are in the offing.
The layout at a glance
Name: Alberta Pacific Ry.
Scale: HO (1:87.1)
Size: 16’-3” x 25’-0”
Prototype: Freelance
Locale: Alberta and British Columbia
Era: 1930s to 1956
Style: walk-in
Minimum radius: 36”
Minimum turnout: Peco large radius (main), Peco small radius (industrial spurs)
Maximum grade: 2%
Benchwork: L-girder
Height: 41” to 48”
Roadbed: ½” plywood and cork (main); ½” plywood and Donnacona board (yards)
Track: Atlas and Peco code 100 flextrack
Scenery: hardshell over cardboard webbing
Backdrop: 1/8” tempered hardboard
Control: Keller Engineering OnBoard carrier control with sound
Meet Jack and Margaret Routledge

Jack Routledge served with the Royal Canadian Air Force and spent 4-1/2 years in England as a rear gunner on Lancaster heavy bombers. He was discharged in 1945 and awarded the Distinguished Flying Cross. He then spent 33 years in the Royal Canadian Mounted Police, retiring in 1979 as Chief Superintendent. After the RCMP, Jack was chairman of Alberta’s Driver Control Board. He passed away on February 11, 2004.
His wife, Margaret, was a registered nurse in three provinces. She found oil painting a challenge and joy. The couple resided in Vernon, B.C., Canada, and enjoyed spending time with their son, daughter, and grandchildren; gardening; and traveling. Margaret died on May 2, 2008.


Awesome!