


By Greg Privette
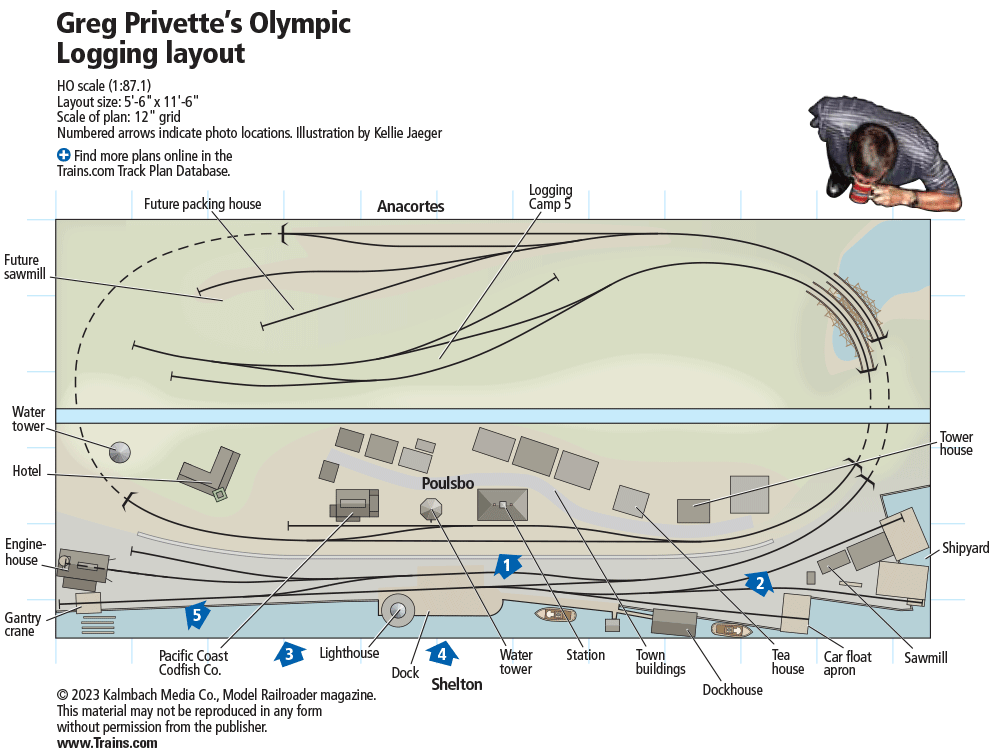
Vacationing near the Olympic mountains of Washington state birthed a vision for my new HO scale layout. Logging was the industry and Shelton, Wash., was home to the last logging railroad in the United States. Old-growth timbers harvested near Camp 5 were delivered by the Simpson Railroad to Shelton starting around the turn of the century.
Other towns in the area also interested me. Poulsbo, Wash., had the Pacific Coast Codfish Co. (PCCC), where hundreds of tons of fish were brought in each year. Dories fishing near Sand Point, Alaska, brought their catch to the anchored three-masted schooner John A, which would take it to PCCC. Anacortes, Wash., had shipyards that needed lumber to build ships that were launched into Puget Sound.
These towns had the need for shipments of logs, lumber, cod, salt, and passengers. For variety, I added a car float dock through which any other type of freight could be imported from the mainland.
I wanted a point-to-point track plan. Setting the lumber camp at the highest elevation, at one end of the line, seemed reasonable. Putting Shelton at the opposite end would yield the maximum rolling stock miles travelled for maximum fun.
Planning the layout
Only about half of a 16’x24’ room was available for my HO Olympic Logging layout. There were several windows that couldn’t be blocked, and I wanted no duckunders. The layout would be attached to one wall and stick out in the middle of the room.
I studied various track plans and settled on a variation of Iain Rice’s Lilliput Logger (published in the August 1998 Model Railroader.) I drew the plan using AnyRail software, which is free to use for smaller track plans. The curves at either end of the track plan make it look like a closed loop, but it’s really a spiral gaining elevation toward the middle. I designed my curves with gradual easements, like the prototypes.
I divided the track plan into several sections to best fit the sheets of 1/2” plywood I had on hand. Then I printed it full size, taped it together, and then taped it to the plywood. I transferred the track centerline through the paper to the plywood using my bride’s sewing tracing wheel. Finally, I cut out the subroadbed with a saber saw.
To lift the track to the planned elevations, I used risers to attach the subroadbed to an open-grid framework of 1 x 4 lumber. Cork roadbed was glued on either side of the track centerline.
I selected Micro Engineering code 70 track and no. 6 turnouts. I installed Circuitron Digital Command Control-operated SMAIL switch machines to line the turnouts and power their frogs.
To build the terrain, I tacked chicken wire to risers and bent it to create natural looking mountain contours. I then covered it with plaster cloth (Scenic Express EX0060 PlasterWrap). House paint covered the plaster. Finally, a mix of Sterling Model molds, static grass and super trees completed the ground cover.
Decorating the layout
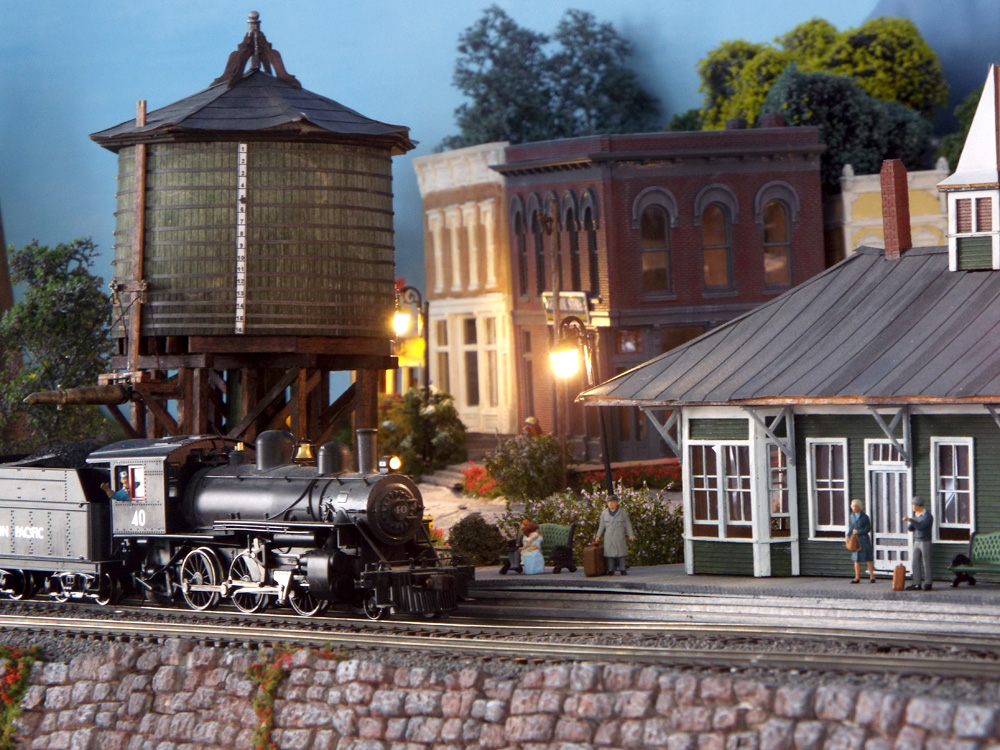
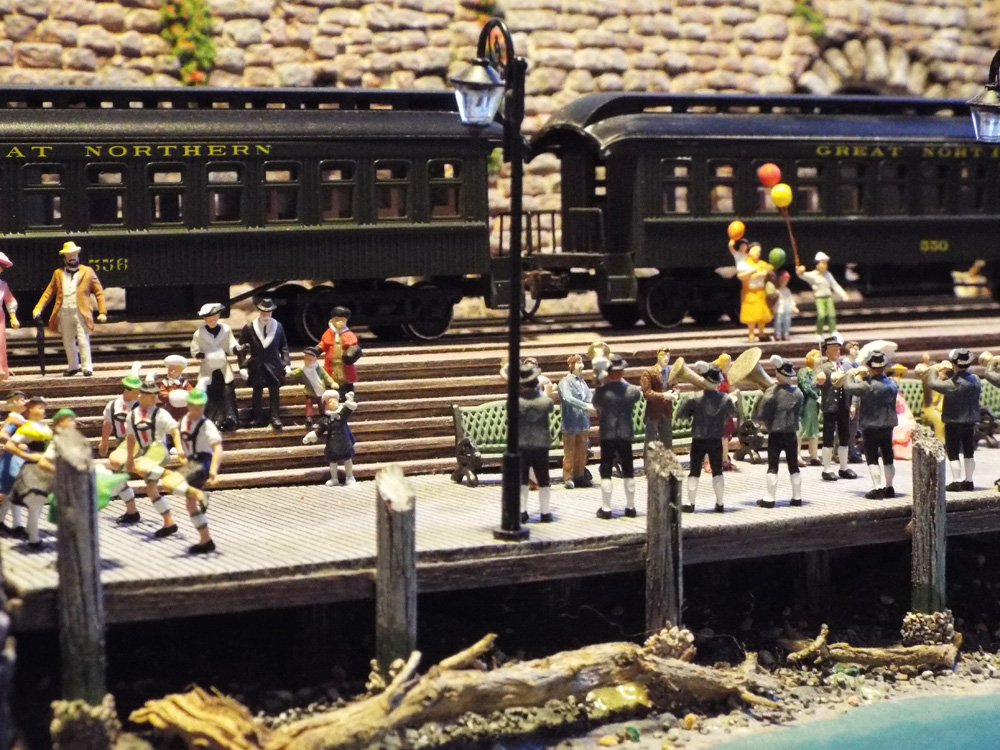
Ever been to Disneyland? My goal for the HO Olympic Logging layout was to combine realism and animation with Disney-style decorations to make a place that not only looked believable but was so attractive that you’d want to live there. Flowers, tree swings, a tea house, and an outdoor cobblestone café surrounded by hydrangeas are the norm. A co-worker who looked at a picture of the layout and asked which Washington town I photographed told me I was successful.
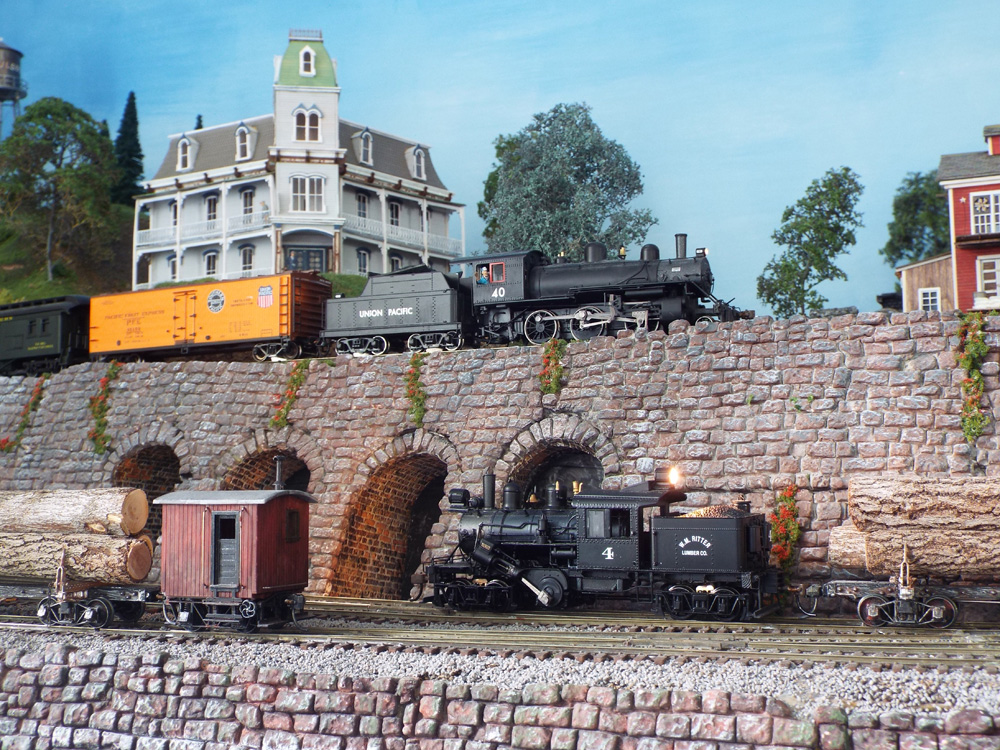
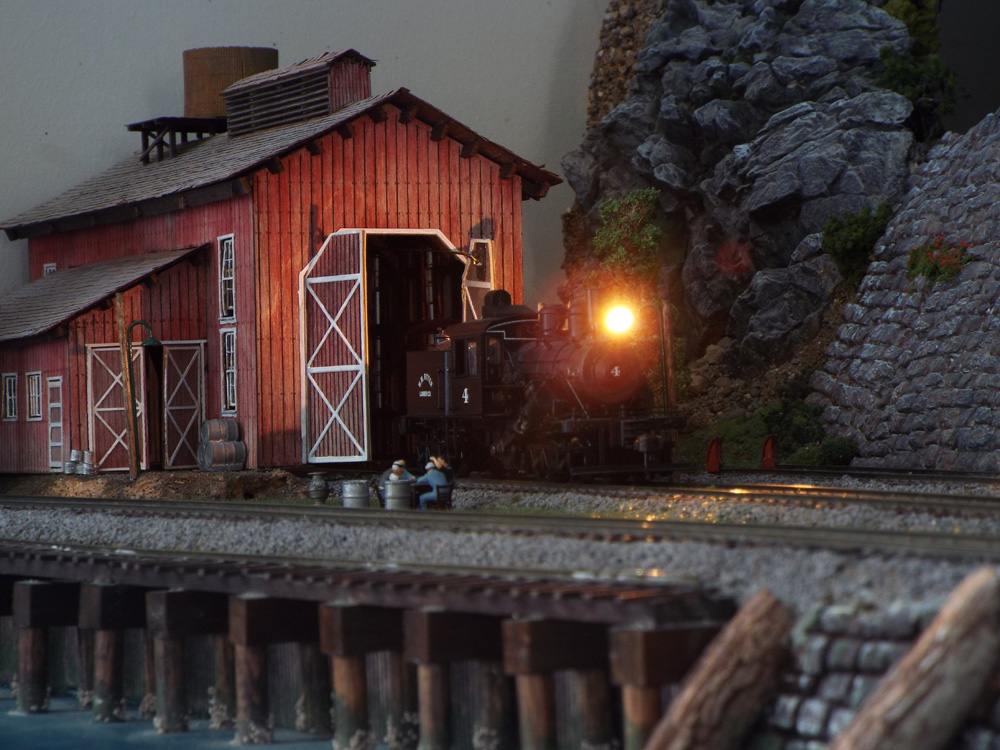
Various structure kits were used to complete the towns and industries. Bar Mills Cundy Cannery was used for the Pacific Coast Codfish Co. SierraWest’s Shipyard at Foss Landing was built built for Anacortes (though it’s currently displayed in Shelton).
The double-sided backdrop is drywall on each side of a wood stiffener hanging from the ceiling. I painted a blue sky, starting with darker paint at the top and gradually mixing with more white toward the bottom. I used Processing3 software to extract a frame from a vacation video of the Olympic mountains to create a backdrop for Shelton and Poulsbo. A wallpaper mural shop printed it out for me, after which I cut off the sky and glued the mountains to the painted drywall.
As of this publication, only Poulsbo and Shelton are constructed. Anacortes and Camp 5 are planned, assuming a large enough room is available after I retire and move to a warmer climate. I hope the terrain will survive the move.
Operation with DCC++
I wanted to use DCC not just to run the locomotives but also to line turnouts, control lights, and animate scenes. To give the maximum flexibility with the least cost, I went with the Arduino-based DCC++ system by Gregg Berman. Gregg made some great videos introducing DCC++ on his YouTube page. All that’s required is a computer (Mac or Windows) with a USB port, an Arduino hobby computer (about $20), and a “motor shield” Arduino add-on (around $40). The software is free.
I chose an Arduino Mega with enough outputs to automate sunrise and sunset, play sound effects, detect train location, open and close servo-controlled enginehouse doors, and animate a water tank spout and a gantry crane – as well as to generate the DCC signals to the track. HO Olympic Logging layout is only 5’-6” x 11’-6”, so I haven’t needed walkaround throttles yet.
Another cost savings with DCC++ is that no control panels are needed – it’s on your computer screen. The yellow lines show the track schematic for each town. Clicking on a turnout switches the route. Clicking the green buttons activates multiple turnouts to enable passage on the selected route.
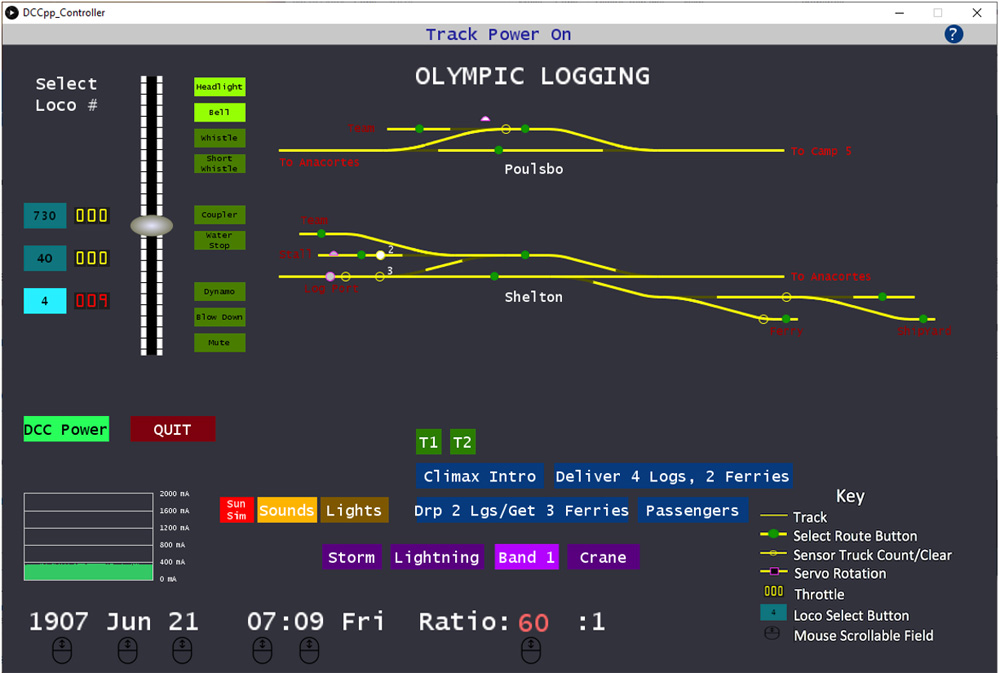
Train detection and control
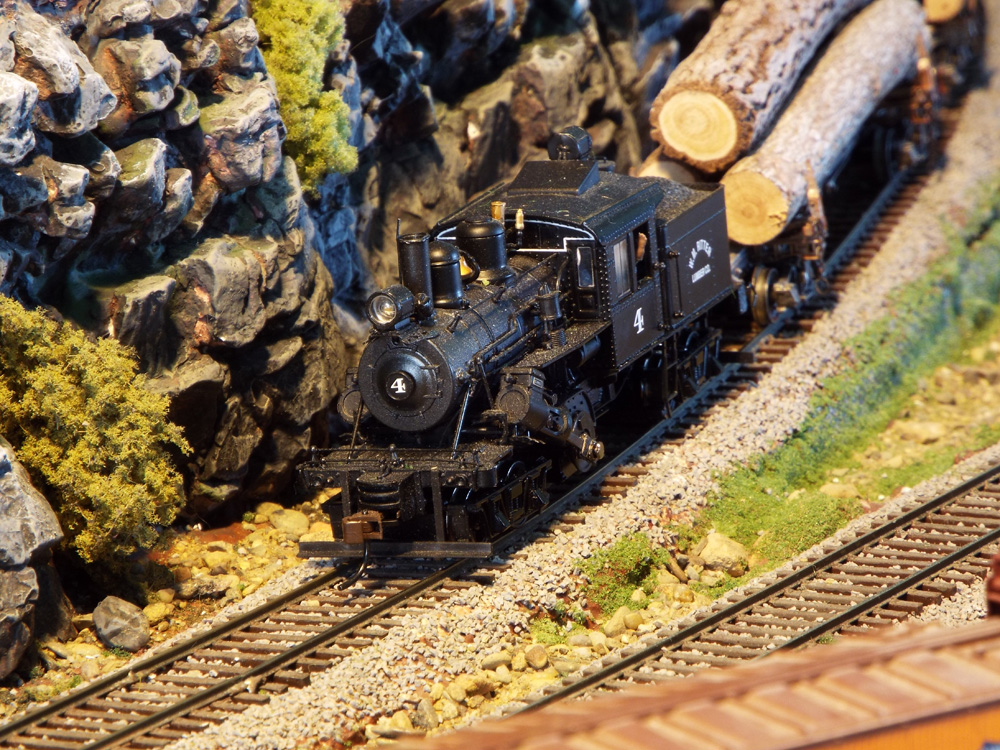
Trains are controlled manually by pressing the cyan button for the desired engine number (Bachmann Climax No. 4 is selected in the photo) and dragging the throttle up or down (the Climax is in reverse at speed step 9). The green buttons control decoder functions (headlight and bell are on).
Better yet, trains can be automated by a script. The dark blue buttons initiate closed loop train control. To sense where trains are, small infrared (IR) light-emitting diodes invisibly shine up from between the ties, reflect off a white stripe painted across each rolling stock truck screw, and trigger an IR sensor in the same QRD1114 package. Note that some rolling stock trucks will not reflect well enough if the white stripe is too far from the sensor – in these cases, a spacer (square tube or wood) can be fitted into the underside of the truck to bring the white stripe down closer to the sensor.
As each truck rolls over the sensor, the count increments. Yellow circles on the screen represent IR sensor locations. When the truck is over the sensor, it turns white. Clicking the circle erases the count. This enables the script to count trucks and, when IR sensors are positioned next to Kadee uncouplers, even perform uncoupling operations! A script can command a locomotive to stop, say, half a second after the sixth count, when the couplers are over the Kadee magnet, to uncouple the car.
Train operators often don’t have time to work all the buttons for coupling and uncoupling sound effects, “all aboard” calls, reverb as the locomotive enters a canyon, or even MUing. Now the computer can send all these codes quickly during complex operations. Half the fun is designing the scripted operations and watching the action.
Lighting and sound
A fast clock was coded in Processing3 to automate much of the animation. The user rolls the mouse wheel over the year, month, day, time, and ratio to set the calendar, clock, and the speed at which layout time passes.
Sunrise and sunset are modeled using an RGBW light-emitting-diode rope light I bought online. The rope was coiled into a foam cooler lid to make a light source so shadows from sunlight could be modelled. Many stretch the rope along the length of the layout, but this prevents shadows. However, the single light source prevents light from reaching the farther points of the layout as brightly – always a tradeoff. The LEDs are driven by four Pulse Width Modulation (PWM) outputs on the Arduino, one each for Red, Green, Blue and White LEDs.
Software was developed to dim through shades of red, orange, and yellow for each sunrise and sunset for a fast-time hour. The latitude/longitude for Shelton was also put in the software so that sunrise and sunset could be modeled at the right time for the actual fast clock day of the year. Moonlight is a dim blue. All LEDs are at full intensity for daylight hours.
The streetlights flicker like old-time gas lanterns. This was also achieved using a PWM output on the Arduino. Presently, all the street lanterns flicker simultaneously, but a product is being developed so that when they are turned on at different times, their cycles will be out of sync, giving a more realistic effect.
Sound effects are made with computer speakers under the layout. Processing3 triggers a DFPlayer (serial MP3 module connected to the Arduino) that plays sound files stored on a removeable data card. Both morning and night harbor sounds were stored to the card and triggered by the fast time clock.
Several types of lightning flashes were also programmed into the Arduino. A number of different thunder sounds are stored and triggered after the lightning flashes.
The free Audacity software transitions the day-to-night sounds so that shore birds and foghorns fade in or out gradually. The band on the town dock plays four different Bavarian songs. At 5:00, a Flintstones-like “quitting time” horn sounds. Yabba dabba doo!
Animations
The red circles on the control screen are for servo-controlled animations; complete circles are for continuously rotating servos (such as on the gantry crane) and half circles are for one-turn servos (as on the enginehouse doors). The color in the middle represents the last commanded position. Clicking the circle advances to the next position.
Other animations like loco shed doors, a water tank spout and a gantry crane were made operational with the same Arduino. The start position, stop position and turn rate are all programmable. Software was also developed to drive any number of servos as long as the Arduino outputs are available.
All of the operation and animation features above are additionally activated by script control. Each script instruction can be directed immediately after the previous event, after some delay or upon the fast clock reaching a given date and time.
Of course, there was some updating of Gregg Berman’s sketches and Arduino software, but he designed the code so that different locos and their DCC functions as well as different track schematics and turnouts would only impact the data not the underlying logic. DCC++ can be adapted to any layout by downloading a free copy and changing data statements for a different layout and loco roster. This could be a great way to “toe dip” into hardware/software education and fun!
Coming soon
If my HO Olympic Logging layout transports well, Anacortes and Camp 5 will be added on the other side of the backdrop. There are plans to build the Vance Creek bridge, one of the highest in the United States. The sea will finally be “poured” for Shelton; structures on stilts would become unmovable and subject to damage if this was finished before the layout travels to its new home.
Animation products are being designed under the company name Rail Conductor, so perhaps one day Olympic Logging features added to DCC++ will be available for purchase.
Layout at a glance
Name: Olympic Logging
Scale: HO (1:87.1)
Size: 5’-6” x 11’-6”
Prototype: Simpson RR
Locale: Olympic mountains of Washington state
Era: 1907
Style: peninsula
Mainline run: 50 feet
Minimum radius: 20”
Minimum turnout: no. 6
Maximum grade: 2.8%
Benchwork: cookie-cutter on 1 x 4 open grid
Height: 47” to 53.5”
Roadbed: cork
Track: Micro Engineering code 70
Scenery: plaster cloth over chicken wire
Backdrop: paint and photo mural on drywall
Control: DCC++ using Arduino microcomputers

Meet Greg Privette
Greg lives in Maryland, is married to Margie, and has one son. He previously presided over the Lockheed Martin Model Railroad Club. The HO Olympic Logging layout is his third. Greg credits his early interest in model-railroad electronics for his later career at NASA, during which he programmed software for space probes and satellites.


Are there any overall photos of the layout? I’m curious if the “seam” (blue rectangle down the middle in layout/trackplan image) indicates a dividing wall, water hazard, or a space for really narrow people to walk through.