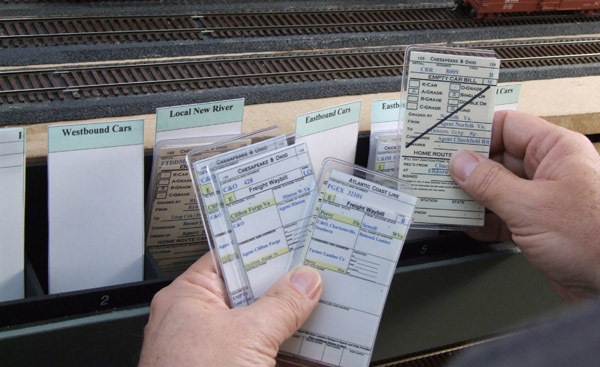
In the February 2012 issue of Model Railroader, Ted Pamperin explains how he used prototype paperwork to create a waybill system for his Chesapeake & Ohio Ry. layout.
Click on the links below to download the Excel files. You can then modify them to match your own layout.


What are the other download files??? I only see the Coal-Waybills one. Are there any for other types of freight? what about passenger ops or Caboose/Engines? Are there any for the Car Cards themselves??? It would be nice if all the links were presented.
The concepts in this article interested me when I first read it, and I intend to use these ideas for car forwarding on my railroad.
One thing isn't clear to me: the diagonal mark across some of the cards, such as the one in the operator's right hand in the photo. My best guess is that this would represents a waybill on which the freight agent struck out all the data regarding a completed shipment, in order to draw attention to the home road routing at the bottom.
I always used the four cycles waybills since 15 years at the club CMFE in Sherbrooke Quebec also at home with the same system but this one seem to be more realistic with less paper and cards to handle…We are looking at this ssystem since Tony Koster wrote about this new way to operate. Thanks and continue
This was a great idea. I use for my railroad.
The waybill templates are very much appreciated. I was going to do this too, but haven't had the time. It is much easier to modify than create! Good insight in the article as well.
We have been using waybills for 31 years but I haven't bothered to make them for coal. We have 4 mines on the layout putting out some 3 dozen loads a day plus through loads, so this is a good idea and a good approach to documenting them.
Great article by Ted, a new insight to waybills, I have down loaded the two files and will be modifying them for my freelanced Sunmount & Moose Creek layout.
Rob
Christchurch
New Zealand
Great time saver! I'll defidefinitely use these spreadsheets to set up my consists once I get my pike up and running.
I don't have Excel but do have Word. Can I get Tony Koester's Word program for his waybills? I would also like to modify it so I can add a picture of each car to the car waybill. Has anyone done that? I have 400 cars in MyTrains. Does anyone have a program to export all my info from MyTrains to the word program?
Reread the article. Makes more sense now. What I am interested in now is the work order cards. Any other views other than the pictures in the magazines?
Excellent, really good stuff. I've downloaded and look forward to using the system.
More instructions on use would have been helpful, though. I'm clear on the freight waybill, but a little hazy on what fields to use for what on the empty car bills.
Nice download. I don't have to reinvent the wheel now. Although I can use a litle more info on how these work since I am a newbie at it.
Excellent article. Great info and a nice download to go with it! Could not ask for anything more. Great job Ted!
Great article! I might just go this route. The part # for the sleeves would be: Domino Part Number: 50-0420-OS
Open Top Sleeve ; Size: 2-3/8 X 4-3/8. But I did notice that if you go with a 2-1/2" x 4" sleeve, the price drops about 40% So if you are going this route, consider other sleeve options to see what will work for you (and adjust your waybill printing accordingly, or trim the sleeves to a bit).
Ted Pamperin Article on Realistic Waybills…very good insight and practical solutions. I am interested in the plastic sleeves he is using, as I do something similar, then place them all into a "nerdy" shirt pocket protector to hold car card, waybill, caboose card. Using vinyl adhesive backed covers on the front and back of the shirt pocket protector to hold the Form 19 and the Loco consist card. The article gives a website for the plastic sleeves (dominoplastics.com) but does not give the specific product. Can you tell us the exact product name /size he is using? I would like to purchase same. Great issue, looking forward to March 2012. Keep up the good work.
Chuck Shell
Dnever CO
Now that I am in a new house, construction begins. The Sand A Line railroad is coming to be. Keep up the great work.
Thank you for the down loads. Excellent. Also excellent is the PDF plan for the Central Wisconsin Purina Sead & Feed store. I will be building this structure soon. Again, Thanks.
Looks good, had no trouble opening the Coal file, but had to do it by double clicking the coal waybill.xls file, not from Excel.
John W, you don't give the MR staff much help by not say what OS you are running or indeed what application you are trying to open them with. I am Mac based and I can confirm these open fine on a Mac using Excel 2011. The file type is .xls which should open with Office 2004 or newer. Hope this helps.
Simon
Melbourne Australia
Opened just fine for me on Open Office [open source software] running on a Linux system.
John Y. You might get some useful help if you would state what operating system and software you are running in your first post. Without this information any suggestions would be just guessing.
These look like very useful forms and the online support is a big plus to the magazine content. I've been an avid reader of Model Railroader since 1964 and you guys just keep moving the bar higher! 8^)
ED
Just forgot to say- yes I have pre-ordered the new operations book which is due out in April.
These articles on waybills/car cards are just great. Excellant for beginners just like myself whom want to start basi operation.
Would it be possible to see more photos of the car card boxes themselves and what "titles/grouping etc are on each box. Does every industry receive its own compartment? Titles- loads, empties , hold, east bound ,west bound??????????
For beginning and intermediate model railroad operations folks, this approach seems overly complicated. The argument that the new waybill forms are more realistic and prototypical seems unconvincing, unless you are a quarter-scale person, since thy are so small, and size -wise very unprototypical. Further, to have the equivalent of a 4-cycle waybill, you need four of these, which makes the card packs much thicker and more unwieldy, especially for trains longer than 7 or 8 cars. I would question whether the data on the waybills is the same for all prototype railroads, or rather specific to just the railroad that the author attempted to duplicate in miniature.
I have completed updating my railroad to these forms with one new wrinkle. I like having the 4 turns per car as the old system was and I did not want to buy a bunch of plastic pockets, so I did the following: In the top corner of each waybill I typed its sequence number, 1,2,3, or 4. If there was a turn that was empty, I added the sequence number to the Empty Car card. Then after printing all the cards off (I used yellow card stock for the empties to conserve ink) I sorted them all out into stacks of 4 for each car. I then placed the 1 and 4 sequence cards face down leaving a 1/8" gap. I then cut 1/2" wide by 3 inch long strips of regular bond paper and centred this over the gap. I then laid a 2 1/2" long piece of masking tape over the back of the waybills and the paper to form a hinge. I then flipped this over and using a dull blade scribed a fold line onto the centre of the paper spine to allow it to bend easier. (I needed the paper so it covered the adhesive side of the masking tape when folded in one direction as it is a sticky impairment otherwise.) I then fold the two waybills back and forth to loosen up the hinging action. Then I sprayed the back side of the #2 and 3 waybills and applied them to the backs of 1 and 4. I laid them all out in one direction, but you could invert them to differentiate one turn from the next. I then placed a weight on the stack of finished books to help them stay flat, (after I was done I waited an hour, reversed the folds on each book and returned them under the weight.)Now you have a book type set of 4 waybills. No poly cover needed, a bit thinner and cannot get out of sequence. It works great! First operating session is Saturday, my crews will notice for sure but there is no real difference from the old, just a new and more accurate presentation!
Just excellent. Time to revamp my car forwarding system on my home layout. This will work great even on a small switching layout.
Great Article, Thanks for giving FREE things to help model railroaders.