


Replicating the color striations, texture, chips, and cracks of concrete with paint and styrene is tricky at best. On the flip side, the texture of most concrete products is too coarse for modeling applications. However, I was able to make my own HO scale prefabricated concrete bridges using Sakrete anchor-bolt cement and styrene sheet molds.
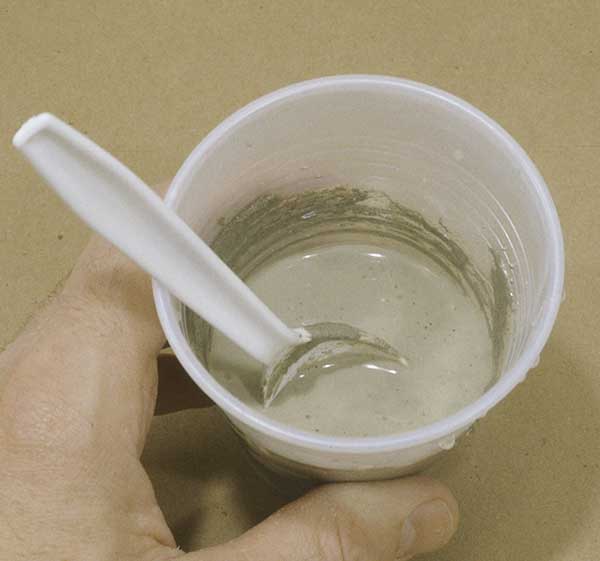
Anchor bolt cement is a concrete-based product that has a finer grain than regular concrete. It’s an ideal modeling medium because it dries to the same colors as real concrete and replicates its texture without looking out of proportion.
Though the project shown here is HO scale, you can use this technique in any scale to model a variety of precast concrete products. In my article “3 common culverts,” featured in How to Build Realistic Layouts: Model the Trackside Scene, I described how to model a culvert. But don’t stop there. Other precast items you can model include bridge beams, structure foundations, warehouse walls, and pipes.
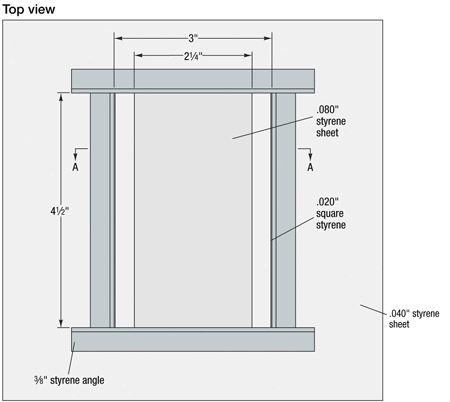
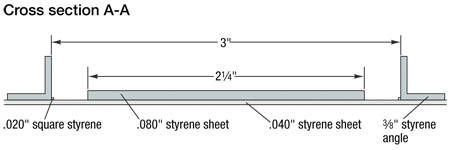
Making and casting molds
I was able to find a wealth of information, including prototype photos and drawings, on the Web sites of various manufacturers of precast products.
While studying the photos, I noticed that most precast concrete structures are utilitarian, where function and cost rule over form. As such, I didn’t worry about making the bridge too fancy from an esthetic standpoint.
Finished castings
Though the anchor-bolt cement hardens in 30 minutes, I let it dry for 24 hours before pulling the castings from the molds. Since the molds were easy to make, I wasn’t overly concerned if they were damaged while removing the castings. However, I carefully pried the styrene back and gently twisted the mold so I wouldn’t break the casting.
If a casting should break, don’t worry. The breaks are generally clean, and the broken pieces can be cemented together with cyanoacrylate adhesive (CA).
Finishing touches
After removing the castings from the molds, I inspected each one for air bubbles. I filled the bubbles by putting a small amount of fresh cement on my fingertip and working it into the hole in a circular motion. I wiped off excess cement with a damp cloth.
I then set the bridge into the scene and placed the flextrack over the bridge deck. Though the bridge is a one-piece casting, you can easily attach multiple castings using a gel-type CA or hot glue.

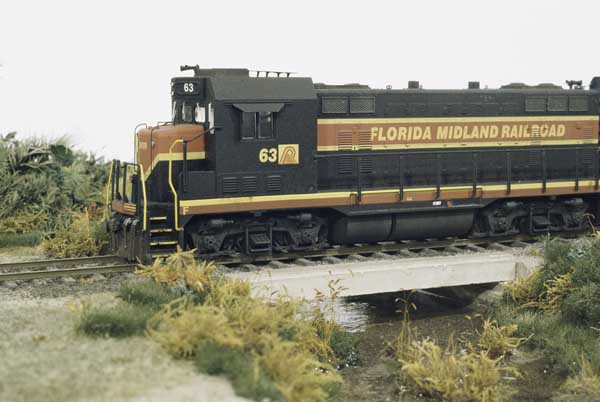
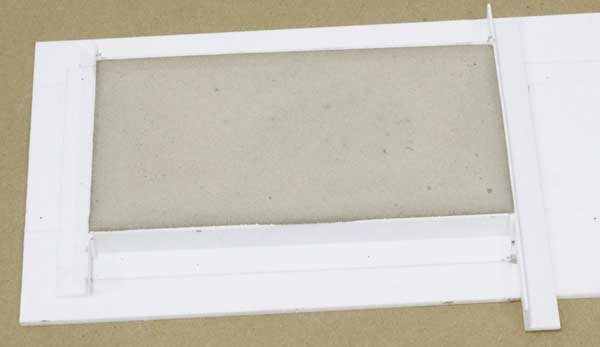
The finished casting (see fig. 4) represents a relatively new precast bridge. With a bit of weathering, you can give the bridge a light gray or tan appearance, similar to that of aged concrete.
Whether you need a precast concrete culvert or a loading dock [for the latter, see How To Build Realistic Layouts: Freight Yards. -Ed.], these casting techniques will work well for a variety of applications. And you’ll be using real cement, so you’ll end up with prototypical colors without any painting.


Anyone ever try Durhams water putty?
Hi, Lance. Have you ever tried using this material as a skim coat over another material (wood) and impressing form outlines into the cement before it dries?
WOW! Never knew you can do that and get a realistic result. I wonder if it would work on making a highway overpass for my pike?
I have also used Quikrete Counter top mix to get the same general idea as Lance was talking about.
Most Quikrete products can be found at Home Depot, Lowes, and i believe at Westlakes stores.
This is going to be a project that my brother, Brian would be quite good at since he loves to kitbash and scratch build!
This is the real thing!
Where can you buy the cement? Just at any home improvemnt stores?
I can't wait to get some cement. I definately want to try this.
I thought this was a great idea to install in my N scale layout plan. But,where do you buy this at? Home Depot, Lowe's,or Ace Hardware. Appreciate some input out there,thank you.
I will have a bridge or two on my layout addition and I wanted a concrete bridge.
fantastic idea – I am going to use this technique for some bridges I need on our HO RR.
Yet, another great idea from Model Railroader magazine. I can't wait to try it.
I did exactly as Lance explained and they turned out perfectly. If you are patient they weather very easily and look realistic. Thanks Lance !!
Thanks Lance!
I am modeling the FEC and in Florida they have "tons" (no pun intended) of small concrete bridges covering creeks, streams and drainage canals.
Is there a maximum thickness that can be poured? I would like to try and pour some bridge supports as well.
Mark
This looks like an easy project that I can do. The possibilities are many and go beyond bridges! Thanks.
That's awesome..i think i can custom make a curved bridge that I've been trying to figure out. Can't find any kits that are long enough or wide enough. Was going to kitbash 4 central valley bridges. Thank you for a better idea!
Helpful article!
I always had a lot of admiration for Mr Mindheim's realistic modeling. It's great that he cares to share his techniques with us. Thanks a lot !
Martin Poiré
Québec City
This I have to try on my main line ballasted bridge.
I am going to try this. I have some DAP Ready-Mixed Concrete Patch. I am going to put that in it and see what happens.
I love any and all ideas of keeping it real. This is wonderful and of course useful in many other areas as mentioned above.
Great article, I'm going to try this for retaining walls
this was a good idea.
I made a 'concrete ' wall using painted wood. But now I can see a real concrete wall on my layout! Thank you.
This is a wonderful idea, and helps solve a problem I presently have regarding a particular bridge needed on my layout. The best part is, I already have fine-sediment concrete mix in my garage, so I can start tomorrow!
yet another fantastic idea from model railroader magazine. .
i'm a long time subscriber to model railroader . .& the concrete is in fact a very realistic scenic item for any scale layout. .
i can't wait to try this product, i will attempt to make several items with this anchor-bolt cement . .