


Malcolm Furlow’s waterfall modeling technique: Malcolm Furlow’s article presented here originally ran in the August 1980 issue of Model Railroader magazine. While many of the brands Malcolm used in the article are no longer available, most all the products have modern substitutes, allowing a modeler to still complete similar projects. As a case in point, I’m planning on doing something very similar on my own Olympia On30 layout but will use Woodland Scenics Deep Pour Water and related products to complete my own fast-moving mountain stream. Sadly, for a lot of Malcolm’s work, we are left with only grainy images taken from the printed pages of magazines and books. However, a special thank you goes to Cody Grivno for finding and scanning many of the original photographs that accompanied this story. Enjoy this look back to 1980 and modeling with Malcolm Furlow. – David Popp
The 3-foot gauge engines and cars of the Colorado mountain-carriers (the powerful Denver & Rio Grande, the Rio Grande Southern, and other Otto Mears’ roads) were fed into the awesome passes and ravines of the towering Uncompahgre Mountains. Clinging precariously to sheer rock cliffs, the rails made their way along such white-water streams as the Animas, Clear Creek, and the Gunnison.
The slim gauge steam cars twisted along these streams and rivers, carrying the hardrock miners, the drummers for whiskey firms, the Irish bartenders, the gamblers, and the madams – all on the way to the false-front buildings and wooden-plank walkways of hastily built little mining towns.
These marks of man fade quickly in the Colorado high places. The intense winters and the rivers that swell to overflowing during the spring thaw are quick to reclaim the grades of vanished railroads.
But the river remains.
These white-water streams and rivers are extremely beautiful and offer a challenge to those of us who would try to recreate a little of the beauty of Narrow Gauge Country. At the beginning of last summer, I packed my camera in my suitcase and, with the family snuggly stuffed into our rather smallish Pontiac, drove to the region of the shining mountains to record for myself the majesty of Colorado’s whitewater streams and rivers.
With this accomplished we drove home to Dallas to rest our hiked-out bodies and to start going over the slides for ideas about a white-water stream or two for the Rio Chama. The ideas presented here are not new, but a few things I’ve learned through experimentation may make the going a bit easier for those who enjoy this facet of scenery construction. Since creating white water – waterfalls, rapids, whirlpools, and rushing streams – may very well be the most difficult type of water to model on a layout, I suggest you read carefully and follow the photographs. They should help you visualize the steps described.
Forming the Riverbed Base – Malcolm Furlow’s waterfall modeling technique
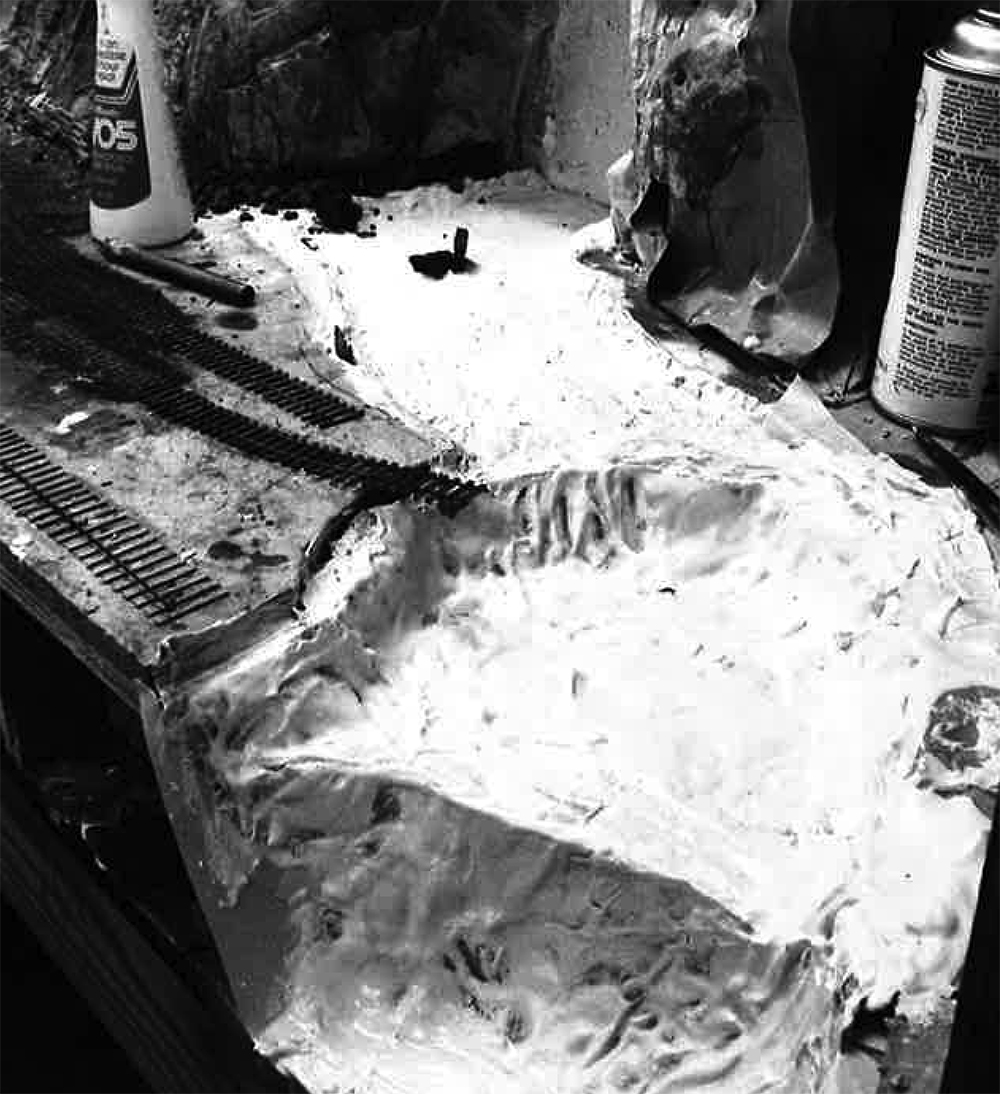
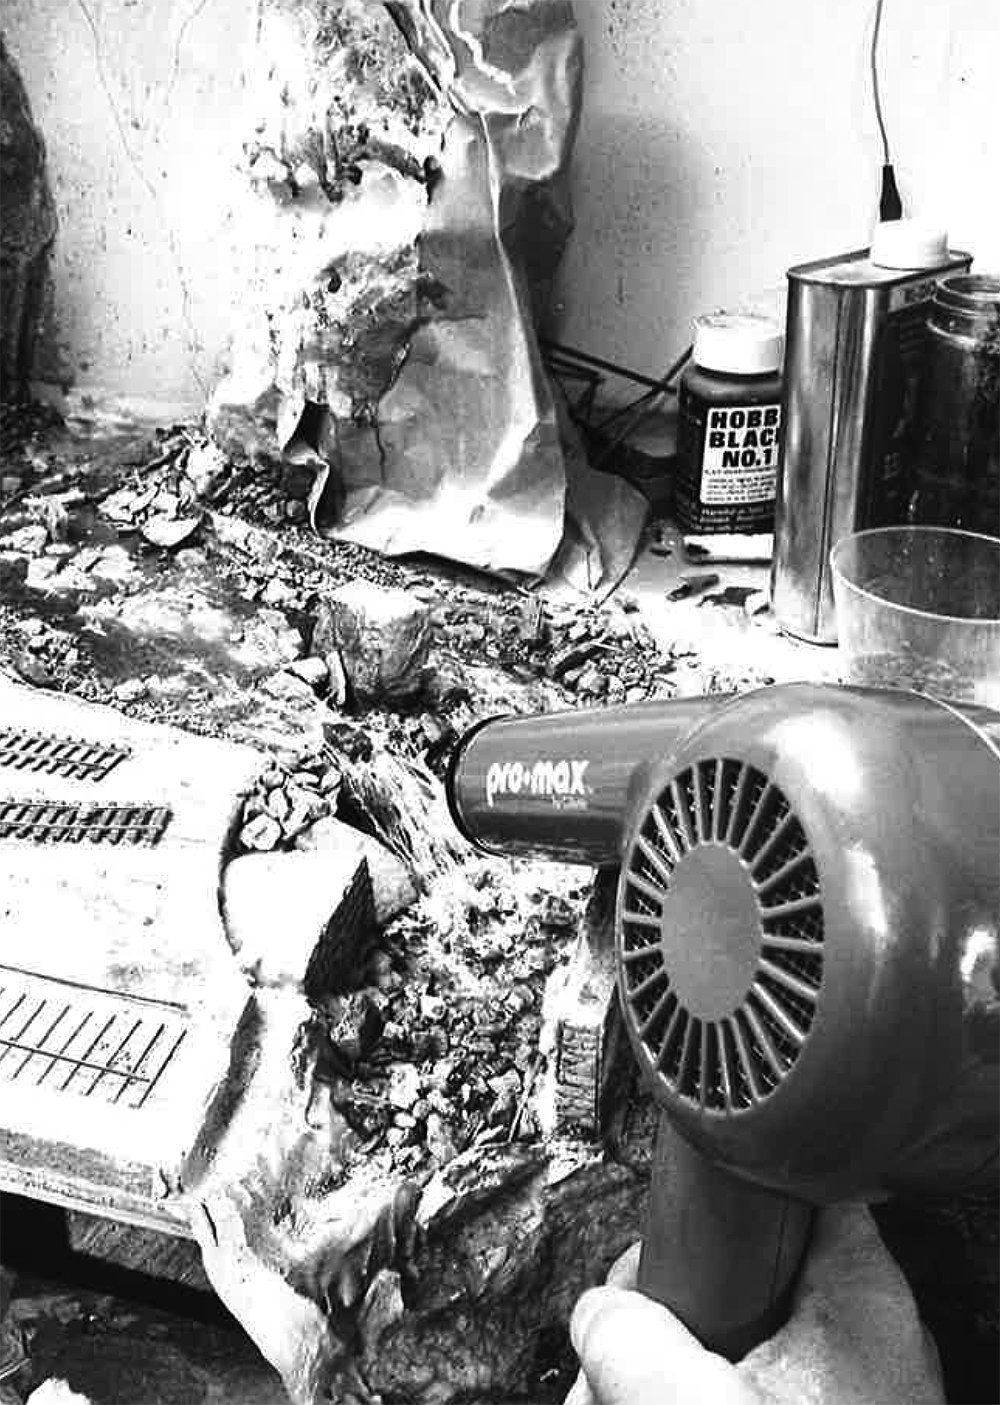
The base for the riverbed is paper (grocery bag paper or industrial hand towels) dipped in Hydrocal, a very hard plaster used as a base for other scenery materials and formed over a depression in the benchwork. Make sure the plaster is sealed around all seams because the casting resin will find even the smallest pinhole to escape through. If the river is placed so as to flow off the table edge, you will need to construct some sort of dam to keep the resin from decorating the floor. Cardboard taped to the edge will work. Be sure to lay rags or paper underneath the layout (just in case). You can remove the makeshift dam when the resin has dried.
Detailing the Riverbed
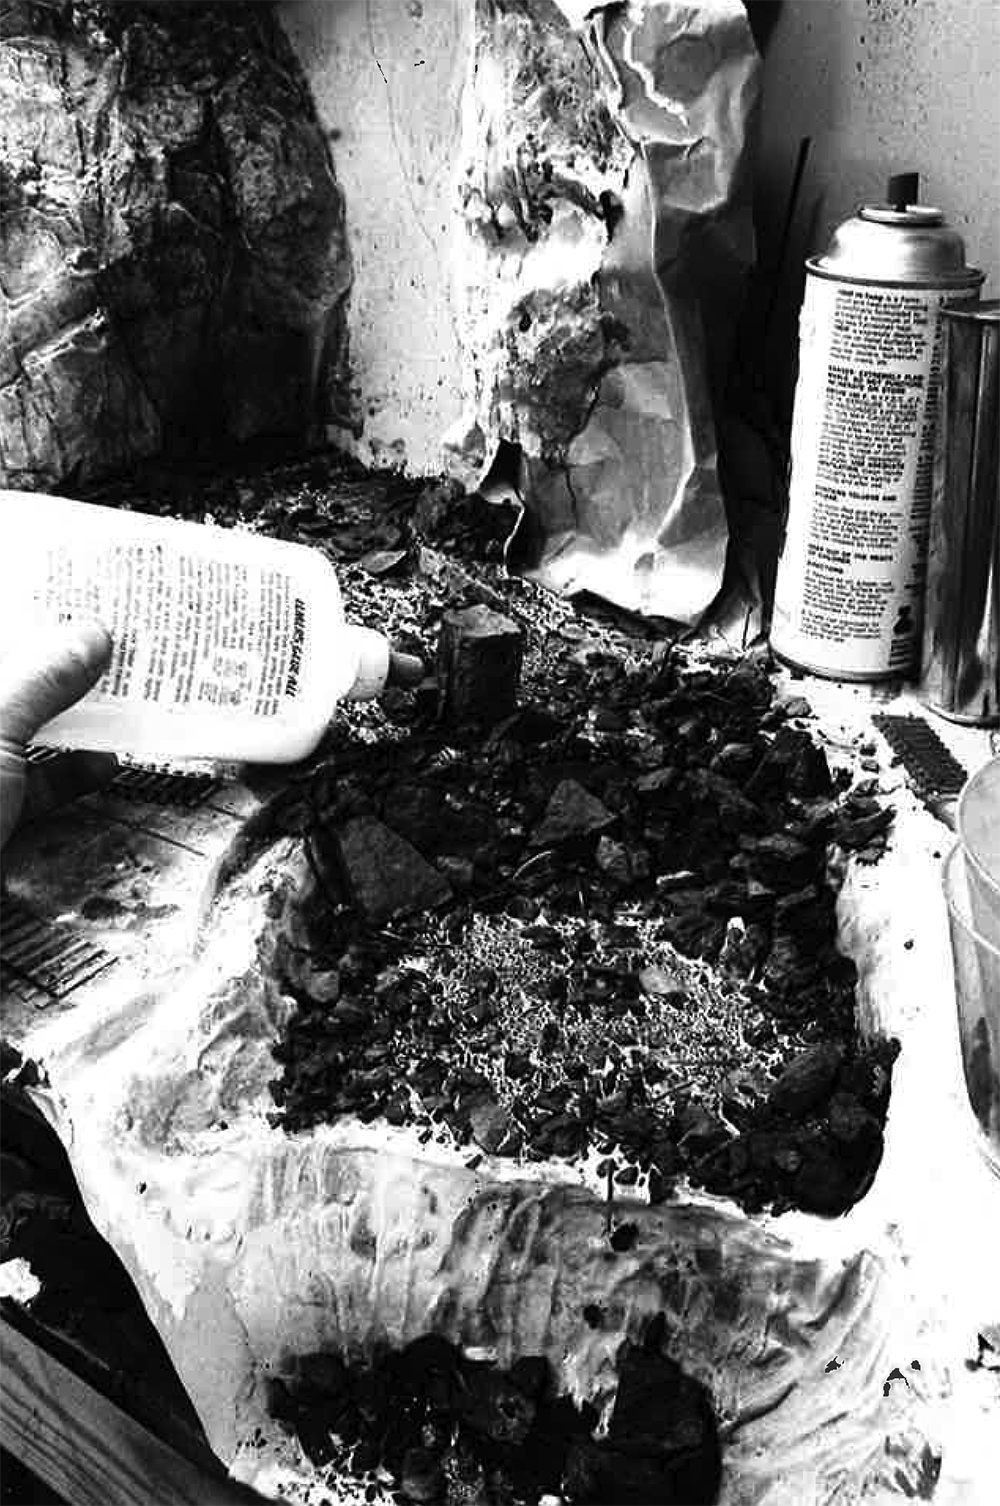
The riverbed itself is a mixture of various sizes of rocks and gravel, with simulated rotted timbers, small twigs, old tires, and anything else you might use to enhance the scene. Got a car or vehicle that didn’t turn out right? Throw it in the river!
If any waterfalls are to be included, I suggest you make them from angel hair. The easiest place to find angel hair is in a pet shop. It’s the material used for aquarium filters. [Also used in Christmas décor. – Ed.] There seem to be two types: one is soft, rather kinky, and without sheen. This is not the kind you want. The other resembles Fiberglas. It’s shiny and comes in straight strands – this is the kind you want. A word of caution: it’s like working with Fiberglas insulation. Little bits and pieces can work their way into your skin and irritate it, so handle it carefully.
Only a small amount is necessary. Comb the angel hair and trim it to length, then use CA (cyanoacrylate adhesive) to glue it in place at the waterfall site. The angel hair will serve to direct the flow of the casting resin.
Before adding resin, everything in the riverbed should be secured in place with a mixture of white glue and water. Thin the glue to a 1:1 mixture and add a few drops of liquid detergent. The liquid detergent acts as a wetting agent. If you use real dirt and rocks for the formation of the banks, be sure you seal this with a good soaking of this glue mixture. The dirt has a tendency to soak up the casting resin. Also, be sure not to leave any loose dirt or rock particles because this will keep the resin from adhering to the river bottom and sometimes create unnatural-looking bubbles on the surface of the casting resin. It’s a good idea to wash any natural rocks or scenery materials to remove loose dust.
Also, the casting resin as a tendency to creep up the sides of the banks a little, so after the resin has dried, it would be a good idea to go back and retouch the banks with more dirt and rocks. If you plan to include any weeds along the river’s edge, this is a good time to place them. [Resin will work its way up between static grass fibers. It’s better to wait to add this material after the resin cures. – Ed.]
Before you apply the resin, be sure the riverbed scene pleases you. Maybe a rock needs to be moved or taken away, or perhaps more rotted timber or twigs along the bank are called for. Make sure that any of the plaster foundation that happens to be peeking through the riverbed is either colored to match the scenery or covered up completely by dirt or gravel. These things must be done before any casting resin is added – it’s too late to make any changes afterwards.
Before going on to the next step, let’s talk a bit about the casting resin itself. Using castin resin can be somewhat irritating to the ol’ nostrils, so be sure that you provide for adequate ventilation. Also, the containers used in mixing the resin must be of the throwaway variety, because once the plastic hardens, it’s there for good. Paper cups work fine, but some plastic cups will soften from the action of the resin.
Getting the hang of working with this material is a bit tricky at first. Experimentation on a small diorama would help. But all new materials and methods take some practice.
Mixing the resin – Malcolm Furlow’s waterfall modeling technique
Mix the casting resin according to the manufacturer’s recommendations but add a few more drops of hardener than is actually called for. This will cause more heat during the gelling stage, creating the ripple effect. Any color tinting of the resin is done during the mixing procedure. Various dyes of green, blue, and brown can be purchased at a craft store. These dyes are especially made to be used with the casting resin, and only a very small amount is needed to color the resin. You will also need to purchase some pearl tints for rapids.
[For videos on making water scenes with resin products, see Canadian Canyons series, Thompson River parts 1 and 3 for how to use and tint resin. – Ed.]
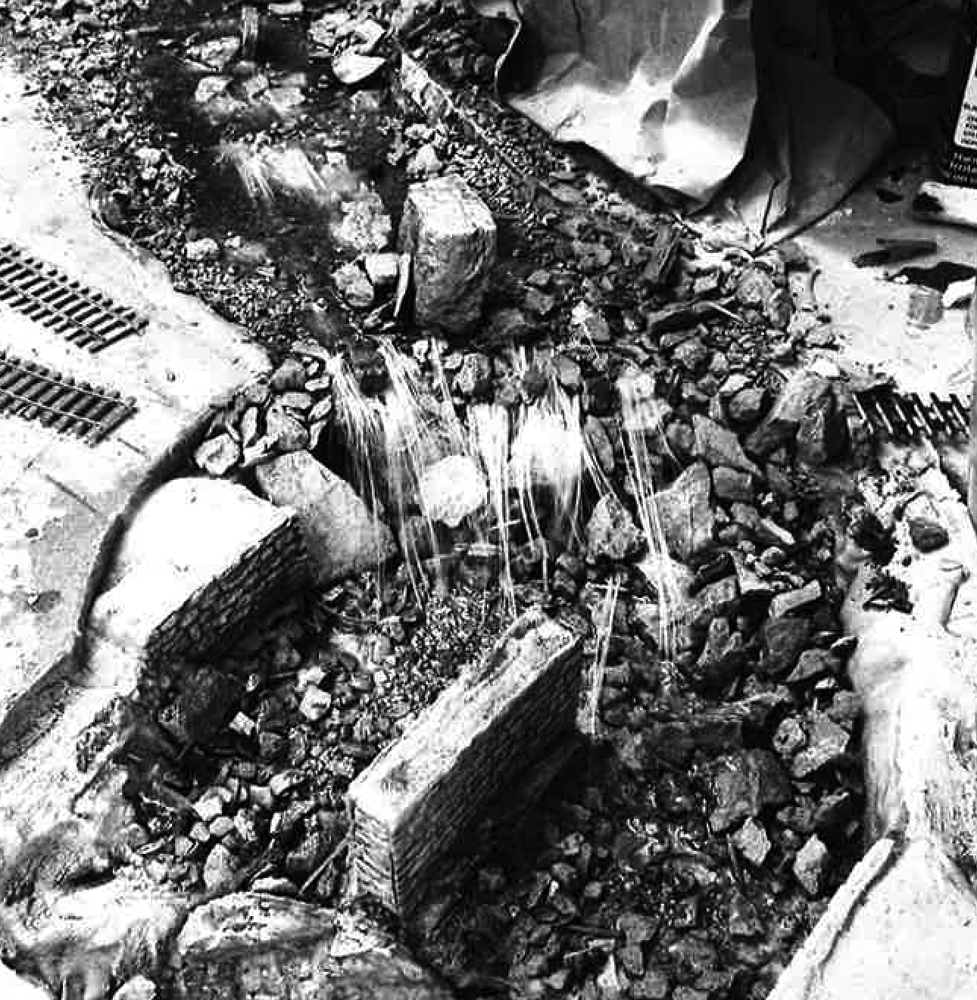
Once the first batch of resin has been mixed, add a little blue-green dye and pour in the first coating of resin, not more than ¼” deep. It can be poured a little thicker but try not to go over ½” or cracking could occur during the hardening stage. The thicker the layer, the more heat it produces. If you wish to give the illusion of more depth, stir in a bit more blue-green dye rather than trying to pour several layers of resin.
While the casting resin is setting, you can use a hair dryer to speed up the action. Be careful not to get so close as to actually burn the plastic. Use of the hair dryer will also keep a lot of the resin from flowing over the waterfall (to be formed from pearl-tinted resin) and will create more ripples.
Mix another batch of resin using only a very small amount of pearl tint (one-half drop per ounce) and pour it over the falls. Start at the top and use the hair dryer to keep the flow back. Experiment with the angle of the air dryer, trying to keep most of the resin on the angel hair.
Before the resin has completely set, take an ice pick or some hard, pointed object and manipulate the resin into ripples and waves. The gel state lasts for only a few minutes, so work quickly. After the waterfall has set, drybrush the falls using a stiff-bristled paintbrush and small amounts of acrylic white paint.
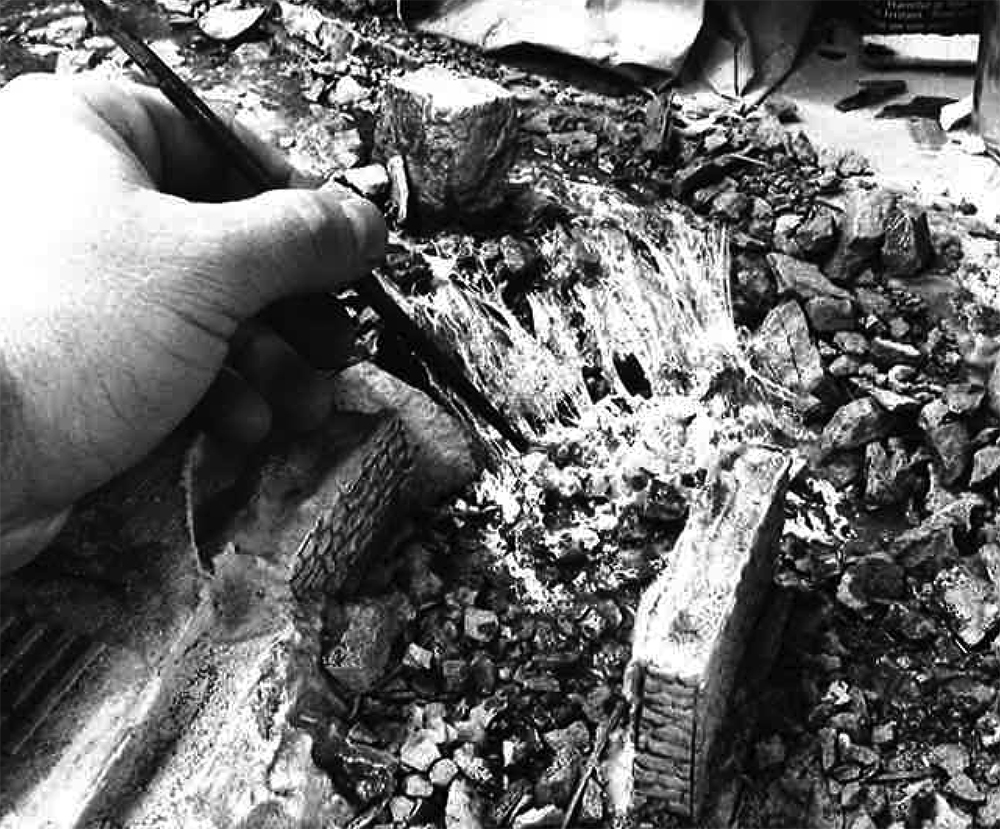
Now move on to the next coating of resin. Mix another batch, using a little less of the blue-green dye, and pour it into the river areas. Repeat the procedure with the hair dryer. A note on coloring: It’s better to mix in a too little color than too much. Exercise a light hand. When this batch of resin has reached the gelling stage, begin creating rapids by picking the resin with a pointed instrument forming peaks and valleys. Rapids should be formed around areas of rocks, timbers, and shallow places.
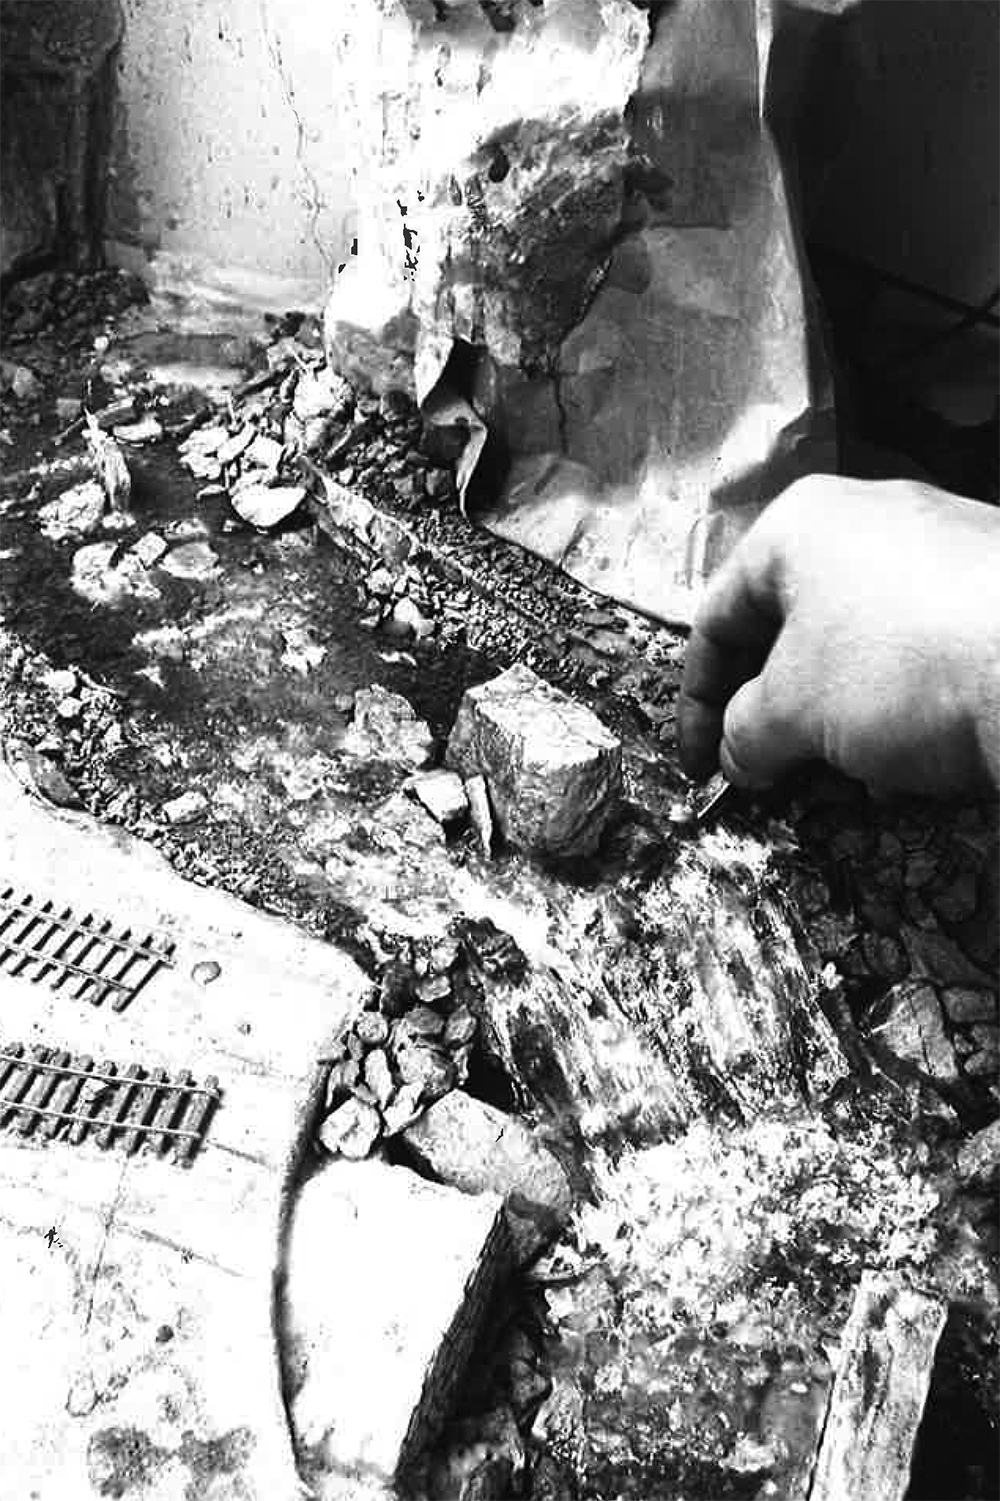
When this batch has set and the last picks of the resin have been made, begin dabbing in this area with the stiff brush dipped in a minute amount of white paint. Touch only the high points. Only the rapids and waterfalls are to be given this treatment; you want the rest of the river to remain blue-green.
Mix a final batch of casting resin, omitting any dyes or colors. This batch should be applied with a disposable brush over the entire stream, including the waterfalls, to achieve a wet look.
Creating white water may very well be the most difficult type of water to model on a layout. On the other hand, it may very well be the most effective scenery on your layout. I think it’s worth the effort.


3-30-2023: Realistic smoke? All of the smoke appears to be similar to my childhood Lionel smoke generators—better than nothing—but a far cry from the powerful, roilng exhausts.
Possible considerations—Deposited smoke particles? “Chuff” synchronization with sounds and driver motion? Combined with whistle and popoff appearances?
3-30-2023: Sparkling, scintillating points of sunlight and bubbles cover the surfaces of rushing, roiling water in the mountain streams and waterfalls. Is there a method of utilizing grain-of-wheat-size leds? Could they be programmed to flash in varying sequences and rhythms? If yes, what would be the installation method?