


By Sam Towler
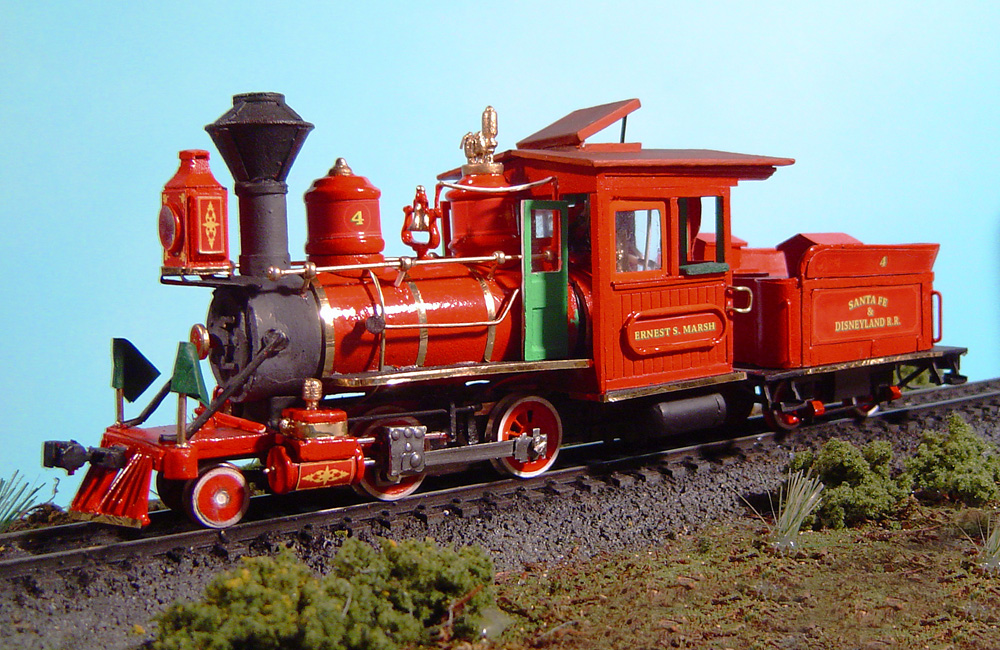
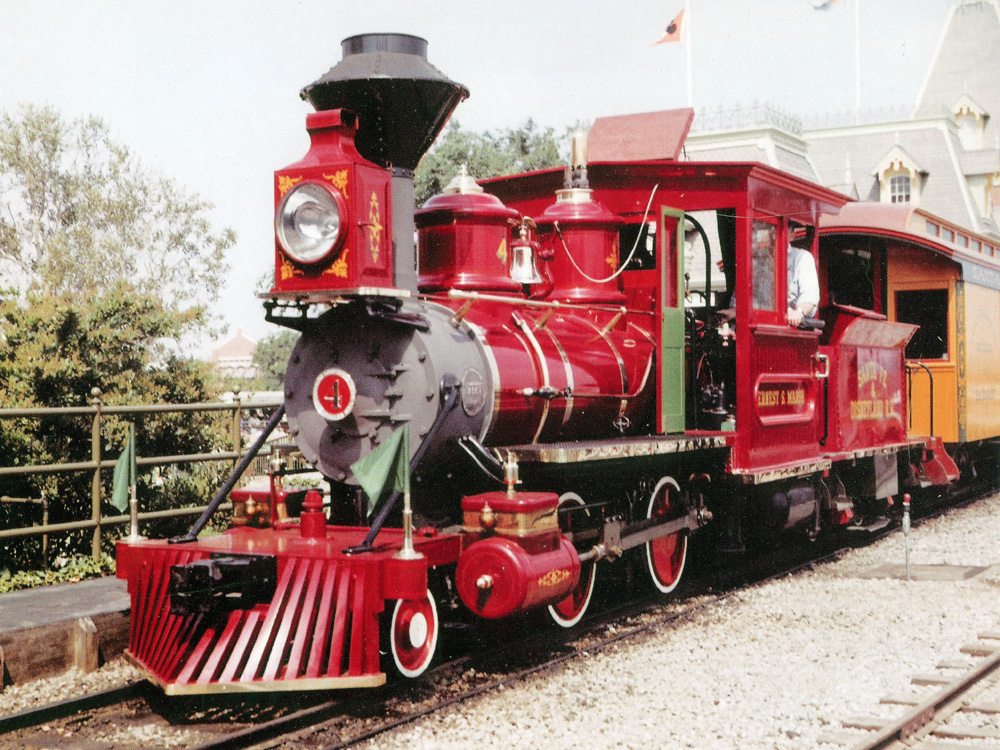
Disneyland is one of the few places in the world where one is guaranteed to see an operating steam locomotive the day they visit. These trains have been hauling happy guests around the park since 1955. One particular engine, No. 4, the Ernest S. Marsh, has always interested me due to its unique look, four-wheeled tender, and the arrangement of the domes and bell. The locomotive was originally a saddle tank 0-4-0 built by Baldwin in 1925 for the Raritan River Sand Co. The locomotive was sold to a tourist railroad called Pine Creek in 1950 and then to Disneyland in 1958. The locomotive was restored, converted to a 2-4-0, remodeled to resemble the Denver & Rio Grande Western’s Montezuma, and put into service in 1959. It was named after the then-president of the Atchison, Topeka & Santa Fe. More than 60 years later, the locomotive still makes its way around the line. Read on as I take you through the process of kitbashing a Disney steam locomotive.
I needed a locomotive from the Disneyland Railroad to go along the back of my Disney-themed On30 layout. I decided on the Ernest S. Marsh because of its distinct look. Now I had to find a model to start with.
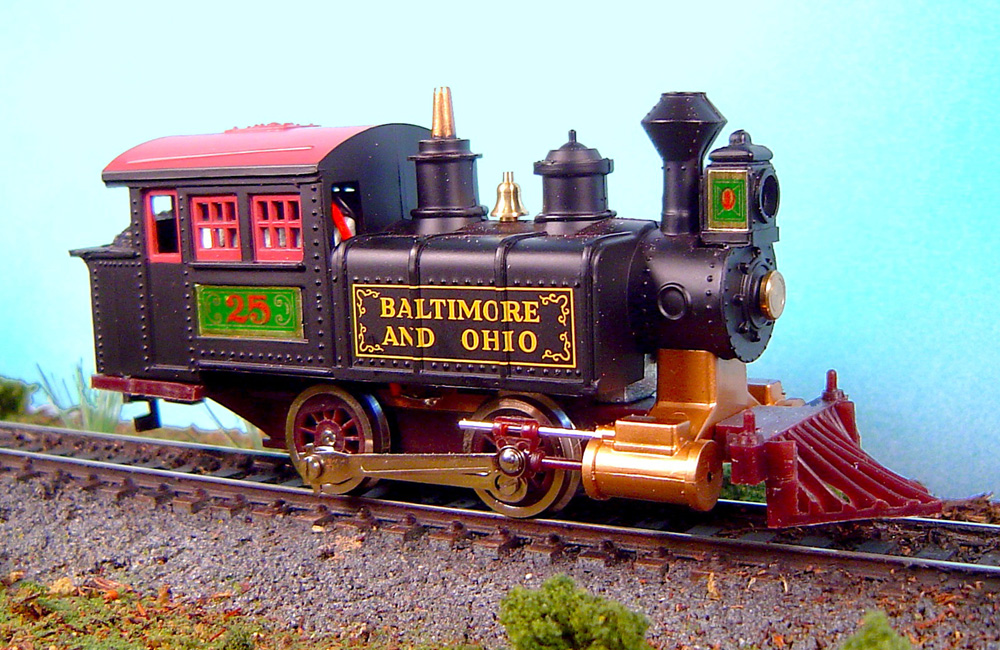
For a starting point, I chose the HO scale Life-Like B&O 0-4-0 Teakettle. It’s a basic engine – just a metal frame, plastic shell, motor, gears, and drive wheels. This makes it good for customization, since there’s not a lot to get in the way or remove. Even better for this project, the drive wheels are exactly the right size and spaced correctly for the prototype.
Starting the modifications
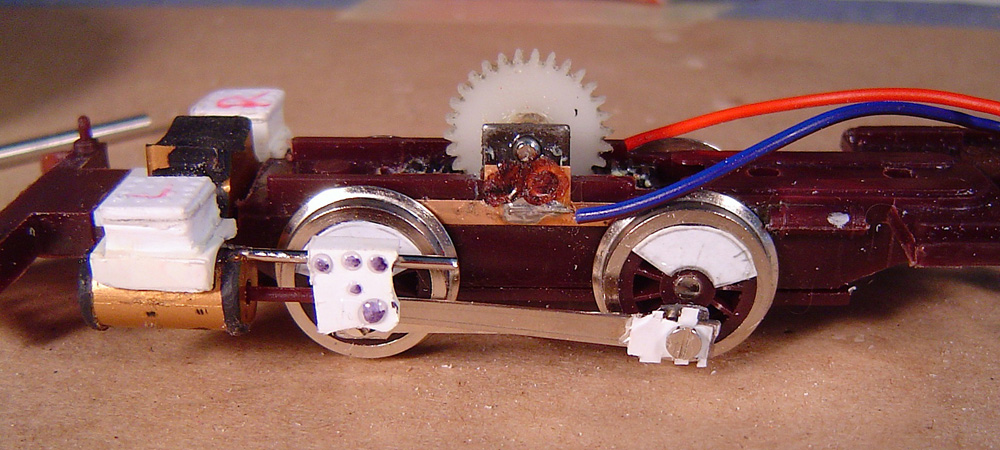
Kitbashing a Disney steam locomotive out of this HO scale model would unfortunately require a lot of work. I found it interesting that my model is starting out as a 0-4-0 saddle tanker, just like the prototype!
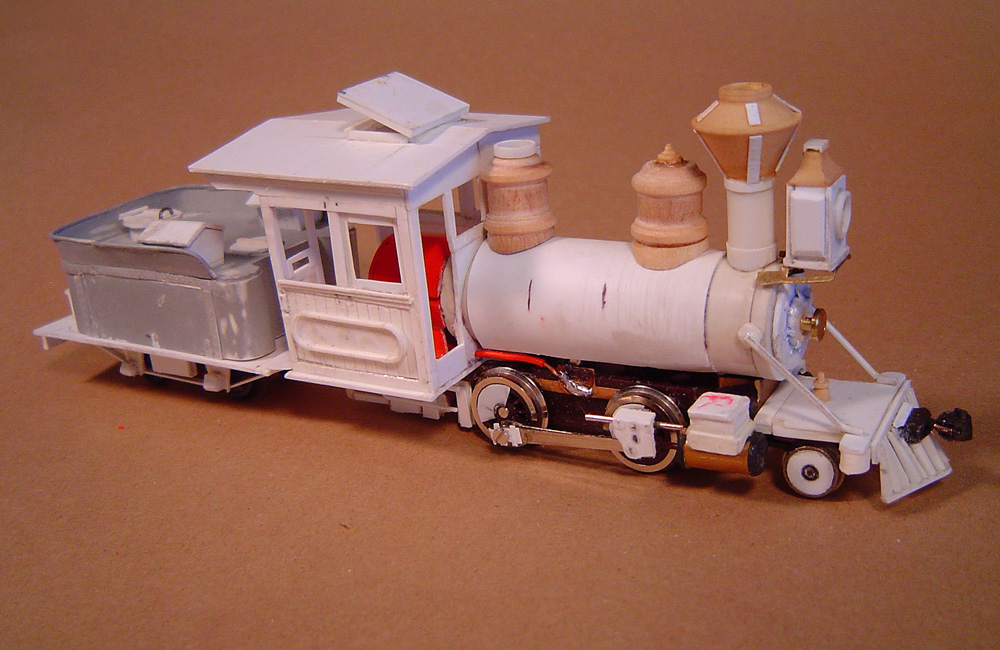
First I removed the plastic shell and the motor. Then I moved the cylinders and smokebox saddle, a one-piece plastic part, back toward the drive wheels. I scratchbuilt new steam chests out of styrene to go on top of them. Next I modified the saddle, grinding it down to a more accurate height for the boiler. I wanted the top of the locomotive to be able to come off and fasten to the chassis with a screw through the saddle, so I drilled a hole through the frame to match the saddle’s new location.
Next was the running gear. First, rather than make new crossheads, I made styrene covers that fit over the existing ones. I unscrewed the crank pins and removed the side and main rods. I ground down the edges of the rods to give them a straighter and more streamlined look. I also had to shorten the main rods a bit, since moving the cylinders back caused the crossheads to hit them when the locomotive was running. I also cut out arcs of .010” styrene to give the appearance of counterweights on the wheels.
Adding the cab and boiler
I sanded down the original cab floor so it was flat, filing off the tabs that once held on the original shell. I made a new floor of .040” styrene sheet and drilled a hole for the flathead screw that originally held the motor but would now serve to secure the cab. I also added a strip of .080” x 0.250” styrene to support the back of the boiler. I made the boiler from a 2-3/4” section of 1/2” (inner diameter) PVC tubing, which would protrude 1/4” into the cab.
The boiler would enclose the new motor. The original was too large and heavy, so I salvaged one from a Bachmann On30 Porter. To accommodate it, I used a 1/2” sanding drum mounted in a rotary tool to carve out a few more millimeters of space inside the pipe. Once the motor fit snugly inside the boiler, I cut a slot in the bottom directly below the worm gear. Since the motor fit so snugly in the pipe, there was no need for screws or tabs to secure it.
Next, I glued the boiler to the tab on the cab floor. I wrapped the boiler in two layers of .010” styrene, leaving the front 7/16” unwrapped to give the smokebox a smaller diameter. I routed the headlight leads through the boiler and over the motor, secured in place with a few drops of cyanoacrylate adhesive (CA). I then soldered the pick-up wiper wires and headlight wires to the motor.
The cab was straightforward. I built it out of styrene strips and scribed styrene sheet to resemble wood planks. I made the roof removable. Below the cab, I detailed a firebox out of various pieces of styrene sheet and rod.

Front-end modifications
On the front of the locomotive, I cut off the original “cowcatcher” and filed down the bottom edges of the pilot platform to make room for the addition of a lead truck. I salvaged the wheelset from the same Porter that donated the engine. I covered the wheel spokes with a disk of .010 styrene to make the wheels match the prototype’s solid wheels. Since the pilot truck’s pivot point was where the boiler screw goes, I had to glue a mount onto the bottom of the running gear.
A new pilot platform was constructed from .040” styrene sheet, strip, and tubing. I also scratchbuilt a more accurate pilot, including a draft box for a no. 5 Kadee coupler. I glued the pilot supports to the smokebox but not to the platform, so the boiler could still come off.
The domes and stack on the original plastic shell looked similar to the prototype’s, but they were the wrong size and the details weren’t quite right. I turned new domes and the top of the stack from a 5/8” wooden dowel. The barrel of the stack is a piece of 5/16” styrene tubing.
I fabricated a new headlight from scratch out of .040 styrene and used a bracket from an HO scale Old-Time 4-4-0 by IHC. I drilled a hole in it so the 12V bulb from the original engine could be inserted from the bottom. The decorative headlight top was made from a scrap piece from the wooden dowel. The smokebox front was made from two layers of .040 circles with the brass number plate from original locomotive shell.
After discarding a few other options as not accurate enough, I scratchbuilt the tender chassis out of styrene. The plastic wheelset is from a dummy diesel locomotive. The tender tank was made from a 3/4” block of wood and a 1/8” piece of balsa (giving a combined height of 7/8”) with the corners rounded out. The fuel and water hatches and toolboxes were made out of .040” sheet and 5/32” tubing.
Detailing and painting
Since many details will be easier to apply later, I got the engine ready for painting. The entire model was given a coat of primer and then a few coats of Rust-Oleum Sunrise Red spray paint. Once the paint dried, all the wheels were trimmed with white. The running gear frame, tender frame, stack top, cab floor, running boards, couplers, and pilot supports were painted with flat black acrylic. The journal boxes on the tender were painted with Testor’s 1103 Red. The smokebox was painted with a medium gray and the cab roof was painted with Apple Barrel Paints Cinnamon Apple acrylic. The inside of the cab and doors were painted with Folk Art 408 Green. The main and side rods were painted with Testor’s 1146 Silver with a drop of the firm’s standard 1149 Flat Black. Some accent areas, such as the cab windows and the nameplate, were painted with Testor’s 1127 Orange with a drop of red in it.
The vast amounts of brass trim throughout the locomotive were done with strips of gold mirror chrome film tape from Avery. More details, including the handrails, injector pipes, tender steps, and flagpoles, were made out of various scrap pieces of styrene.
In the cab, I created a removable “backhead cap,” which is a scrap piece of PVC pipe with pieces of styrene representing the cab plumbing. This slips over the back of the motor, concealing it. A bell from the On30 Porter was added between the domes.
Though Disney has a good reputation for having well-kept and spotless locomotives, they do tend sport a little grit and soot from time to time. I brushed on some black powdered paint to simulate the soot and grime on the cab roof and the smokebox. I installed window glazing of .010 clear styrene, and a few final touches like the cab window awning and armrests.
The various graphics and decals were created in Adobe Photoshop and were printed on “Do-it-yourself” sticker paper from Office Depot. With the flags on the pilot and a bell rigged with a .020 rod cord, my project kitbashing a Disney steam locomotive was complete.


An outstanding locomotive ….. GREAT WORK, Sam! Both innovative and excellent modeling!!