


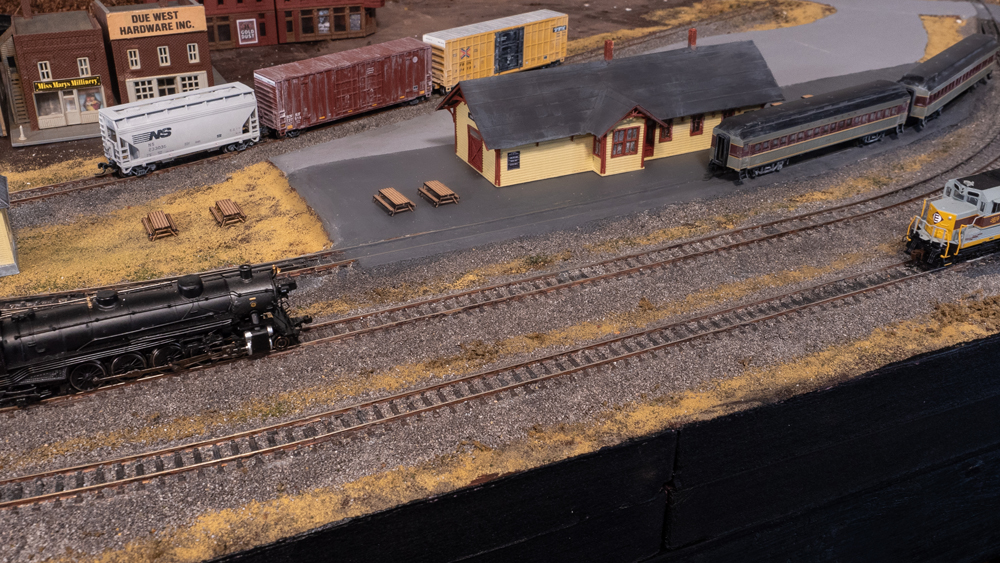
I can’t deny that I love Kato Unitrack. Its ease of operation, solid electrical contact, top-notch quality, and quick setup time make it irresistible to me. And unlike other plastic roadbed track brands and products, it has more prototypical dimensions. But there’s also no denying that straight out of the box it looks toy-like, a characteristic shared with the other plastic roadbed track so often included with starter sets.
I won’t try to debate the merit of one type of track over the other; at the end of the day it’s all about how the final result looks and operates (and how much fun it provides). But if you do decide to stick with plastic roadbed track for your layout, and you’d still like to achieve some degree of realism, you’ll probably want to improve the track’s appearance. Using some thoughtfully applied scenic textures and techniques, it’s entirely possible to make even the most basic starter pack track look believable.
I’ll in no way claim to be the creator of any of these ideas. I studied various tutorials and added my own unique spin in some cases. Instead, I hope by sharing my experience, other modelers will be encouraged to not necessarily rule out sectional or plastic roadbed track for their model railroads if they too enjoy its convenience and ease of setup.
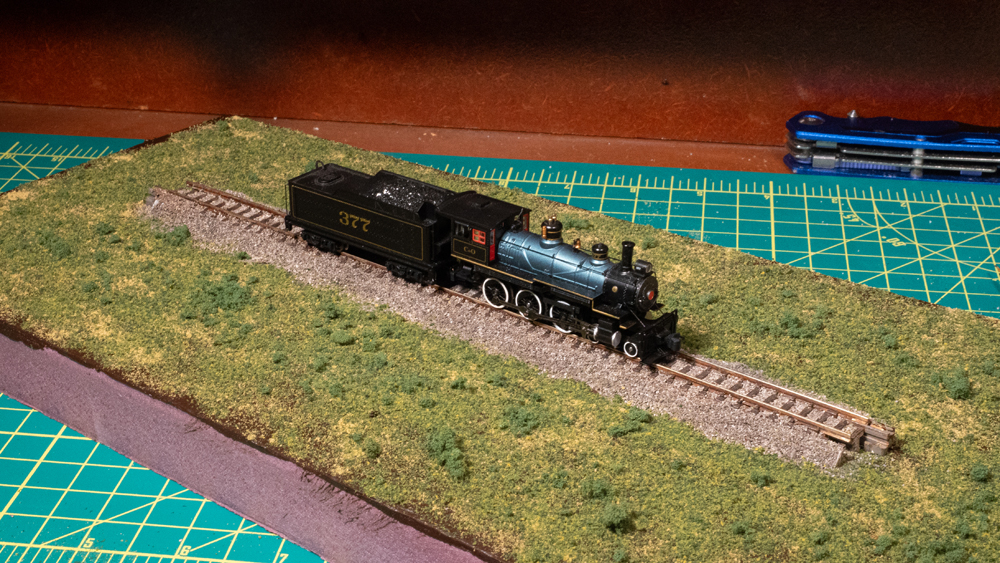
The following guide to ballasting Kato Unitrack is based on my own experience of scenicking my N scale 6 x 3-foot layout, the New York Midland Railroad (based on MR’s Carolina Central track plan), which is still in the construction phase. [The Carolina Central was first featured in the December 1996 issue of MR. A track plan and bill of materials using Kato Unitrack can be found on Kato’s website. –Ed.] I replicated the process on a small piece of insulation foam for demonstration purposes using an extra piece of Unitrack I had left over.
Though I’m focusing on one specific product and brand, this technique can be applied to Bachmann E-Z Track, Atlas True-Track, and similar plastic roadbed track offerings from other manufacturers. I believe these techniques can be applied to other scales, as well.
The first steps
Before laying any track, I first paint my terrain a flat brown and let that dry. In my case, the terrain is pink extruded-foam insulation board. This base coat will ensure that only earth tones will show under the ballast and texturing.
On my layout, I planned out how I wanted to lay my track pieces and began drawing out the plan. This is where the convenience of Unitrack becomes so apparent; just snap the track pieces together and you have a functional model railroad. Next, I determined exactly where I needed to drop electrical feeders and drilled holes through the insulation foam base to accommodate them. I like to set the electrical drop directly in the middle of the track, as the hollow interior of the roadbed will hide all of the wiring connections. Once my Unitrack rail joiner feeders were connected to the rails and dropped, I simply applied some white glue to the underside of the plastic roadbed and set it into place. The ballast and adhesive I will add later further bonds everything to the terrain.
Track weathering
Once the track is in place, it’s time to get started on the ballast and weathering. This is a multi-step process that requires some time and patience, but the results are worth the effort and can be lots of fun if you enjoy the creative aspects of the hobby. I address the ties first, as Unitrack comes straight from the package with a very unrealistic glossy sheen to the ties, which are painted black rather than brown. I paint the surface of the ties a burnt umber using matte acrylic paint, but brown/black/white paint mixes could work also depending on the type of railroad you’re modeling (in my case, a modern regional mainline with well-maintained infrastructure). I’ll use a small flat brush to gently apply the brown paint onto the tie surfaces both inside and outside the gauge. I’ll cover this with ballast later on, so a trace bit of brown here and there will likely be hidden under the crushed rock layer. I also take this opportunity to paint the rails brown, as they have a notable shine straight out of the box.
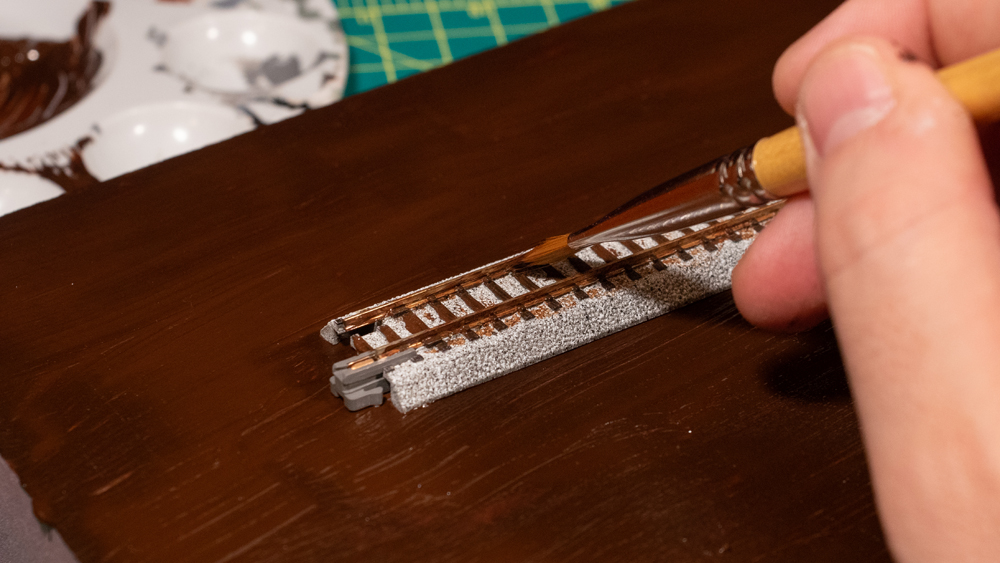
While I give the paint time to dry, I prepare some weathering washes by diluting white and burnt umber paint in separate containers. These two washes will accent highlights and midtones on the ties, giving them nice, subtle color variation. When I’m ready to accent the ties, I first make a pass with the white wash, lightly applying the bristles over the tie surfaces to bring out the highlights. I’ll allow that wash enough time to dry, then apply the second brown wash very lightly, giving it a lighter shade as the burnt umber mixes with the white. The multiple paint passes create a very subtle but striking effect once all the weathering is complete. You could also use an overall flat gray here and achieve similar results, but I like the color variation from tie to tie. When the paint has dried and I’m satisfied with the appearance, I’ll remove any excess paint on the rail head by running over it several times using my index finger wrapped with a piece of paper towel soaked with isopropyl alcohol. I try to avoid removing the paint on the sides, as the brown is appropriate for weathered rail. The paper towel may snag rail joints, in which case I’ll use a tweezer, or sometimes my thumb and forefinger, to pluck it out.
Ballast
With the ties and rails now painted, the next step will be to add the ballast. Though Kato has its own brand of ballast to match its distinctively speckled roadbed, I prefer to use Woodland Scenics fine gray ballast, as it more closely resembles ballast often seen in the northeastern United States. That said, I find the Woodland Scenics color to be just a tad too bright for my taste, so I add the ballast to a cup and mix in a sprinkle of black weathering chalk until the ballast color looks just right.
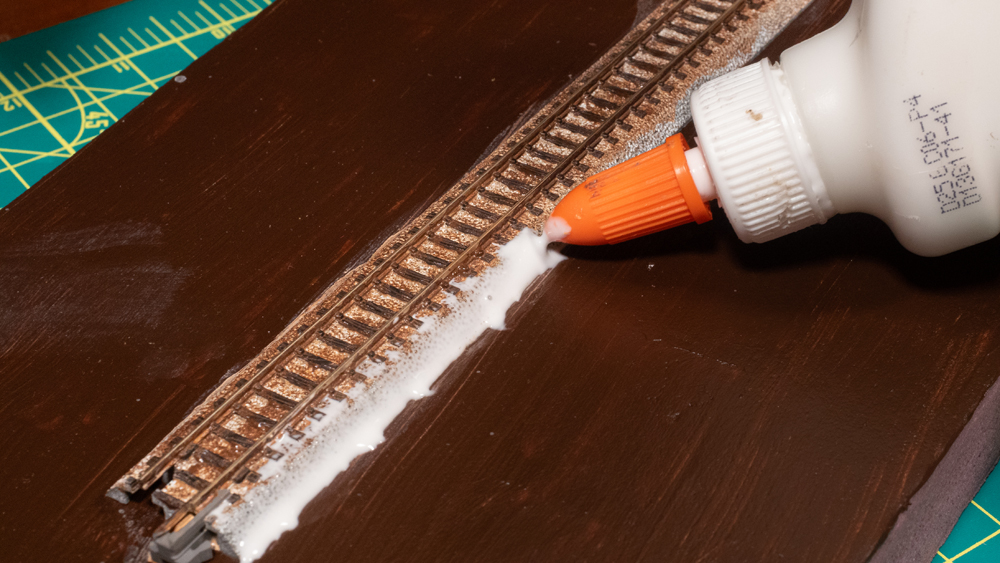
Next, I get some Elmer’s white glue ready to apply to the roadbed. I find it’s best to work in small two- or three-foot track sections at a time to avoid rushing and making things sloppy. I smear some white glue onto the sides of the plastic roadbed, avoiding big droplets or pools of glue. Ballast applied to larger drops will form a bubble and not settle correctly, a major headache to fix later on, as I learned the hard way. I also avoid adding glue to the track gauge at this time, as that will be handled later. I also avoid the tie surface so crushed rock won’t set to the tie and bury them.
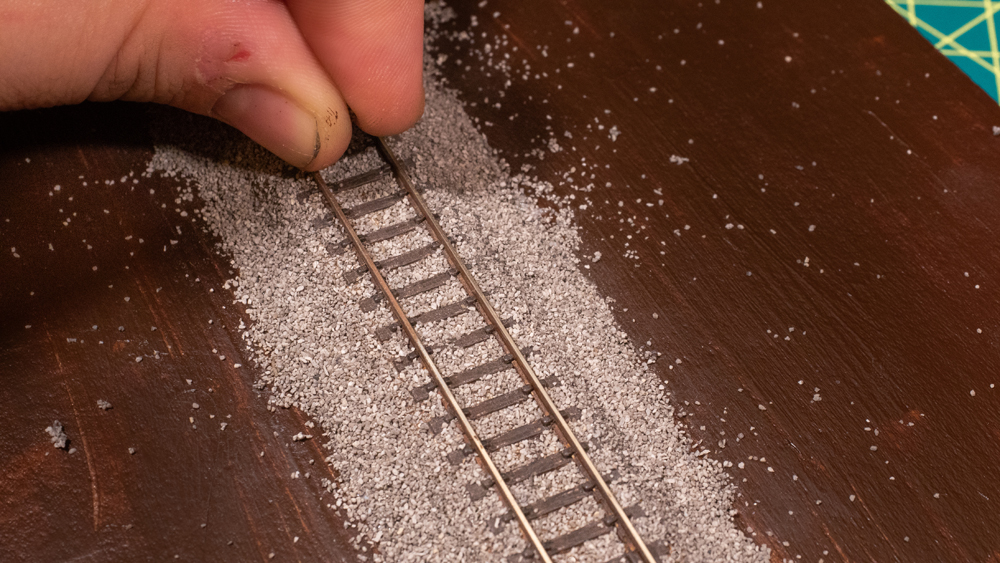
Once the glue is applied to the sloping roadbed, I grab a small amount of ballast between my thumb and index finger and gently sprinkle it on the outer ties, working my way down the track. Next, I’ll run my index finger gently back and forth across the outer tie surface until the ties are exposed again. This not only exposes the ties but also works ballast in between them and allows it to run down the sloped roadbed and settle on the glue. I find this method works well to apply the ballast evenly, but if any spots need touching up afterwards, I can always sprinkle on a little more ballast.
When the shoulders of the roadbed are ballasted, I shift my attention to the track gauge. I sprinkle a very small amount of ballast in between the rails, making sure the ties are not covered, working my way slowly down the track. Then I run my finger in the gauge, sweeping any stray grains of ballast off the ties and working them between the ties. There should be enough to cover the space in between each tie so no plastic is visible, but not so much that ties are buried with crushed rock. When that’s in place, I’ll apply a 50/50 solution of water and glue in the track gauge using a small eye dropper wherever there’s ballast, making sure it’s thoroughly soaked but not pooling. I then allow that to dry completely and observe how the ballast settles when dry. If there’s a bit too much in any one spot, I can gently remove the excess by carefully scraping it off using an old hobby knife. Because this is N scale, it’s incredibly important to note how much ballast settled into the track. It’s very easy to add too much, something you may miss at first glance but will become painfully obvious when the scene is blown up in layout photos!
This process is very easy for straight and curved track of all lengths and radii, but I alter things slightly for my turnouts where switch clearance is paramount to smooth operation. With plastic roadbed, there’s little to no space beneath the points to add ballast without gumming up the mechanism. I basically avoid adding any ballast material to turnouts around the points and frog. Instead, I apply ballast to the outer roadbed and within the gauge only up to the close clearance points. I avoid the guard rails, frog, points, heel, and closure rails, then lightly paint the actual turnout a blackish gray to give the appearance of heavily oiled switches.
I paint the turnouts with a product called Neolube, a conductive lubricant that is essentially graphite mixed with a cleaning solution. Straight out of the bottle, it’s a very dark black color, so I use a very light coat, as too much will make the turnouts solid black. Despite Neolube’s conductive qualities, it’s important to thoroughly clean the rail surfaces (paying close attention to the frog and points) after application. Neolube is fantastic not only for turnouts but for any track where you’d like to create the impression of oil or grease stains. I added a very thin and light line down the center of my mainline track and heavier splotches near my engine facility to create the impression of heavy oil stains from idling engines.
Overall, I’m very pleased with how well this process transforms plastic sectional track pieces, and I personally think it’d be hard to tell my track apart from a similar layout using flextrack. I hope that this technique will convince those who feel more comfortable using roadbed track that they can easily achieve a degree of realism by texturing and painting it. As long as it looks nice, operates well, and brings you joy, then that’s all that matters.
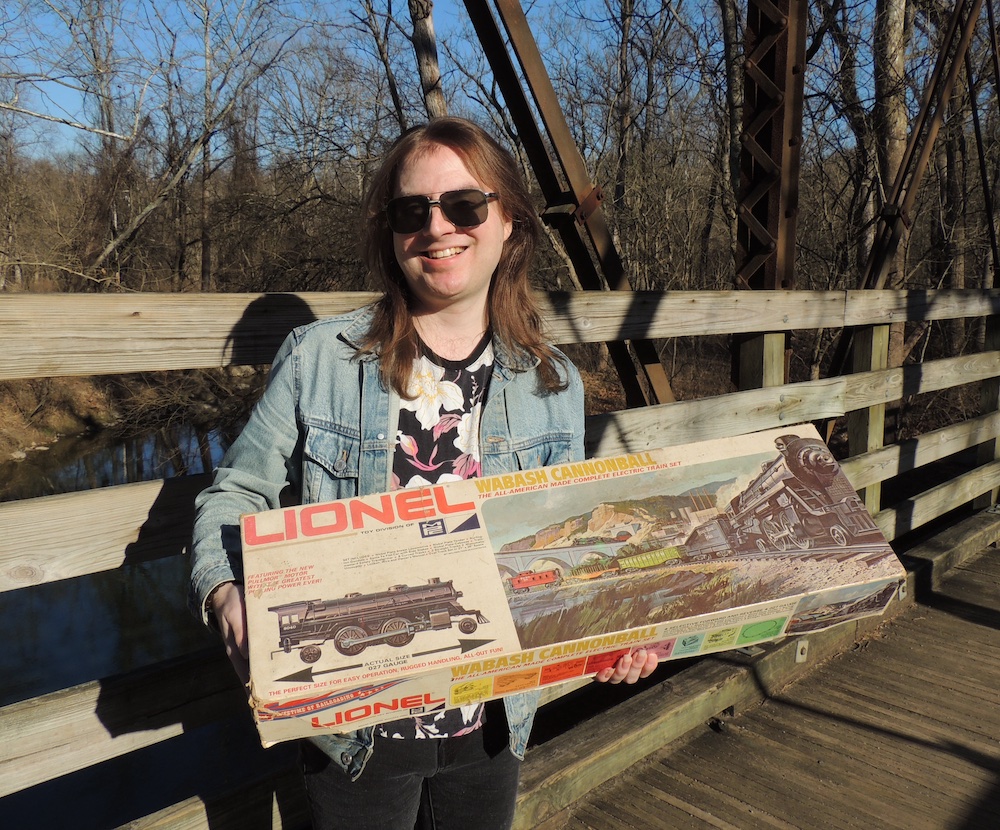
Frank DeStefano is a 31-year-old video producer living in Queens, N.Y. While not at work, he enjoys full-size railroading, history, exploring old taverns, and time spent with friends and family. He is a volunteer at the Black River & Western in Flemington, N.J., and serves as the railroad’s social media manager. His HO scale Flushing & Brooklyn RR was featured in the September 2023 issue of Model Railroader, and he was featured in associate editor Bryson Sleppy’s The next generation of model railroading.


I do something similar with my HO Unitrack, except I don’t add the side ballast until the track is in place on the layout.