


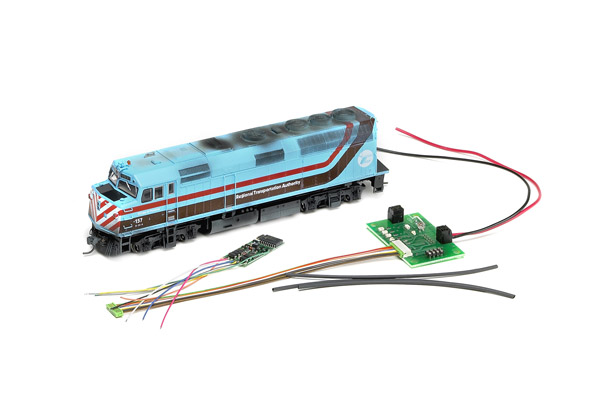
 7 tips for installing decoders: I don’t know about you, but I have far less hobby time than I would like, so I need to spend what time I do have wisely. Installing Digital Command Control (DCC) decoders isn’t one of those projects I look forward to doing, but it’s a necessary task for operating my HO scale layout realistically.
To help decoder projects go more smoothly, I’ve compiled a list of tips and check points I use when doing most any decoder installation. On the surface, it may seem like I’m pointing out obvious things – steps that you may be tempted to skip. However, if you do them all, chances are good that your decoder installation will work properly on the first try – and that’s a great feeling.
1. Test the locomotive
2. Check the lights
 While you’re testing the locomotive, you should also check the voltage of the bulbs to determine if they need resistors when converting the engine to DCC. If you’re using 1.5V bulbs, you must place a properly rated resistor in series with the bulb, or the lamp will burn out immediately when activated.
If you’re unsure of the bulbs’ voltage, disconnect them from the locomotive and try lighting them with a 1.5V battery (a AA cell will work). The bulbs will light at normal brightness if they’re 1.5V lamps. If they worked when you tested the locomotive but now are dim or don’t light at all, they’re probably 12V lamps.
Another possibility is that your locomotive uses LEDs (light-emitting diodes) instead of lightbulbs. These always require a resistor. If your installation uses LEDs, keep in mind that they are polarity sensitive. They have two leads: an anode and a cathode. The anode must be connected to the positive lighting common wire (blue) and the cathode to the function wire (such as white); otherwise, the LED will not light.
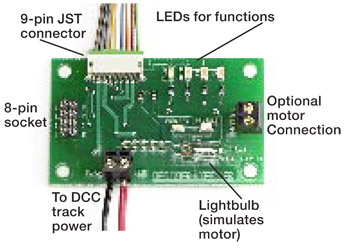
3. Test the decoder
 I’ve rarely found a defective decoder straight out of the package, but it can happen, and testing the decoder before you install it saves a lot of guesswork later. Decoders are very easy to test at your work-bench, and DCC suppliers such as Loys Toys and NCE Corp. offer inexpensive testers. You can also make your own. The June 2001 Model Railroader, page 81, featured a homemade tester built by Bill Darnaby.
4. Isolate the motor
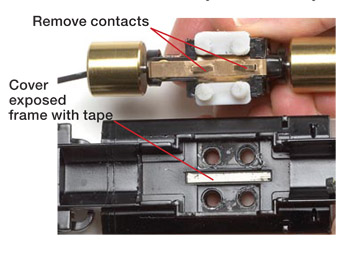
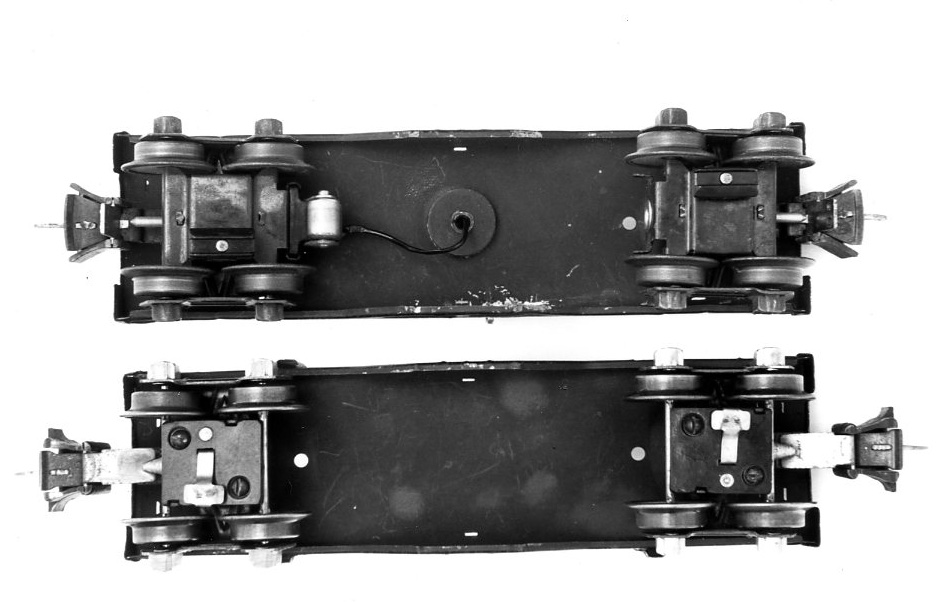
The cardinal rule in decoder installation is that the motor must be electrically isolated from the rails, and this includes the frame of the locomotive if it’s used to conduct electricity to the motor.
In a DC locomotive, the motor gets its power directly from the rails. On some models, such as the older Athearn engine shown above, the motor receives power directly through the frame. If this connection is not broken, you’ll destroy your decoder when you try to operate the engine on DCC.
5. Know the color code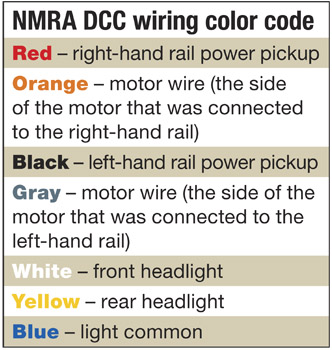
Wired installations are the most difficult, but they’re still well within the capabilities of a modeler who has some experience soldering. Wired decoders have no plugs or sockets, just a number of colored wires. The National Model Railroad Association (NMRA) has a Recommended Practice (RP 9.1.1) for the color code.
After the motor wires are isolated, simply connect the power and motor wires following the NMRA color code.
6. Insulate connections
To prevent short circuits caused by exposed wires touching, you need to insulate the connections. I use heat-shrink tubing, shown in the top photo of the page.
Make sure to slip the tubing onto the wire before soldering the connection. Once you’ve made the joint, slip the tubing over the exposed wire and gently heat the tube with your soldering iron or a heat gun. (Hold the heat source close, but don’t touch it to the tube.) The tubing will shrink to fit snugly over the wire and insulate it.
7. Test the installation
When you’ve finished installing a decoder, test your work before you reassemble the locomotive. Place the engine on the programming track and attempt to read back CV1 (configuration variable 1). It should read 3, which is the default address for all new decoders. If that works, place the locomotive on your main line and run it in both directions (using address 3) and test all the lighting functions. When running an engine that’s disassembled, make sure that the decoder and loose wires don’t touch the rails or the engine’s frame, which could cause a short circuit.
If the engine and decoder function as expected, reassemble the model and program the decoder. With that, you’re ready to move on to another project. As a follow-up, next month I’ll take a look a some things to consider when choosing decoders for your locomotives.


It looks like very few recent comments are being responded to. For the question, “Does MRR have any videos showing how to convert DC locomotives to DCC?”, in Google, I typed in the search phase: How to convert dc locomotive to dcc model railroaders magazine
I got what seems to be a lot of good links for this question.
Doesn’t someone offer solderless wire terminals to attach wires to module without soldering? I think you stick wire through terminal eye and fold back wire and slide lock over wire to complete connection? Thanks Ed zabelka
Does MRR have any videos showing how to convert DC locomotives to DCC?
hi, lenz decoders are exelent
i have a samhongsa brass ho triplex,3 motors,what type of dcc decoder would i need,
Will this also work for N Scale?
I'm trying to install a dcc sound decoder and speaker in a proto rs2 and can not decide where to install the speaker. its 1/4 by 3/4 square
I enjoy these articles…but I would like to see some practical advise or instruction on how to remove tne engine shell to put a decoder in or a work sheet on Removing and keeping them in place when re-installing the motor power rails. Most manufacturers show what needs to be done, but not how to do it.
Just bought a Overland UP 3 unit Gas Turbine (n scale) am looking to install DCC decoders. looks like I should use Z scale hard wired ones…
HAVING TROUBLE CONVERTING PRODIGY DECODERS TO DIGITRAC POWER? CANNOT GET UNITS TO RUN. ANY IDEAS WOULD BE APPRECIATED. THANKS
Thanks so much for this easy to understand article. Even though the Union electricians don't have anything to worry about from me, this makes it sound easy. Now, a like article on track wiring; loops, turnouts etc. and I might even get my trains to run !
I run DC but would love to have my Metra F40PH (pictured) run with sound – will a decoder work for sound on a DC system with the MRC blackbox?
I'm new to model RRing and DCC. These are helpful steps to follow
after years fighting it i am finally converting my layout to dcc. i would say 50% of my locos are dcc ready but i have a few old ones such as the climax from roundhouse which were never setup or designed for dcc. i am now repowering each one of them with new motors since the old motor stall rate is so high. 1.5 i was told when tested. before each step i ask a lot of questions till the first is done then i hope the rest will be downhill. the biggest thing is making sure the motor is well isolated. and secure. please wish me luck i think i will need it . lol
Having been involved selling DCC systems at exhibitions in the UK, I learnt about running locos, installing decoders and wiring layouts, but I am still learning from articles in MR and from the MR forums. Keep up the excellent work guys.
I am currently using a MRC Prodigy Advance2 and love it. To anyone wondering what decoders work with what systems, I have Digitrax,MRC,TCS,NCE, whatever Bachman uses. Whatever came with my TrakMobile from Factory Direct Trains. Last but not least an Atlas decoder. I am currently repowering some older diesels and will be going with more sound. Please keep the DCC articls coming even if you repeat some or update the older ones.
Our club is just getting stsrted into DCC. Lots of locos to convert ! This info is great for us beginners, Thank You for your help.
The advent of DCC was the reason for me to come back to the bobby after more than
35 years. I've installed decoders both motor and sound in over 20 engines so far. The challenge with sound is that besides the decoder, you have to find space for the speaker.
To answer Patrick Judge's question, can you leave the address at 3? yes of course, however, if there another loco with the same address, the will both move at the same time. To all that start I would like to suggest that they read the monthly DCCCorner in MMR
it offers a wealth of information
Hi Curt,
Yes you should be able to operate a sound decoder with an MRC black box on DC. You may also want to check out their new Tech 6 throttles, which also lets you program DCC decoders on a DC layout. Thanks for your interest.
Dana Kawala
Senior Editor
Hi Paul,
Yes NMRA compliant decoders (including most of the major brands like NCE, Digitrax, MRC) will work with each other and on any DCC system. Hope this helps.
Have a good day.
Dana Kawala
Associate Editor
Hi Sam,
Any brand of decoder will work with your DCC system.
Thanks for reading Model Railroader.
Dana Kawala
Associate Editor
Mr. Bettig thank you for that answer to my question ie clears up a lot of fog for me.
If you are hooking up DCC for a buddy can you leave the address at 3 so he (or she) can set the address at a later time to what they want?
thanks for the tips – was just about ready to install.
Thanks … great article. I'm Jumping back into model railroading after a 35 year layoff. DCC … what's that? I'm reading everything I can find to catch up with technology!