


I’ve wired a number of control panels for clubs. Control panels stick out into aisles and therefore need to be rugged. Control panels also take a good amount of time to wire. If you make a change in your track, modifying the panel to reflect the change can be difficult.
I’ve always liked being able to control turnouts with my throttle. DCC-controlled turnouts can also be controlled by dispatchers using software like Java Model Railroad Interface (JMRI).
Basic DCC accessory decoders simply throw a turnout. Often, they’re designed to control either slow-motion switch motors or twin-coil switch machines. On a lot of layouts, a basic unit may be all you need.
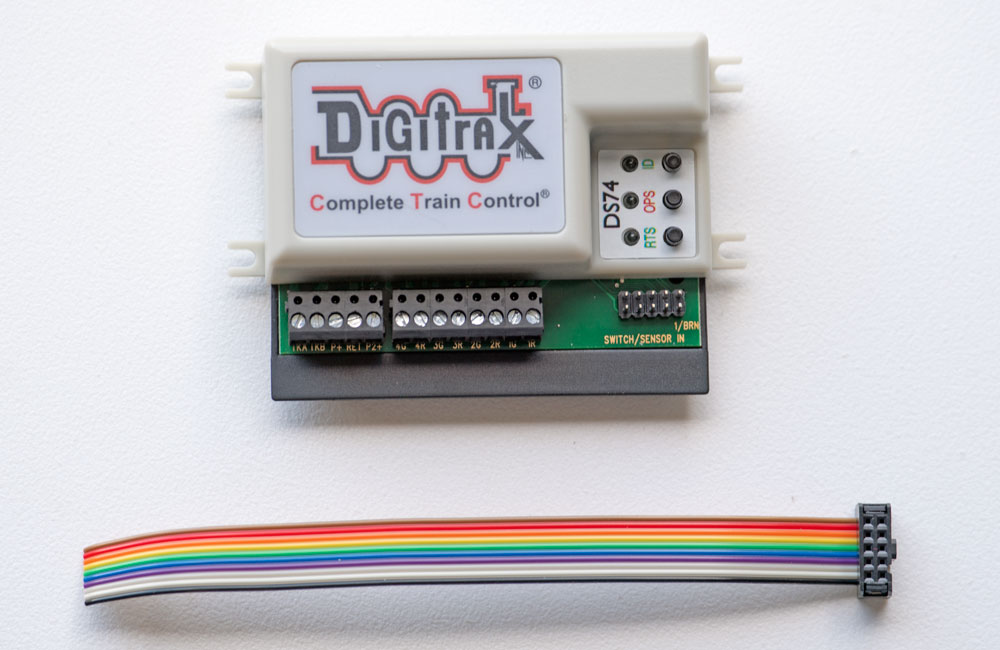
If you want an accessory decoder that can also operate turnouts from a control panel, control signals, report turnout position to JMRI or other computer program, report block occupancy to your computer, control routes (multiple turnouts lined with one command) without the need for a computer tied to your layout, trigger a route from a control-panel button, or also drive LEDs, you might need an advanced accessory decoder, such as the new Digitrax DS74 (see above).
Is a DS74 right for you? If you don’t have a Digitrax system or LocoNet emulator, the ability to line routes across multiple accessory decoders isn’t available to you. The DS74 sends turnout commands for other turnouts over LocoNet. If your routes only use the turnouts associated with a given DS74, it will work for you.
The DS74 defaults to controlling twin-coil switches machines. One option switch changes it to control slow-motion switch machines.
The DS74 has a 10-pin connector available for switch inputs, position feedback, and block detector inputs. The DS74 comes with a cable you can use to make connections for these devices. You can make your own terminal strip or solder your connections to the cable. You can also use your own switches and LEDs.
If you want something quick and easy, you’ll want its optional DSXC4 breakout board. It connects to the DS74 with a supplied cable. It also can be connected to Digitrax’s BD4N block detector. The DSXC4 also provides breakout connections for the plug and play DSXCP1 control panel switches and indicator lights. The DSXC4 also has screw terminals for switch inputs or block occupancy inputs.
Given that the DS74 has a lot of capabilities, you may have to configure it. If you’re using balky twin-coil switch machines that require a capacitive discharge kick to get them to flip, the DS74 has an option for that.
If you’re using slow-motion switch motors like the Tortoise by Circuitron, there’s one option that you set to enable this feature. Option switches 1 through 4 need to be set to C, T, T, T.
Setting option switches 1 through 4 to C, T, C, T enables the DS74 to drive eight LEDs. You’ll need to put a resistor in series with each LED. Try a 1,000Ω, ¼W resistor. If you need it brighter, you can go down to a 680Ω, ¼W resistor. Connect the cathode end (the shorter lead or the side of the LED with the flat edge) of the LED to the R or G terminals, go through the resistor, and then connect the other end of the resistor to the P+ or P2+ terminals on the DS74. If you can’t get the LED to light, you may have it hooked up backwards. You’ll then turn the LEDs on or off with turnout commands.
Since the Digitrax BD4N block detector doesn’t have a LocoNet connection, you can get BD4N output signals to LocoNet using a DS74 via a DSXC4 breakout board. You’ll need a cable from the BD4N to the DSXC4. You can buy cable and connectors to make what you need by purchasing the Digitrax SDCK Signal Driver Cable kit or buying your own connectors and cables from electrical distributors like Digikey or Mouser. The SDCK comes with 30 feet of cable and eight connectors. You can make four cables that have the length you need.
Many modelers who want DCC control still want a control panel. If you’re planning a control panel, the DSXCP1 recessed control panel button makes it fast and easy. The DSXCP1 contains a pushbutton toggle switch and two LEDs. If both LEDs don’t alternately light when you press the button, reverse the connection of the DSXCP1 pushbutton to the DSXC4 breakout board.
You can provide your own switches to control turnouts. The DS74 only accepts a single input to control each turnout. Each press of the button toggles the turnout to its other position. One nice thing about using momentary pushbuttons to control turnouts is that you can have multiple pushbuttons on more than one control panel control a particular turnout. If you need to drive two LEDs from one output for multiple panels, don’t use less than a 1,000Ω resistor for each LED.
The DS74 can be programmed to control eight routes with up to eight turnouts each. The routes can drive turnouts connected to other DS74s via LocoNet. There are a couple of ways to set up routes. “EZ-Routes” can be set up with any throttle or a computer by pressing the RTS button on the DS74. However, you can’t read back, review, or edit routes set up this way. No problem; there’s an easier way to do all that using the DT602 advanced throttle.
Using the DT602 (make sure it’s updated to sub version 0.6, September 14, 2021, or later), you can call up all your DS74s and it will show the range of accessory addresses. You can list all the routes within a given DS74 and all the turnouts in each route. They call it advanced DT602 based DS74 configuration. You’ll call it very slick. Note that even if you have a DT602D wireless throttle, you’ll still need to plug it into LocoNet to set up routes.
The DS74 can be powered either through track connections, an external power supply such as their PS14 wall transformer, or your own 14V, 300mA power supply. Anyone who ever powered an accessory decoder from the track bus quickly learns that isn’t a great idea. If there’s a short on your track bus, the DS74 will stop working. If it was in the middle of moving the points of a turnout, it will stop and won’t be able to resume until power is restored. If you have a large layout with a lot of accessory decoders off your track bus, the power drain could add up to be significant. So modelers have learned to power their accessory decoders from a separate booster to avoid these problems.
The DS74 can be used with legacy Digitrax throttles, like the DT402, and legacy command station stations like the DSC100. You can set the option switches or CVs with the DT402, but you won’t be able to use the slick route programmer. I preferred setting option switches over CVs, as a single CV can configure eight option switches. You could make a mistake in setting a CV that will leave the DS74 doing something you didn’t intend.
If you need more than the basic accessory decoder and want something small, the DS74 may be for you.


What about Kato single solenoid turnouts? Digitrax says they are P&P for the DS64? And what is one to do without LocoNet?
The DS 74 will not operate Peco PL 11 switch motors. This is confirmed by Digitrax after sending a Peco switch with attached PL 11 and a DS 74 back to Digitrax for testing.
What is the advantage of this sort of stationary decoder over a SMAIL?