


Track ballasting made easy: Model railroading is fun, right? Well, most of the time it is, but there are some aspects of this hobby that make us shudder. And judging by the questions we receive, one thing many of us don’t enjoy is ballasting. However, adding ballast (the rocks between the ties and along the edge of the roadbed) isn’t that difficult, and it goes a long way toward making our layouts more realistic.
On model railroads ballast is purely cosmetic, but on real railroads it serves several important purposes. First, ballast holds the track in place and keeps the ties and rails from shifting. Second, it helps drain water away from the track. Third, ballast evenly distributes the weight of the rails and equipment to the subgrade. Finally, it keeps the track level and in alignment.
The type of material used for ballast varies between railroads. However, in its book A Practical Guide to Railway Engineering, the American Railway Engineering & Maintenance of Way Association has a list of recommended ballast: “granite trap rock, hard lime-stone, open hearth and blast furnace slags, other limestones, prepared gravels, chat, volcanic ash, pit-run gravel, and coarse sand (as a last resort).”
Fortunately, we don’t have to go to a quarry to get our ballast. Instead, we can go to our local hobby shop and pick up a bag from Arizona Rock & Mineral, Noch, Woodland Scenics, Hunter Scenery Co., and Busch, among other firms. For this article, I used Highball Products HO scale Genuine Limestone Ballast, which we’ve used on the MR&T main line since 1989.
Though ballasting requires some patience, it’s a task worth learning. You may even find that ballasting is fun after all.
Step 1: Between the rails
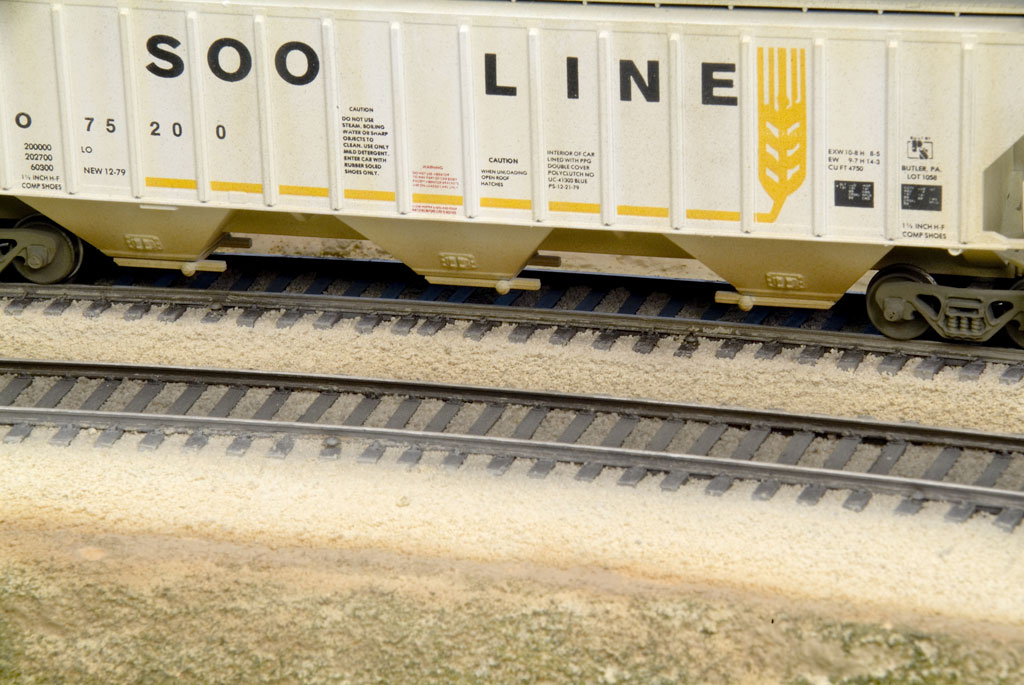
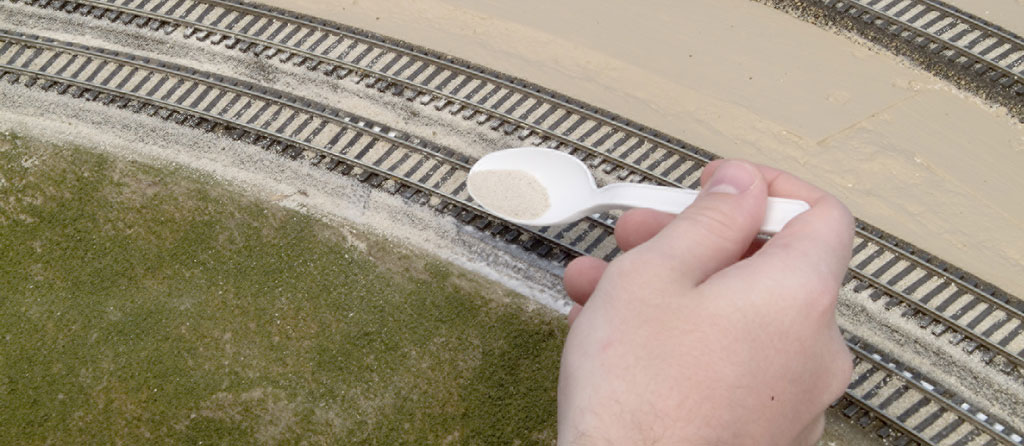
I ballasted a stretch of main line between Big Bend and Mukwonago, starting with the area between the rails. I like to ballast this part of the track first because I can cover a lot of ground in a short amount of time.
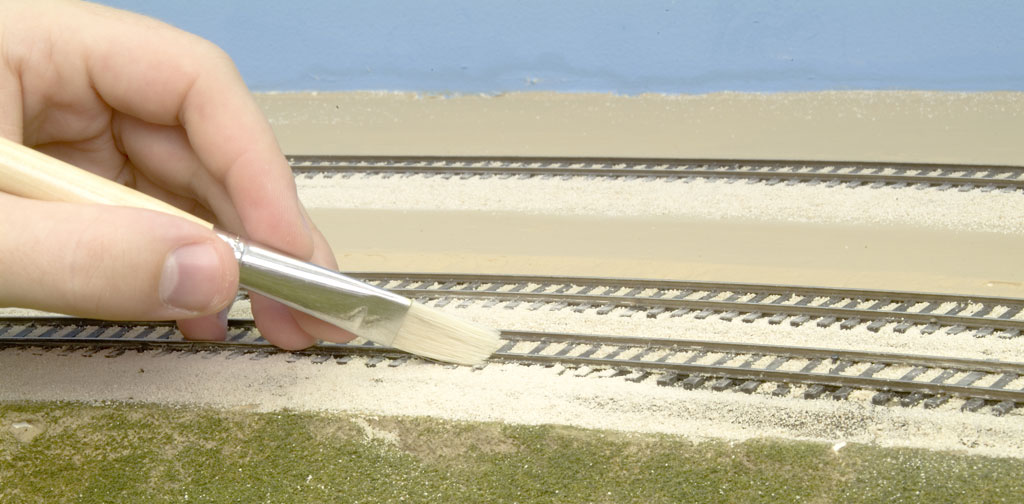
First, I poured about 11⁄2 ounces of ballast into a 3-ounce drinking cup. I then bent the lip of the cup so it formed a spout, making it easier to pour the ballast between the rails. I used a 1⁄2“-wide paintbrush to spread the ballast, working the brush back and forth until the ballast was off the tops of the ties.
On prototype railroads, particularly high-speed main lines, keeping ballast off the ties is important because the suction created by passing trains can cause the ballast to fly around, potentially damaging equipment or knocking air hoses loose. Ballast regulators and compactors are used by railroad maintenance crews to keep the rocks groomed.

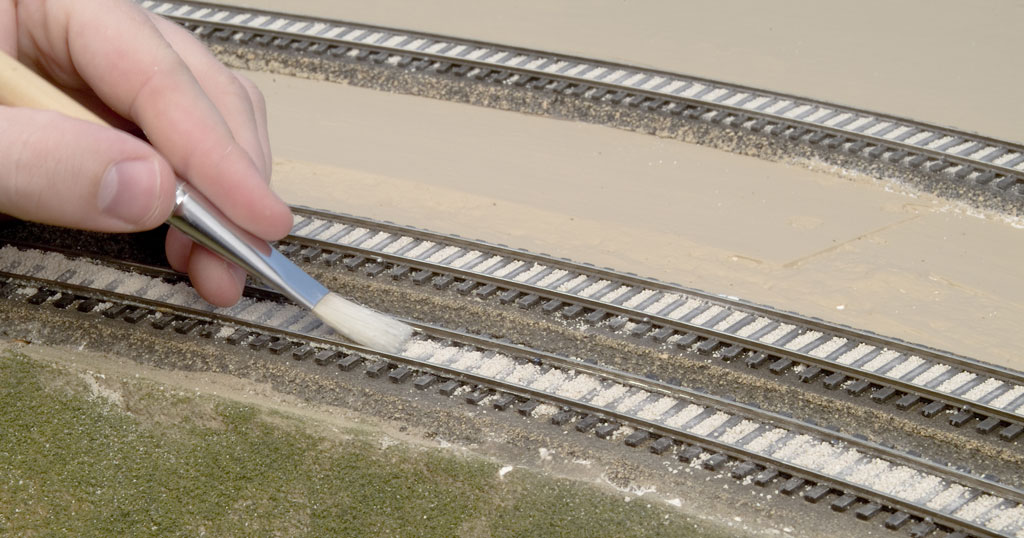
Step 2: Shoulders
Ballasting shoulders was a task I used to dread because the granules would wash away when I applied the Scenic Cement. However, I learned a neat trick used by veteran modelers that makes ballasting shoulders a breeze and results in clean, even edges.
First, I poured some white glue into a mixing dish and diluted it 15 percent with water. Then, with another 1⁄2“-wide paintbrush (not the same one I used to spread ballast), I applied the glue along the shoulder, making sure I had an even edge along the base of the roadbed.
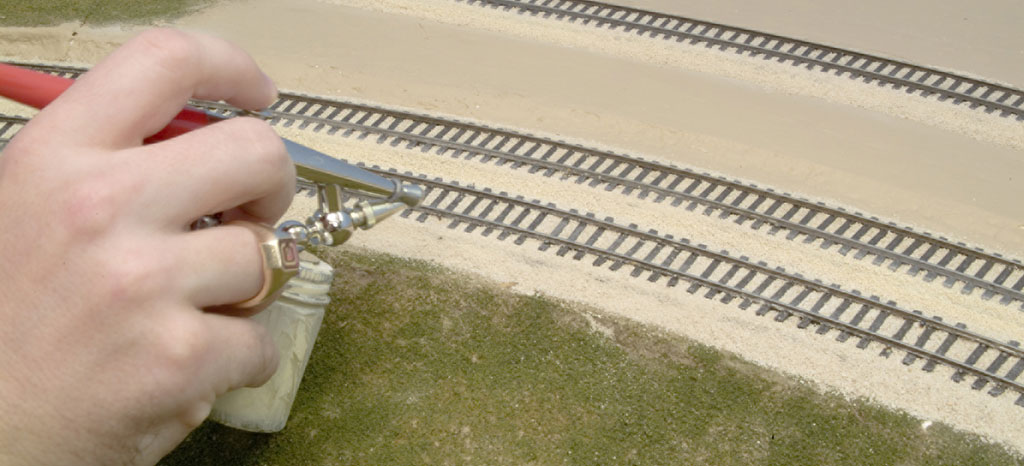
No matter how careful I am, there are usually a few spots where the roadbed shows through the ballast, especially on the shoulders. Fortunately, I discovered that Polly Scale CSX Tan is a perfect match for our limestone ballast, so I used an airbrush to touch up the light spots. I thinned the paint 30 percent with 70-percent isopropyl alcohol.
After airbrushing the ballast, I weathered it with Polly Scale paints mixed 1 part paint to 9 parts 70-percent isopropyl alcohol. First, I used an airbrush to spray Grimy Black between the rails to simulate the oil and grease that drips off freight cars and locomotives. Then I lightly sprayed the areas outside the rails with Earth. I also used the color to spray a faint transition line between the ballast and the ground foam, helping to tie all of the scenery together.
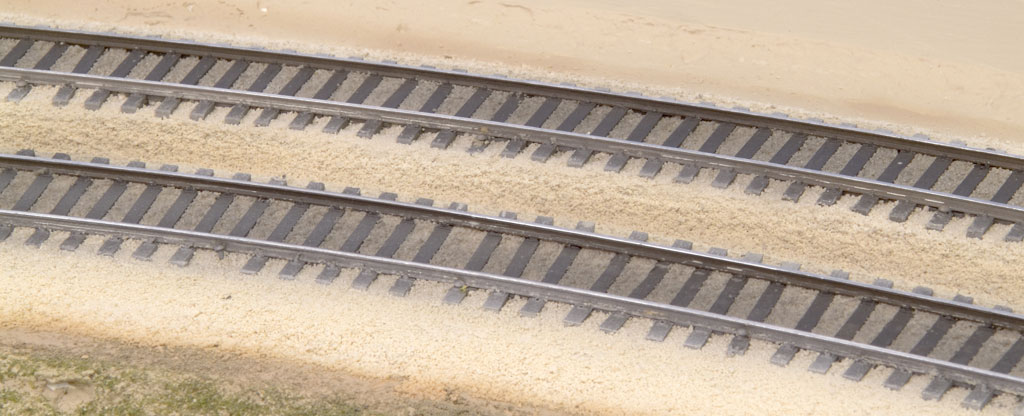
With that, another section of the MR&T has been ballasted. But with a 200-foot main line and several industrial sidings, there’s still a long way to go. However, using these simple techniques, ballasting the rest of the layout won’t take much time at all. With the right techniques, track ballasting can be made easy.
Watch Trains.com director David Popp add track ballast on Model Railroader‘s Red Oak layout.


Great article Cody , thank you.
Great article! By the way, when I was in the hobby store a few months ago, I saw that Arizona Rock & Mineral had different colors specific to several prototypes such as Union Pacific. Of course, to me, being a Union Pacific modeler, this was interesting, but my question is: Are there any other brands of model ballast with colors specific to certain railroads like Arizona Rock & Mineral? Your thoughts would be appreciated on this subject.
Save money on your ballast supplies. Go to your local pet store and buy the 20 lb bag of lizzard cage filler. It is the same color as ballast you buy in the hobby shop, but a 20lb bag is as much as four or five bottles of that "other" companies product and it works great! They also carry english ground walnut shells if you model branch lines or western themes! And yes I have pictures…..
Great article. The shoulder tip was just what I was looking for.
I have used this method to ballast my HO layouts and found it to be very effective however I mix a little scenic sand in with the ballast which is tan in my case as the scenic sand is the same color. The sand makes the ballast stick better and does not show up once the glue has set. Just a thought.
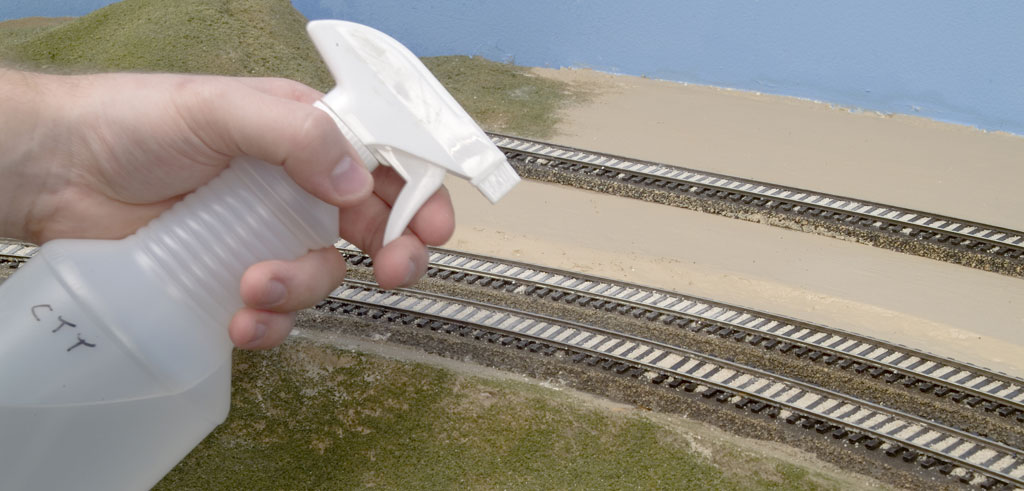
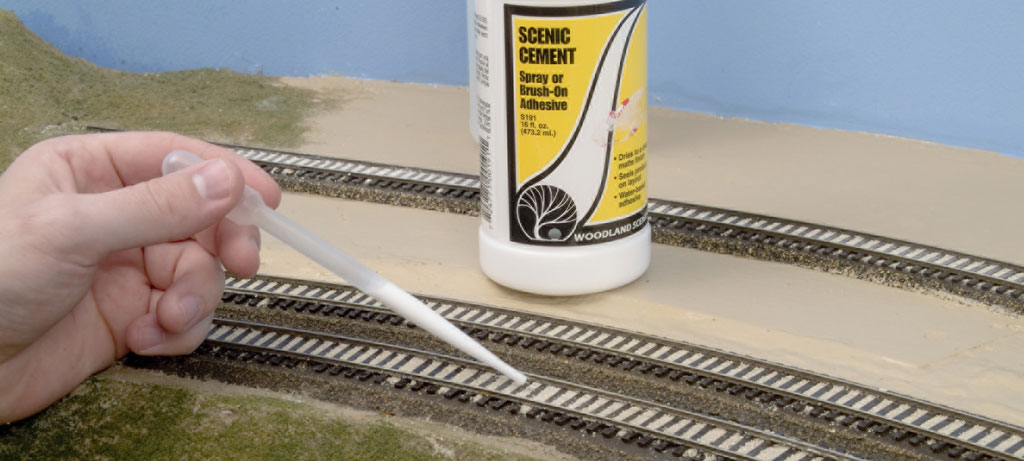
After painting the ties and edges of the rails and spreading the ballast with a soft brush, I wet the ballast with a fine sprayer (I use the Woodland Scenic Sprayer with water and a teaspoon or so of detergent). I then use a syringe filled with their Scenic Cement and run along between the rails and along the ballasted sides. It all seems to stay in place and is mighty quick…and solid. I take great care at turnouts – best with a dropper. With any white glue I find there is a slight shine on the ties against the light, so a slight weathering job seems a great idea.
Thanks Larry B. for adding the comment about the "bright boy" I was wondering about that, very soon I will be adding ballast to my layout. I wonder if running a beed of white glue to the angle side would help hold the ballast?
want to know if this method will work on a G scale layout with G scale Track? Thanks Jesse from Michigan
I spray the ballast with Windex or any other glass cleaner. Helps the 50/50 glue and water mix absorb better.
i really like it
Good article for beginners, but how do you ballast the turnouts and around Atlas snap switches? I assume very carefully.
"The second coat won't stay in place on the shoulders. It wants to roll down and pile up at the bottom"
same here
70% I P A won't burn straight let alone mixed 50:50 with water.
I tried the alcohol mix in the spray bottle but it kept blowing out the ballast. Some one on the Tyco forum suggested spraying UP and letting it mist down until soaked
Switched to 1 part decopage 3 parts water and a few drops of dish detergent in a glue bottle that works fine.
Still have trouble with the angled sides in getting a build up of ballast at the bottom while at the same time thin at the top edge
I am just getting into the hobby with a first attempt at doing scenery. This article will help a lot in my attempt. Confidence is something that only comes with experience and experience is something I don't have yet. You made it a little less intimidating. Thanks!
I use several layers of masking tape to build up a small lip to run the shoulders out to, let everything dry out then run a knife between the ballast & tape lifting the tape at the same time.
No alcohol in the water, just a drop of washing up liquid. apart from that all good info.
Alan
I am new to railroading in ho scale and found the article and comments very good, comments can save hours of labor, thanks a whole bunch.——–Don W.
I pretty much that same method on my layout & it worked well , the only thing with my layout is it is modular & do shows with it so my ballast had to be all glued down.
Dave
Sure simplifies the process. I have about 100 feet of unballasted track to finish. This article helps make it look easy. Thanks.
Sure is great to benefit from the experience of others. Ballasting clearly presented with a few new wrinkles in the process.
i have used this typ of method before but didnt know about the alcohol in with the soap and water i will try this on my n-scale layout thanks for this information.
dave rost -Indiana
Cody – quick question – I used the method as-described, and had difficulty with the second coat on the shoulders. I'm using Woodland Scenics Fine ballast, on HO track. The first coat went down as-expected. The second coat won't stay in place on the shoulders. It wants to roll down and pile up at the bottom. Any suggestions?
Also, quick comment – I changed over to using only wet-water, no alcohol. The alcohol content was actually softening the paint on the ties such that it would peel off if I tried removing stones while the glue was wet. Have you had this issue?
thanks much.
Kevin
How does that ballasting jig work as to the spoon method, I think it has a leveling gaugein between the rails .
This works really well. I use wet water instead of the alcohol.
Thanks
Bob
I am working on my first realistic layout, found the article very helpful.
I have used alcohol on medium grey ballast on my n scale layout and glue right after. No paint peel,and dry the next day.