


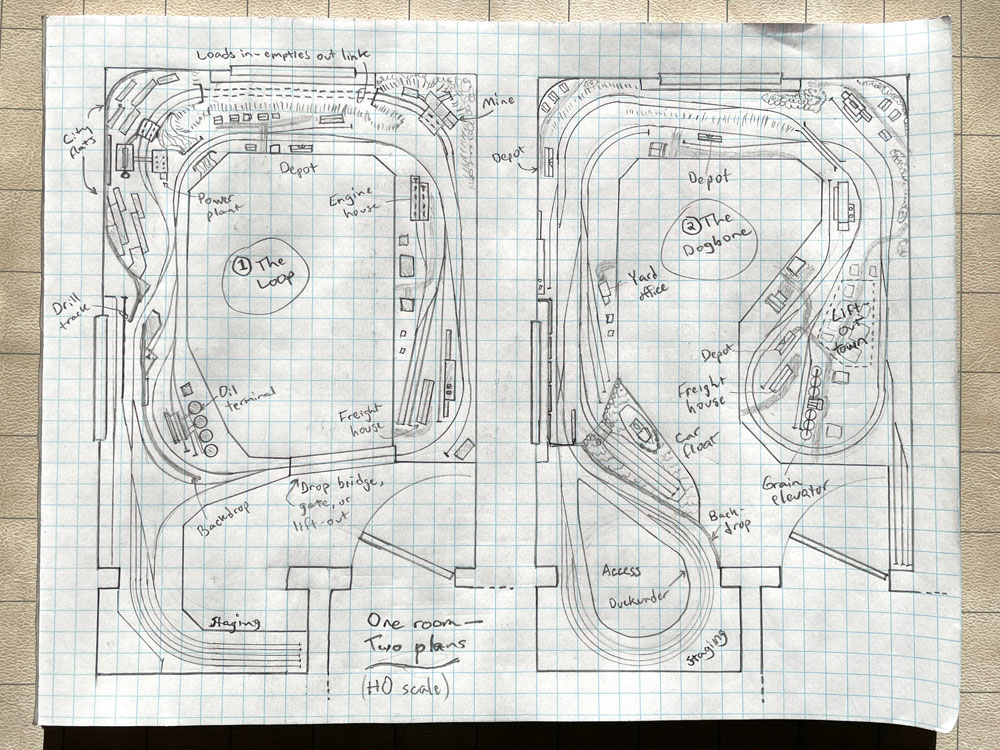
Finding the best approach for a track plan isn’t always easy. Even if you’re building your layout in a small room, you still have an almost infinite number of choices, decisions, and trade-offs to make. What scale? Around-the-room or island shape? Duckunder/gate or walk-in? Staging? And if so, what kind? To illustrate my thought process when planning a layout, I started with a generic 9 x 12-foot spare bedroom with a 2 x 5-foot nook representing a closet with the doors removed. Let’s look at the advantages and disadvantages of two design approaches.
My goal was not to model the same line in both plans, or even to include the same features in both. Rather, it was to explore what kind of operating interest I could wedge into a small room using two different track configurations: an around-the-walls loop with an entry gate or duckunder, and a dogbone with no obstructions to entry. Would my sketch show one or the other approach to be obviously superior for small rooms?
Common factors in both designs
To make the comparison fair, there were some factors that would have to be the same, most obviously the scale. I chose HO scale because I wanted to test which configuration works better in a small space, and a 9 x 12 room puts far fewer constraints on N scale than it does HO.
Second, I wanted continuous operation; when operating a small layout, it’s good to be able to put some laps on the odometer to make the layout feel bigger.
I wanted to include staging from which trains could enter the layout in either direction. That way, I would need to fit in only one staging yard to represent both “ends” of the railroad when operating point-to-point.
Finally, I adopted an 18” minimum curve radius.
Approach no. 1: The Loop
My first effort was the layout I labeled “The Loop.” This plan would rely on a duckunder, lift-out, drop-down, or swing gate to provide a continuous operating connection while allowing access to the center of the room. Its placement would be determined by the sweep of the door into the room. So the first feature I placed was a curved, stub-ended staging yard in the closet. In order to have the yard serve both ends of the layout, I needed to place a wye at the yard throat. I quickly realized I couldn’t do that without severely abbreviating the yard, so I incorporated the yard ladder into one leg of the wye. Adding a drill track will let trains in any yard track back into the wye to cross the bridge. I used 18-inch curves to make the wye as small as I could, I was still disheartened about how much space it took up in the room.
I adapted the best I could by placing some industries on the other side of a backdrop from the wye, like the oil terminal. The main line curves along the backdrop, paralleling one leg of the wye until it joins it to cross the bridge. The other exit from the wye emerges between some city buildings to join the main line farther up, limiting the number of turnouts I could place for spurs or passing tracks. In order to access the top-left corner of the room, I branched the track to the power plant off the line from staging rather than off the main – not ideal. If I were building this plan, I would join the mine branch to the main by crossing the staging lead on a diamond.
Placing the power plant immediately gave me the idea of making it a loads in-empties out arrangement with a coal mine in the opposite corner of the layout. In a layout this small, most freight would realistically originate from or terminate in staging, so a loads in-empties out arrangement adds some nice operating variety. Layers of low-profile buildings behind the power plant provides the feeling of a large city in a small space.
The next town along the line is rather close to the city scene. In order to keep it from feeling too close, I put a river traversed with a stone arch bridge between them for a visual break. I also placed a depot in the town, but no industries, and no depot in the industrial city. That way, neither a freight nor a passenger train should stop in both locations.
Leaving room for the door to open means the shelf on the room’s only long, unbroken wall is only 9-1/2 feet long, which is unfortunate for my plans of putting a working yard there. If I include a narrow industry between the main line at the back of the shelf and the yard, that leaves room for only a short three-track yard. Since an industry spur wouldn’t branch off a classification track, I put an engine house on the switchback. A longer yard and a drill track would be nice, but there’s just not enough length.
Approach no. 2: The Dogbone
Now let’s look at the plan on the right, “The Dogbone.” To avoid a duckunder or gate, this layout would need two turnback loops to provide the continuous operation option. The only way I could see to accomplish this was to put one of the loops into the closet. I tucked three long staging tracks inside the loop and put a double crossover at its throat so it could serve both “ends” of the main line.
If I placed the other loop as close to the door as I could, that didn’t leave a lot of room between the loops for industries. I could have put a stub-ended classification yard there, but I wanted more operating variety. A car float that can be fiddled during the operating session provides another source and destination for freight cars. Trains can originate from staging, transit the main line, and terminate at the car float or its small adjacent yard. That operational scheme appealed to me.
Since the main line would be passing through each scene twice, I decided to stagger stations so as to place them as far from each other as possible. Elevating the track along the back of the shelf on the left let me cross it over the main on the right so its spurs and structures could be in front on that side.
I wrapped a passing track around the outside of the turnback loop on the right side, which also gave me a good place to attach industry spurs. There’s plenty of room inside the loop for industries or a short yard. Since access to the back side of the loop would be difficult, I decided to put a town scene on an emergency lift-out structure and keep my industries to the front of the loop. A narrow three-track shelf behind the door can serve as fiddle staging or perhaps represent an interchange.
Finding the best approach for a track plan
So, which approach is the winner here? Though I’m not really happy with the lack of a large classification yard on the Dogbone, I think it has fewer compromises and more visual interest than the Loop. It has a longer main line with more distance between stations than the Loop, and the Dogbone’s three depots add the option of local passenger service the Loop lacks.
What other mainline configurations could fit in this size room? A 5 x 8-foot island would fit in the middle but wouldn’t take very good advantage of the space. At the other extreme, a helix in the closet could link two or three scenicked decks with a large lower staging yard. And N scale would open up even more options. There are almost endless possibilities, even in a spare bedroom. Break out your graph paper and sketch out all your ideas before settling on one.


I’ve been playing with a very similar track plan as the dogbone– my room of choice is closer to a 10 x 14 with a doorway in just about the place you have one. I calculated the riser length needed for the needed clearance at the bridge over/under on mine (3% for the first 4 feet, then 2% thereafter on one end and 2% on the other) and it would give me a basically up and down layout. By the time the track is high enough to cross over, it is time to go down again– not enough ‘flat’ running at either level to suite me. The table is in place now, so I’m playing with alternate patterns. Maybe an elevated ‘town’ on a separate line rising off the main line.
Hi Steve —
Great piece on small room layout design. I have two small bedroom possibilities now that kids have moved on. One in 10×10 and the other 10×11. Both have closets and windows. My question though has to do with how the layout covers the windows. In your two plans, (1) what is the height height of the layout? Is it even with the window sill? That would seem to be the case if I read the illustrations correctly. (2) I’ve never been comfortable “covering” a window opening with a layout unless you provide non duck-under access to the window for both maintenance and safety reasons. I know so many layout drawing plan views like these two show the layout “covering” the window but in reality, I don’t see how that works.
The Loop plan seems to give up a lot of real estate for staging. Another approach that isn’t often seen is to use “surround staging”. This is done by running a second loop of track around the outside of the layout, hidden by a low backdrop/inside buildings/under or behind scenery. While this gives you even more staging length than the three tracks, there needs to be a passing track so that the order and direction of staged trains can be varied. The drawbacks to this strategy are that it effectively makes your room smaller, and access to staging can be problematic.
Really excellent series, informative and widely applicable. Thanks Steve!
Thanks, Steve, for another great sketch and the process of weighing different layout pros and cons.