


As the author of Model Railroader’s “Ask MR” column, I get a lot of questions from readers. Usually I either know the answers or at least where I can find the answers for them. Sometimes, though, I get a question that stirs my imagination and prompts me to compose a more involved response. Such was the question I received in late April from Kevin Caddell.
I just moved and I need to downsize to a shelf layout. Any ideas for a shelf layout that you would recommend? The layout is going to be 1 x 5 feet. – Kevin
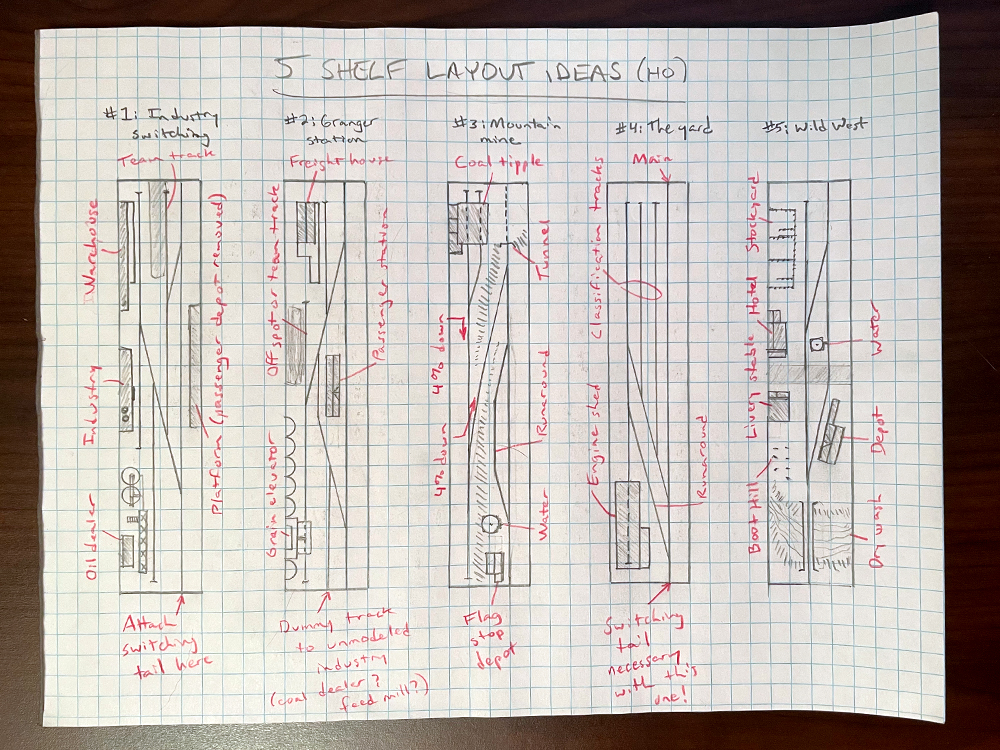
Since Kevin didn’t say what scale he was modeling in, I sketched up my ideas for a shelf layout in HO scale, because it’s the most popular. (I later found out he models in N scale, but adapting my ideas to a smaller scale just makes things easier for Kevin.) I sketched up five small switching layouts, trying to do my best to put the most operating potential possible on those small shelves. Each has a different theme, meant to appeal to different kinds of modelers – operators, scenery fans, or structure builders.
All five of the plans share some assumptions. First of all, the main line extends off both sides of the layout, so it could be incorporated into a larger layout if another move takes place later.
Second, in order to maximize the length of sidings, I used no. 4 turnouts. Likewise, I’m assuming a short wheelbase locomotive and 40-foot freight cars.
In spite of these space-saving tactics, some plans still require a removable switching tail, two to three feet long, to be operable. It should be simple to build such a single-track cassette and store it away when the layout is not in use.
Let’s take a look at my five ideas for a shelf layout.
Plan 1: Industrial zone
When I started out in this hobby, switching puzzles were a big thing. Modelers designed (and often built) tiny modules and challenged each other to switch all the sidings in the least time or the fewest number of moves. Legendary model railroader John Allen designed the most famous one, the Timesaver, leading people to start incorporating its track arrangement into their home layouts – forgetting that the point of a switching puzzle was to be difficult to switch, the opposite of the prototype’s goal.
Although I didn’t want to make my first 1 x 5 plan purposely difficult to work, I drew inspiration from those switching puzzles of old when it came to packing in as many car spots as possible. A factory, a warehouse, and an oil dealer offer a variety of car types to receive and ship; the team track, as a “universal industry,” can receive any kind of car. Since there wasn’t space for a depot, I acknowledge the history of this modern-era layout by including the edge of a concrete slab where a depot once stood.
The central passing track, at 18 inches long, should be able to handle four 40-foot HO scale cars or two cars and a four-axle road switcher. Bringing in a four-car local freight job from the detachable staging/switching cassette, servicing all the spurs, and assembling the outbound train should provide a fun half hour’s activity.
Plan 2: Granger station
This plan steps back in time to the 1960s to appeal to fans of Midwestern small-town railroading. There aren’t as many structures on this track plan as on the previous one, but there are still plenty of spots to switch: a grain elevator, a freight house, a team track, a house track behind the depot, and a spur representing an unmodeled industry. There are plenty of options for this last track that would be appropriate for a small rural town, like a coal dealer, lumber dealer, dairy, cannery, packing plant, or feed mill. But the elevator should provide most of the traffic in this town, and part of the local’s job will be to rearrange those cars as they get loaded, complicating maneuvers.
This plan is designed with the thought in mind that it will eventually become part of a larger layout, extending the main lines in either direction. The runaround track being longer than the one in the previous track plan unfortunately makes the tail tracks on either end long enough to hold only the locomotive. Again, a removable switching tail is needed to make this workable as a standalone module.
Plan 3: Mountain mine
There’s only one industry on this track plan, but the steep mountain switchback should keep the local freight’s operator busy servicing it. The passing track will hold two 40-foot coal hoppers, and the spur in the tunnel should be just long enough for one hopper and a short engine. Taking empties up the hill one at a time and returning with loaded hoppers will therefore take several trips (and careful planning). Depending on the era in which you decide to set the layout, the water tank might be a relic of days gone by, or it might be another important stop in a steam locomotive’s operating scheme. The tunnel, the changes in elevation, and the Appalachian setting provide plenty of opportunity for interesting scenery in this small space.
Plan 4: Classification yard
Going in the opposite direction, this is a layout that’s all operation, with almost no scenery. This is the design for the operator who’s content to spend an entire session as yardmaster, making up and breaking down trains. With only three tracks to work with (though the main could be turned into a fourth), those trains can’t be all that long, but that’s the kind of challenge that yardmasters love. The detachable switching tail is mandatory for this plan; make it at least as long as your longest yard track. To fill in the empty corner and add some modeling interest to this otherwise plain slab of terrain, I added a single-stall enginehouse. A craftsman wood kit would be a real standout.
Plan 5: Wild, wild West
I decided to just have fun with the final plan. There’s not much operation to be had here; this plan is for the modeler who likes interesting scenery and structures. It’s set in the American Southwest in the late 19th century, which means 4-4-0 steam engines and short, open-platform passenger equipment. There’s a livery stable, a saloon/hotel, and a Boot Hill cemetery scene to give the town that cowboy atmosphere. And speaking of cows, the one industry spur in town is, of course, a stockyard. The dry wash on the edge of town could make way for more track and structures, but it adds a lot of scenic interest to what would be a fun, conversation-starting display.
I stopped sketching only because I ran out of time and graph paper. I could think up a lot more possibilities, even in such a restrictive space. What could you do in just five square feet?


Hello, I’m interested in these plans, especially the Mountain Mine one, for a small layout to be placed on a fireplace mantel. Using 4% grades as shown in the sketch I get around 2in elevation for the track where the coal tipple is located. Is that correct?
If so, what would be height of the mountain in front of the tipple where the tunnel is?I would think the clearance inside the tunnels should be at least 3in that would make the top of the tunnel higher than the track where the coal tipple is located.
Am I missing something? I’m struggling to picture in my head how this would look like.