


Sketching with Steve
The good old 4 x 8 train table is a tradition – if not a cliché – for a reason: plywood comes in 4 x 8-foot sheets. When our dads or grandpas bought us our first train sets for Christmas, they often nailed that simple oval or figure-8 onto a table made of one sheet of plywood. It’s simple to build and fits your basic HO scale oval with room to spare.
But there’s only so much you can do with a 4 x 8. Take a look at some of the plans Kalmbach compiled in one of its best-selling books, 101 Track Plans for Model Railroaders (which is still available in the Kalmbach Hobby Store, KalmbachHobbyStore.com). Most of the plans maximize the main line with a twice-around approach, sending one loop climbing up and over the other. But even those that use very tight curves (15” radius) have room for only a handful of spur tracks and sidings. Some don’t even have passing tracks.
Here’s a question: If you’re already cutting up the plywood sheet to lift the grade up and over, why are you still limiting yourself to the size that plywood used to be? Let’s see what we can do with a twice-around plan if we add just one foot to dimension of the table, making it a 5 x 9.
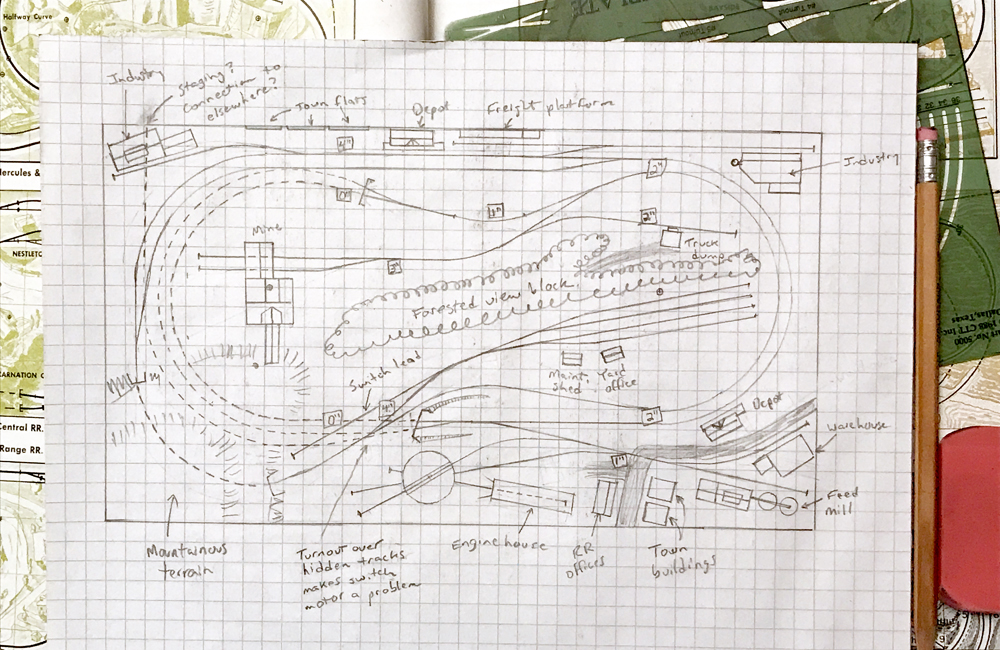
I began by plotting out the two nested curves on the right and the grade-separated curves on the left, then connected them with straightaways and 18” radius curve sections. The elevations are based on a rise of 1/2” per foot of track, which is just a hair over a 4 percent grade – a little steep, but doable by a single locomotive pulling a train of length appropriate for this size railroad, four to eight cars.
To maximize realism – something that twice-around plans often lack – I decided to hide one end of both loops in tunnels. The mountainous terrain this would require suggests setting the layout in coal country, so I added a switchback coal branch in the middle of the layout, with a simple truck dump on one end and a sizable mine tipple on the other. On the other side of the main loop I placed a coal-marshaling yard where empties and loads can be exchanged and coal trains assembled. I’ve positioned the turnouts to these two destinations so a train moving clockwise around the loops can switch both as trailing-point turnouts.
Now, where could those coal trains go? I’ve already put a passing track inside the lower-level tunnel; that could be used to stage an empty hopper train and receive a loaded one when the session is through. If we can assume we’ll control turnouts on the layout with remote-control switch motors, we can add another turnout just inside a tunnel portal to add a stub-ended track. This can either be used as a single muzzle-loaded staging track or lead to a separate staging yard attached at top left. Either way, be sure to build your mountain for easy access in case of derailments.
Speaking of switch motors, there’s one place where that will be a problem: the turnout leading to the coal marshaling yard. Falling as it does directly on top of the hidden trackage, it will require either manual control or a switch motor positioned under a structure off to the side of the track.
There’s a nice large area at bottom right that seems perfect for a town scene with a couple industries. By employing a switchback we can also include a small engine servicing area. Since there isn’t space for a coal tower, water tank, or particularly large turntable, we’ll have to set our layout in the early diesel era and work the layout with a Geep or Alco road switcher.
A depot and a couple of industries at the top of the plan, and we have a destination for a local freight or mixed train in addition to the coal traffic. This train should also run clockwise, or else four of its five industrial spurs will be facing-points.
The one thing I’m not happy with about this plan: with a 5-foot wide table, the reach-in distance to the coal marshaling yard is an issue. At 6’-4” tall, I can reach in 2-1/2 feet easily, but not everyone can. The approach to the yard could be curved more to bring it closer to the main line, reducing the reach, but that would also necessitate reducing the length or number of tracks. I could have put the yard where the town is – there’s plenty of width – but the length is again an issue. Or you could eliminate the town and engine servicing area, reducing that end of the layout to 4 feet wide, but that sacrifices a lot of interesting operation. Perhaps another solution will present itself later. After all, this is just a sketch.


I remember track plans that us a 4×8 sheet and making cuts to make puzzle pieces. They were reassembled into 5×9 with a center hole. I don’t know if it was an article or magazine.
I did a 5×9 on a tablet tennis table. I covered the table area with 2 layers of 1/2″ insulation foam board and eventually glued them together. I did not glue the foam to the table. But before that I modified an MR 4×8 plan by making 22″ curves on the outside and an elevated loop cutting across the middle into a hill area with a mine over the lower 2 loops. The larger curves allowed lots of space for yards, sawmill and small warehouse / downtown village. I laid my track and drilled 1/2 holes through the foam where Atlas under-the-table switch machines would connect with the track switch on top. I then glued the foam layers together and created my hard shell scenery. I was then able to flip the foam ‘sandwich’ on its side and cut rectangles out of the bottom foam layer for the switch machines and ran wires from each switch machine over to one side where I built a control panel bolted to the table. The foam is not glued to the table tennis table. This way the 5X9 layout is quite light and can be carried out a door when I move or sell it. My track design resulted in 2 reverse loops. As I am using Bachmann E-Z DCC I installed DCC reverse loop controllers. I bought mini 3-wire connectors to allow for the control panel to be disconnected from the layout.
Although my principal modeling is in Sn3, I also have a smaller HOn3 endeavor at our seasonal home in California. I dredged up an old plan from the January 1961 issue of MR for “The Drago and East Ridge” by Don Reschenberg which I modified by adding a foot in each direction. That allowed me to increase the minimum radius to 20″ (from the original 18″) and upgrade to #6 turnouts…as well as yield a bit more overall space.
One of my criticisms of Railway Modeller, is the lack of small layout plans. 17ft x 17ft as shown in the latest addition of MR is not small by beginners standards. Young modellers cannot afford the cost of large layouts. Cost is a major factor. 8X4 does not allow much scope beyond the toy train scheme. However cuttting the 8×4 to make a round the room scheme, makes for larger radius curves and more prototypical operation. If we wish to introduce more young people into our hobby, we need to show more low cost ideas. Fine scale modelling on a layout the size of a warehouse is fine for those who can afford it. But it would be nice to see some inspirational layout built from a 8×4 sheet built for less than 500 dollars. The Beer Line project was the best thing MR has done in years. I am sure that a similar project would attract more new people to our hobby.
Whilst the manufacturers may not like cheap builds, they will ultimately benefit if the the rail bug becomes a life long hobby.
Nice layout idea, but you have raised an important concern about reach with a 5 foot width. I did an N gauge with a 5′ width and thought it would be wonderful for the wide curves it would allow. Unfortunately, with age, I am now down to 5′ 10″ and discovered that the middle of the layout was impossible to reach and work effectively; so I had to build a bench to stand on, which added a foot or more to my height and made working in the middle possible (but still presented some problems). My best advice for some one if you do this is: always start work in the middle and move out to the edges.
I started my track plan with one quite typical and very similar to what you show. Within reason, there were few things limiting the size of the layout I could build but I settled for 12′ x 8′ with 2, 24″ square “access” areas in the layout.
Both have removable “tops” with landscaping and scenery. One even has a siding for the cattle yards.
Scenery covers the “back” of the layout where it is against the wall/backdrop. Last year, I had an issue with a track joint under the scenery and had to pull the layout away from the wall 2′ to get access.
Solution? I am putting casters on 8 of the 16 “legs” of the table so I can be rolled away from the wall if/as needed.
The layout is attached to the wall with 2 ⅜” studs that go through the rear 2x4s of the table structure.
I just remove 2 nuts and roll out the entire layout.
I like it (as I do MR’s project The Virginian). Both of these would do well as 4×8 in N scale. I model in N and am looking at down sizing to a retirement home. Your sketch has got me interested for my retirement layout. Graham from New Zealand.