


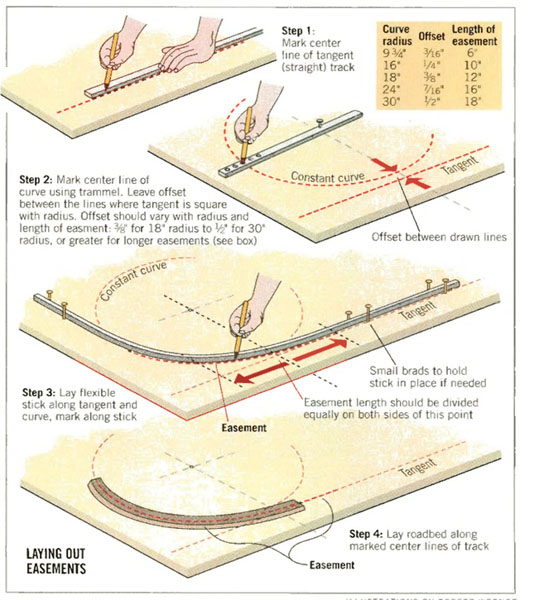
Your trains will look better and long rolling stock will track more reliably if you add an easement between the straight and curved track. An easement is a gradual transition, or a very broad non-concentric curve, inserted between the tangent track and the circular curve.
Obviously, you can’t have a true easement with sectional track, although if possible you might want to insert a broader radius curve, like a 22″-radius section, between the straight track and the 18″-radius sections. Whether you’re using flextrack or handlaying your track you’ll find easements will keep things running smoother and looking better.
The prototype uses all kinds of fancy formulas to figure out easements, and you can spend a lot of time adapting those same formulas for model railroad use. But that’s hardly necessary. I plot easements using nothing more complex than a pencil and a flexible piece of wood.
Start by drawing the center line of the tangent track directly on the subroadbed. To ensure a constant radius curve use a trammel, which is nothing more than a piece of wood (a 1 x 1 works fine) with a hole for a screw or nail at one end and holes big enough to clear a pencil every inch starting with your minimum radius and ending up with the largest practical radius. Or you can use a template made from styrene, Masonite, or cardstock, cut to the desired curve.
Draw a circular curve of the desired radius. Don’t connect this line to the center line for the tangent track – instead leave a slight offset, about 1/2″ to 3/4″, between the two lines. The offset and length of the easement varies with the curve radius. For an 18″-radius curve the offset is 3/8″, with a 12″-long easement. The offset is 1/2″ for a 30″- radius curve, with an 18″-long easement. Mark the point where the tangent is square with the radius and equally divide the length of the easement on both sides of that mark.
Now you’re ready to mark the center line of the easement. Use a piece of flexible wood molding. Hold the wood along the center line of the tangent and bend it to match the radius of the curve you already marked. For very large curves you may need to temporarily drive a few small brads along the molding to hold it in place. Once you’re satisfied with the alignment trace along the molding with a pencil, creating a nice smooth transition. Remove the molding and lay your roadbed or track in place along the center lines.
This is a simple way to lay curved track with an easement. A detailed explanation of easements, complete with a table showing suggested measurements for various curves, can be found in John Armstrong’s Track Planning for Realistic Operation (Kalmbach). John also presents convincing arguments for using easements.
Marty McGuirk is a former associate editor of Model Railroader magazine. This article was first published in the November 2001 issue.


Hello I’m new here my base board is 1300mm X 900mm and like to do atheist 3 mainlines Wat curved track would I need I’ve seen them as rad 1 rad 2 rad 3 but not sure what brand to use. if any one can help it be appreciated thank you.
track nails works from atlas
My belated father taught me the same way as you described G Michael Kostelac. It still proves to be the most economical and easiest way to draw radius.
Many years ago a gentleman got me started in HO trains. One thing he taught me was that for drawing a radius he used a simple and time tested yardstick. This saving measuring. If I drill a hole at the one inch mark, then for a 15″ radius I would drill a small pencil hole at the 16″ mark and so on for each need radius. I too had problems following some of the instructions especially for the “offset”. What side of the tangent would this be on. Pictures would certainly be very helpful.
When I do and easement, I do the offset as described in the article. I then measure about 6″ to 8″ inches on either side of the tangent point of the straight track and where the curve would start if no easement was going to be used. I then spike the track down along the curve to the 6″ or 8″ inch point before the true tangent point. I then spike the straight section of track and again only up to the 6″ to 8″ inch point before the true tangent point. You now have 12″ to 16″ of track with out any spikes. Now look at the curve, the flex track should float gently from the strait track to the curve with an ever increasing curve. The track closest to the straight track may need a little help and be straighten a little as you spike the track around you easement. I found just letting the track float around the curve makes for a nice gentle easement.
I’ve been using this method for some time however I’ve found that 6mm (1/4″) dowel is quite durable and very flexible. I can concur that the results are very good.
What kind of wood is that flexible?
I have no problem following the description myself. However, if the distance to be increased in N scale is 1/2″ that means in HO that’s an inch and O it would be two inches. That 1/2-3/8 of an inch isn’t universal.
Seems simple enough to me.
WOW. Great article. Ive been looking for an explanation just like this. Graphic with chart is great.
Wow, this showed up out of the blue! Been a long time.
Don’t see the problem. I think this is clear, and the drawing is easy to understand…
Look at the diagram. IT’S VERY SIMPLE.
As others have stated, graphics would be nice.
Bring on the "fancy formulas" the prototypes use. They couldn't be more confusing than this easement description. Does anyone read these comments? Why hasn’t a clarifying graphic been added?
Very confusing description and no graphics to refer to.
MR used to have downloadable PDF files of easement templates online. I have been searching, and it appears that they have removed them.
The offset is to the outside of the curve. So, a 30" radius curve slowly transitions to a 30 and 1/2" radius in the last 18" before meeting the tangent, using the formula above.
Well, that was clear as mud.
The "Offset" can be built by constructing a line parallel to the Tangent (strait) track at 18 3/8" (18"Radius curve + 3/8" offset) apart. Set the center point of the 18"R on the parallel line. Where the 18"R curve does not reach the track center line is the "Offset". Draw a line from the 18"R center point, square to the Tangent track. From this intersection, measure and mark half the easement length each direction. Anchor the bending stick on the Tangent track up to this measurement mark. Bend the stick towards the 18"R curve until it smoothly aligns with the 18"R curve near it's measurement mark (Hint: grasp the free end of the bending stick well-past the 18"R curve). Anchor the stick and mark the easement center line.
I would like to know what the "offset" is. Offset to the inside of the track center? Offset to the outside? I suspect it is to the inside. I guess I will just have to play with this and figure it out.
Greek. Is there an english transaltion?
Made some headway, however, a video would be great.
Going to give it a try. It depends on how wide I can go with the curve without running out of room. The room is only 7 feet wide and I'm using S Scale flex track.
I am having trouble with these written easement "how to's". How about a video?
Several options, track spikes, caulking, small nails, and diluted white glue as well as full strength glue have been used. I like nails and I use a nail set to drive them to contact with the tops of the ties. Do not drive them so tight that they bow the track. If you go through some of the books published by the folks that bring you this web site you will find an answer that works for you.