


3-D print a rail cart porta-potty: A requirement of a modern railroad, besides moving freight and passengers, is addressing the needs of the employees while on the job. This includes, of course, all of the workers, from the office personnel devising service plans to the maintenance-of-way crews doing track upkeep. As modelers, we only become concerned with this when it becomes a visible part of our railroad operation. A typical assembly of maintenance-of-way equipment might include equipment such as tie cranes, ballast regulators, and laser alignment carts, just to name a few.
In recent years, a new addition has joined the maintenance lineup: the rail cart porta-potty.
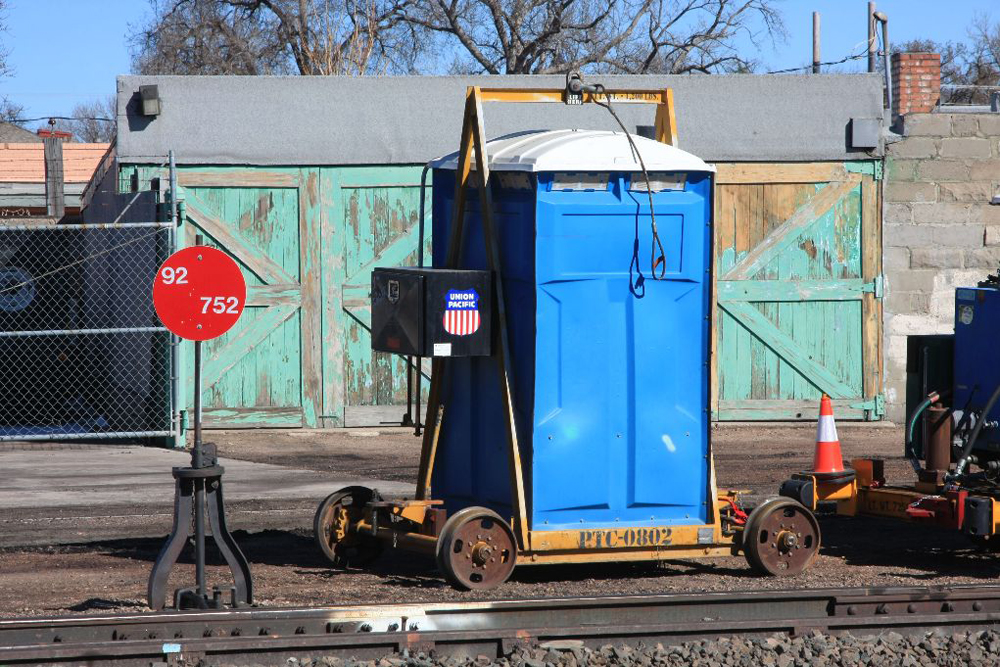
The cart moves with the crew as their work progresses along the right-of-way. The base for the is a rail chassis designed by the railroad or a railway equipment supplier, and outfitted with a standard porta-potty of the sort one may see at a construction site. Several variations of the chassis can be found on the internet. Some have ladders, platforms with handrails, auxiliary water tanks, etc. I was inspired by the design that seems to be widely used by the Union Pacific RR throughout its system.
I determined that this was going to be a resin printing project. The missing link was a detailed dimensional drawing of the actual rail cart. The cart manufacturer stated that the wheels were 16” in diameter. From this dimension, I was able to reasonably scale the necessary dimensions to develop a complete 3-D model.
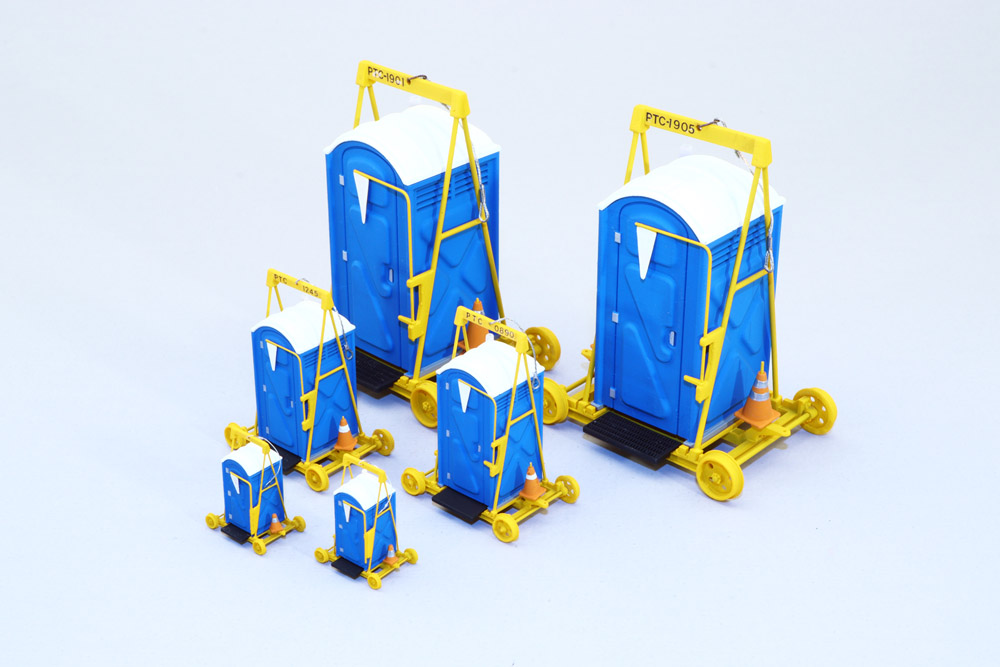
The next step was to divide the project into individual parts that would make it conducive to supporting, 3-D printing, painting, and assembling. Initially, I developed the 3-D model for O scale. Then, using the scaling feature of the modeling software, I was able to concurrently print the project in O, HO, and N scale in a single printing session on one build plate. A few components of the N scale version were combined into one unit because of their small size.
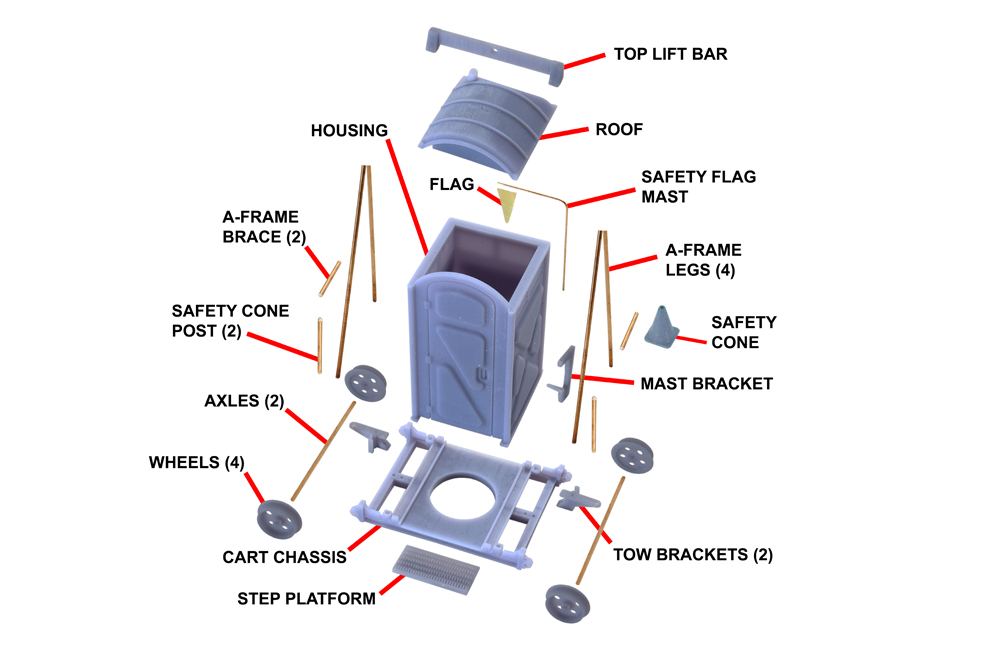
Tichy Train Group was the source for the various diameters of bronze wire used throughout the project. I cut the bronze wire pieces slightly longer than the dimensions shown on the chart. This allowed me to remove any burrs or deformities caused by cutting and to bring the pieces to finished length. The exact length of each piece isn’t critical. However, it’s important to keep the four legs of the A-frame equal to allow it to sit evenly on the cart chassis.
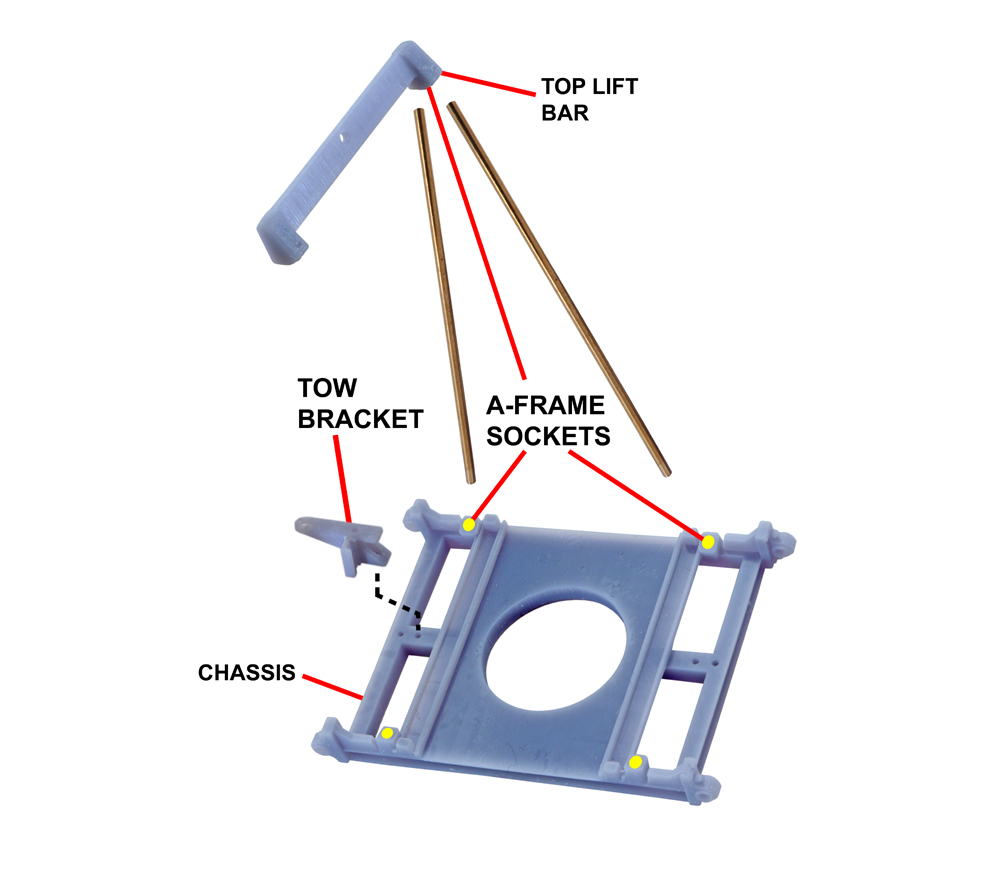
With all of the wires finished to an appropriate length, I was now able to assemble the cart, securing all joints with thin cyanoacrylate adhesive (CA). I began by installing the axles, wheels, tow brackets, and safety cone posts at each end of the chassis. The four bronze legs of the A-frame were inserted into the sockets on the chassis and top lift bar. I then checked the assembly for straightness and used CA to bond the dissimilar materials.
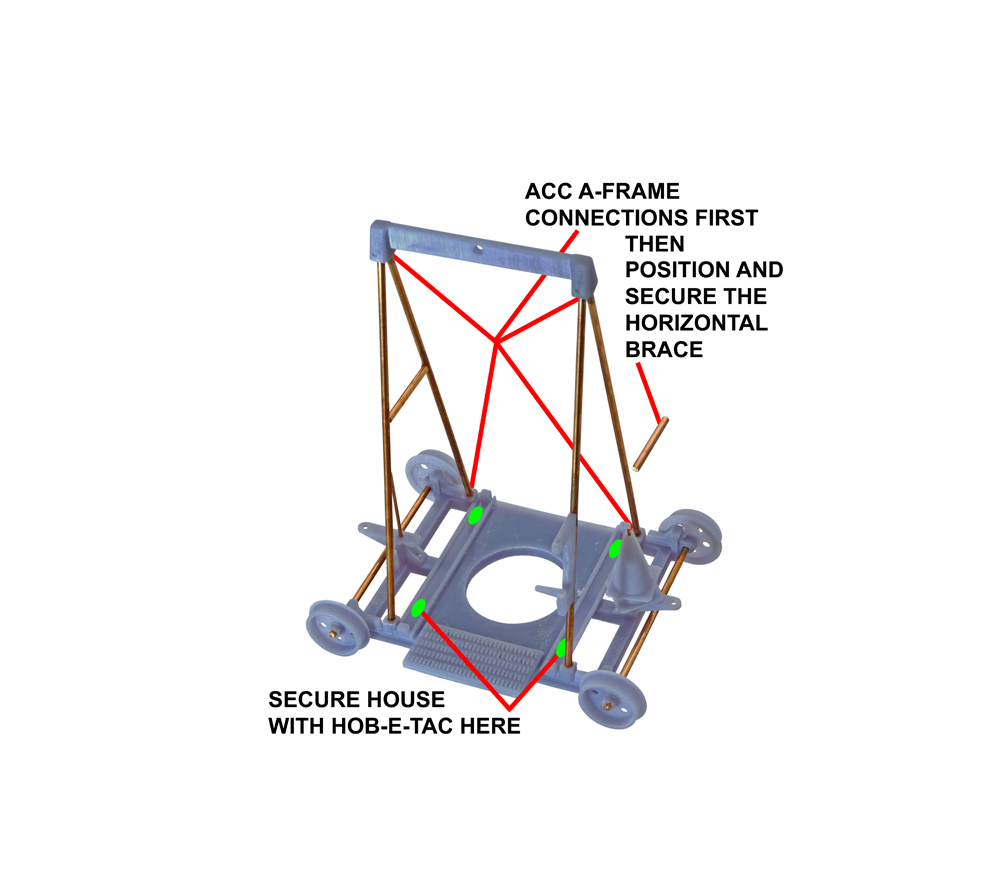
Once this basic frame was assembled, I was able to locate and secure the two horizontal braces to the A-frame. I then attached the safety flag bracket to the A-frame. The mast for the safety flag is bent at a 90-degree angle and sized for each scale to match the prototype.
I made the safety flag, for all scales, using .005” thick brass and soldered it to the mast. Cyanoacrylate adhesive could be used here instead of solder.
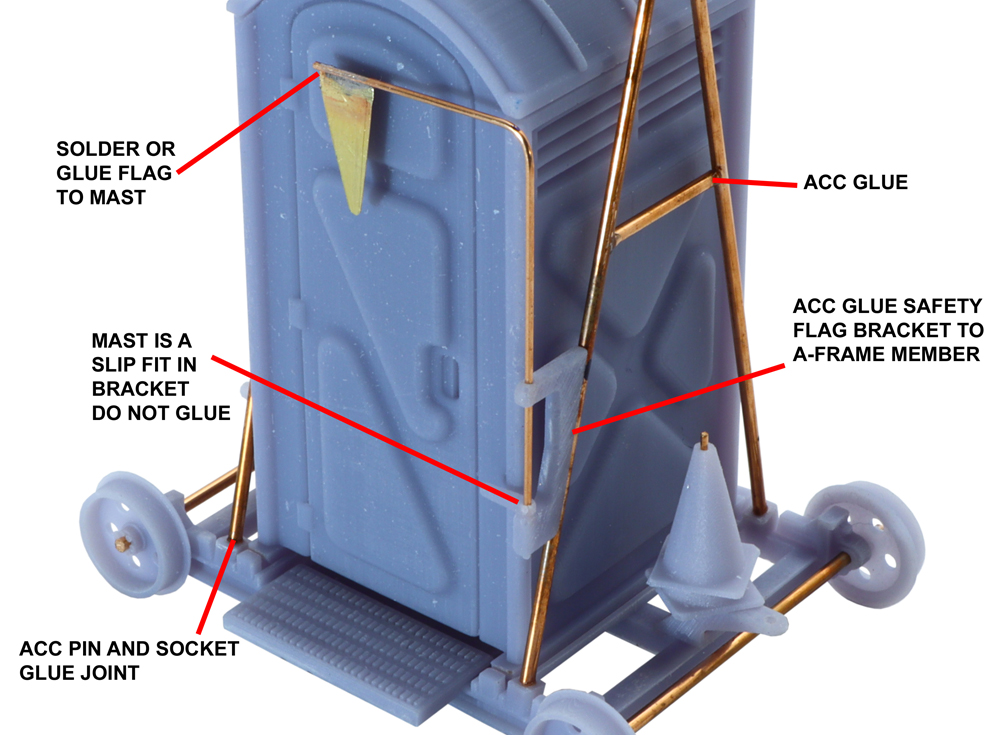
The safety flag and mast assembly should drop into the openings on the flag bracket. Don’t glue the mast as it should swing out freely as on the prototype. Due to the small size, the N scale version is permanently secured in the closed position.
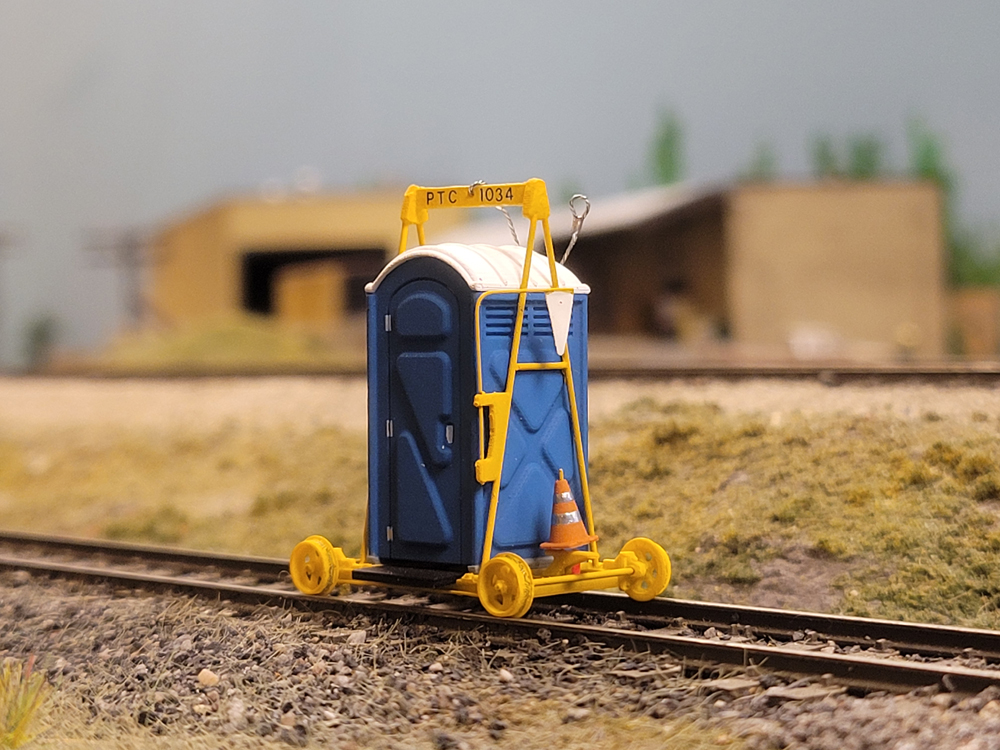
I painted the assembled cart safety yellow (Railbox yellow works well for this). If not available, 32 parts of yellow to 1 part of red should be close to an acceptable shade. I painted the porta-potty housing Amtrak blue, the roof and safety flag white, and the step platform black. The colors for the porta-potty can vary widely depending on the railroad, so refer to prototype photos if possible.
I then cut individual letters and numbers from a Microscale decal sheet and applied them to the top lift bar. Using decal remnants from past projects, I cut small silver rectangles to represent the hinges and door latch, appropriate to each scale, and secured them in position with decal setting solution. Later, I applied Testor’s Dullcote to hide the decal edges and give the model a uniform, flat finish.
I then mounted the finished porta-potty to the rail cart with Woodland Scenics Hob-e-Tac. This would allow future removal, if necessary. To complete the project, I fashioned a lifting cable by stripping the insulation from a length of 28 gauge stranded electrical wire for the O scale version. I removed individual strands to make the wire thinner for the HO and N scale versions.
I attached the cable to the top lift bar with a small loop at one end and a loop at the opposite end for lifting. I placed the safety cones on the mounting posts and the porta-potty cart was ready for service.
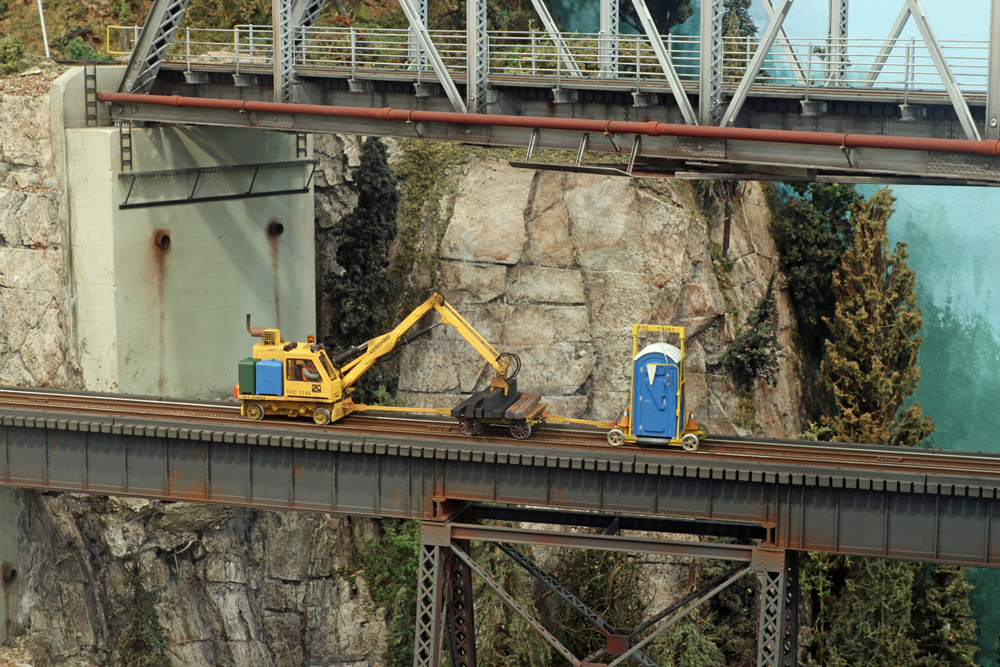
The cart may be displayed on your railroad in a variety of ways. If you have MOW equipment it will be right at home joining that lineup or parked on a siding near a worksite. Many times, the crew, using a crane, will lift the cart off of the rails and simply place it on the ground adjacent to the track. If you don’t have MOW equipment a few of these carts together can make an interesting flatcar load as they are moved from one worksite to another.
The porta-potty house, minus the rail cart, can also be used as a standalone feature placed anywhere near an industry or construction site on your layout. Using this rail cart porta-potty is one sure way to help reduce any Occupational Safety and Health Administration violations that may occur during track maintenance on your modern era railroad.
To 3-D print a rail cart porta-potty for your layout, download the files below, available in O, HO and N scale.
Rail cart porta-potty, O scale
Rail cart porta-potty, HO scale


What is new is old. Anyone remember Whit Towers’ biffies?
http://www.wrightfield.com/oldstuff/caboosenet/RAILS/Biffy/
Steve Prevette bhbf.weebly.com