


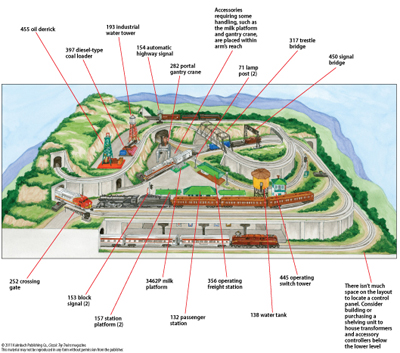
Layout designer: Ray Stuber
Scale: O
Layout size: 6 x 10 feet
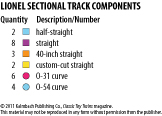
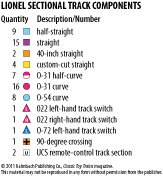
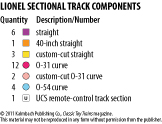
Track type: Lionel O
Minimum curve: O-31
Originally appeared in the March 2011 issue of Classic Toy Trains.
Click on the link to download a PDF of this track plan.
How to Build
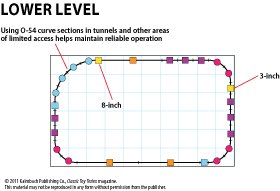
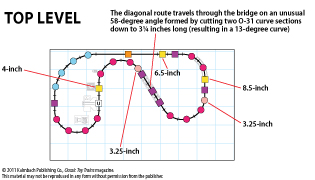
A couple of points before construction: First, there is an error on the lower level track plan – the 3-inch section should be 8 inches. Also, if you intend to build the layout, mock-up a few sections of the layout before you start. Make sure the clearance along the back on the middle level allows for 15-inch cars. You can move the figure 8 section over a little if necessary. Also, the bridge pier as well as the bridge at the top on the upper level needs to be carefully located. The overhang on the cab of steam engines can hit the bridge if too close to the curve.
Build the layout bench work in four steps:
1. FRAME (Figure 1)
2. LOWER LEVEL (Figure 2)
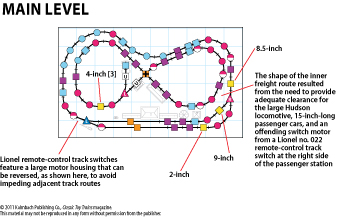
3. MIDDLE LEVEL (Figure 3)
4. UPPER LEVEL (Figure 4)
FRAME
Construct out of 1 x 4s or 2 x 4s for the lengthwise (10 foot) pieces, depending on how many legs you intend to use. At each end, add a frame piece 4 inches over from the end piece which supports a 1 x 6, providing the base for the lower level track as well as serving as an attach point for the risers supporting the middle level. The other 5 frames can be on 18-inch centers.
LOWER LEVEL
Add 1 x 12s 18 inches long in 3 of the corners for the O-31 curves. In the upper left corner, add a 1 x 12 2 feet long and another 18 inches long to support the O-54 curve. Add 1 x 6s along the back, front, and sides for the lower level track base. Decide on the roadbed you want to use (if any) and determine the height you need for the risers that support the middle level. Take into account the height of the track and tallest equipment you want to operate; I would suggest 11 or 12 inches minimum. (11 inches would make it easier to cut the risers out of 1 x 12s.) On the right side, attach 1 x 2s on each side of the risers to provide a base where the middle level plywood sections join. Add the lower level roadbed and track and test
MIDDLE LEVEL
The middle level could be constructed from 2 4 x 8 sheets of 3/4ths plywood. You could also use half inch, just make sure you have enough risers. The 2 x 4 pieces left over can be used to complete the base on the right side. Make sure you have enough clearance along the back for 15-inch cars and your engines. Add the roadbed and track.
UPPER LEVEL
The upper level could be constructed out of a 4 x 8 sheet of half inch plywood. You may need an extra 2 x 4 piece for the section over the double tracked tunnel. Use the cookie cutter method to build this level. Again, determine the clearances you need and add the risers. Place on the middle level, add the track, and enjoy your new layout!
Download the PDF below to see a diagram of each level.


can this layout fit on an8ftx8ft