


Giving your trains a permanent home starts with building a train table. Here are two popular construction types: butt-jointed and L-girder. We’ll show you how to build a simple 4 x 8-foot train table using both techniques.
Modelers have been using these method since the early years of the hobby. In fact, the information and diagrams are borrowed from a 20-plus-year-old Kalmbach publication, Small Railroads You Can Build.
Download free PDF plans for basic train tables.
How to build a train table
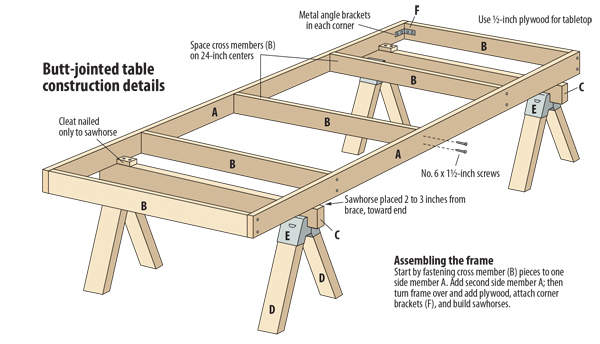
The size, 4 x 8 feet, is the traditional starter train table for the good reason. It’s the standard size of a sheet of plywood. This is just a starting point for your O or S gauge railroad; you can use these techniques to build larger layouts as well.
These tabletops can be assembled with only a few tools: saw, drill, hammer, measuring tape or yardstick, and screwdriver. That allows you to complete the carpentry stage quickly.
First considerations
Before you dive into construction, you should consider the height of your table. A height of 40 to 48 inches – several inches higher than the average table or desk – is usually considered comfortable. Trains look more impressive running closer to eye level, but layouts above 50 inches are difficult to work on without standing on some kind of platform.
Butt-jointed framework is best if the table needs to be portable. The frame and top can remain separate from the legs, and the layout can be stored by leaning it against a wall where it will take up very little space. The disadvantage of the butt-jointed system is that the cross members (labeled B on the illustration above) must be accurately cut to the same length.
The L-girder design is most often chosen for extensive layouts. It’s heavier and once built is more difficult to disassemble.
Off to the lumberyard
With height and type of construction determined, you’re ready to visit your local home improvement center or lumberyard. Common-grade pine is adequate for framework, but you may find the cheapest grades to be badly knotted, warped, or twisted. As your lumber needs are fairly modest, premium grade pine may be a better choice. If you do not have a saw, most lumber dealers will be willing to cut pieces to length for a small fee.
Similar considerations apply to plywood. Utility-grade ½-inch-thick plywood plugged and sanded on one side is fine for a tabletop that will be covered by scenery. If you’re going for a painted surface, you may need to look at the better grades of plywood.
Wood or drywall screws make for secure joints. Having a drill and a driver will make the process go a lot faster.


new