


Having trouble viewing this video? Please visit our Video FAQ page
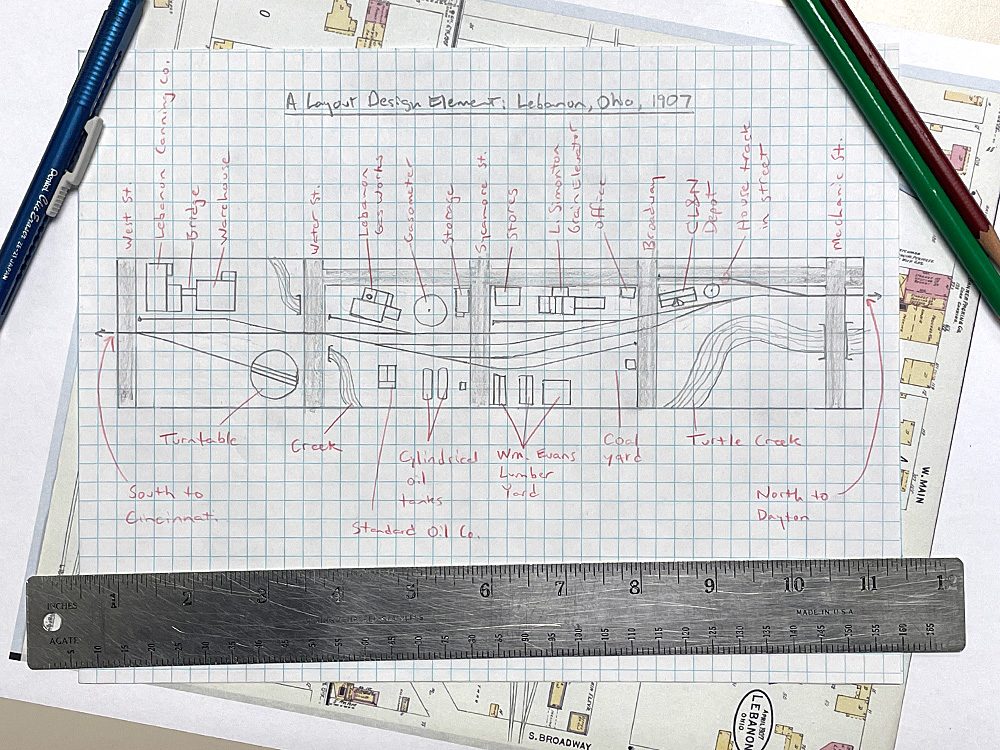
The plywood panels are now in place, and the track centerlines are all marked! In this episode of the Canadian Canyons series, it’s time for David to begin the track laying effort by first installing cork roadbed. Follow along, as he demonstrates tips and techniques for preparing the N scale cork material, and then applying the roadbed to straight, curved, and turnout sections on the layout.


I too have been using the centerline method of installing cork, but recently ran into a problem. I’m finishing laying cork on my layout and discovered that the last two boxes of Midwest HO cork were cut incorrectly. The cut between the two halves of each section resulted in one half being 3/16” wider than the other.
I contacted Midwest and they offered to send me a replacement. I declined since I didn’t want to wait.
My work-around has been to use two narrow halves together and two wide halves together. I’ve used them such that the narrow pieces are farthest from the aisle, where it appears smaller anyway.
I wonder if others have had this issue?
Great video, did you not want to paint the wood before install? Are you not worried about moisture and additional warping? David you always do a great job and we thank you for the hard work of you and the rest of the team here at MRVP.
Oh, brother. I just started watching this series with this part. I’m way ahead of this on my own layout. Well, I now have a lot of knowledge regarding how I should have done this. Question to self: Do I completely start over or…. Well done, Sir.
As always another great how to video. I have one question, All the layout building materials,structure kits, locomotives, rolling stock and all other items related to each project donated in consideration for mentioning their names or does MR purchased everything? Not trying to pry, just curious because building a layout is not cheap.
You can always teach an old dog new tricks, e.g. using t pins to position cork bed angles was just great. What I liked most was once confirming what I learned about model railroading for the last 65 years that is somewhere between precision engineering and an art form. It is ok to make mistakes and correct them as you go along. Thanks David for another great episode.
This was a very instructive video. Thanks David
Thanks David for another great instructional video. Cant wait to see how the layout progresses.
Still think I would rather lay down the cork sheets. Just make an overlay of your track centers and other lines you feel necessary before putting down the cork. Then trace the lines on the cork.
Understand your reason for not using cork sheets; but why do all the cutting and fitting when you could have used cork switch pads?
Yeah, I know, you’d have to do some cutting and fitting with them.
Hi David,
before you put down the road bed, you had the start and end points of all the turnouts marked. Why didn’t you transfer those markings to the outside of the cork as it went down, as now all those makings are lost. Were they important, or not really necessary for laying down the track later?
Nicely done… I see I have much to improve on for any extension to my layout. I did similar splicing with my cork roadbed when laying mine in HO scale, just not as neat as you did. Nor did I go back and sand the center ridges or sides to form a nice beveled edge for ballasting. Thus I’ve had to go back and repair certain areas to make my track more bullet-proof for operations. Thanks again for being a great teacher in this step-by-step process.
Great video David on laying cork roadbed, especially N scale which is a bit harder than HO scale. One comment. I had a mechanical drawing teacher who continually warned us about using scale rulers as either a drawing or cutting edge for fear of scaring the fine markings along the edge. Use a plain metal edge to cut, leave the scale ruler in the drawer. Thanks.
Thank you David I’m always learning new techniques.
Nitpicking I know, but Shouldn’t the segment be called installing Cork Roadbed as opposed to subroadbed. I always thought that the plywood was the subroadbed.
Excellent idea with the T pin marking where to cut for the angle in the cork. I always eyeballed it and usually had to cut it a couple times till angle was correct. I will try this next time.
Thanks
I like the T pin trick for making the roadbed cuts for the turnouts.