If you’re looking for a fun, easy-to-build detail for your structures, check out the Ne Series of HO scale neon sign kits, part of the Noble Gas & Tungsten line from DVL Design LLC. As of press time, there are more than 200 sign designs; three etched-metal frame styles — grid, open, and panel; and six light-emitting-diode (LED) colors — amber, blue, green, red, white, and yellow.
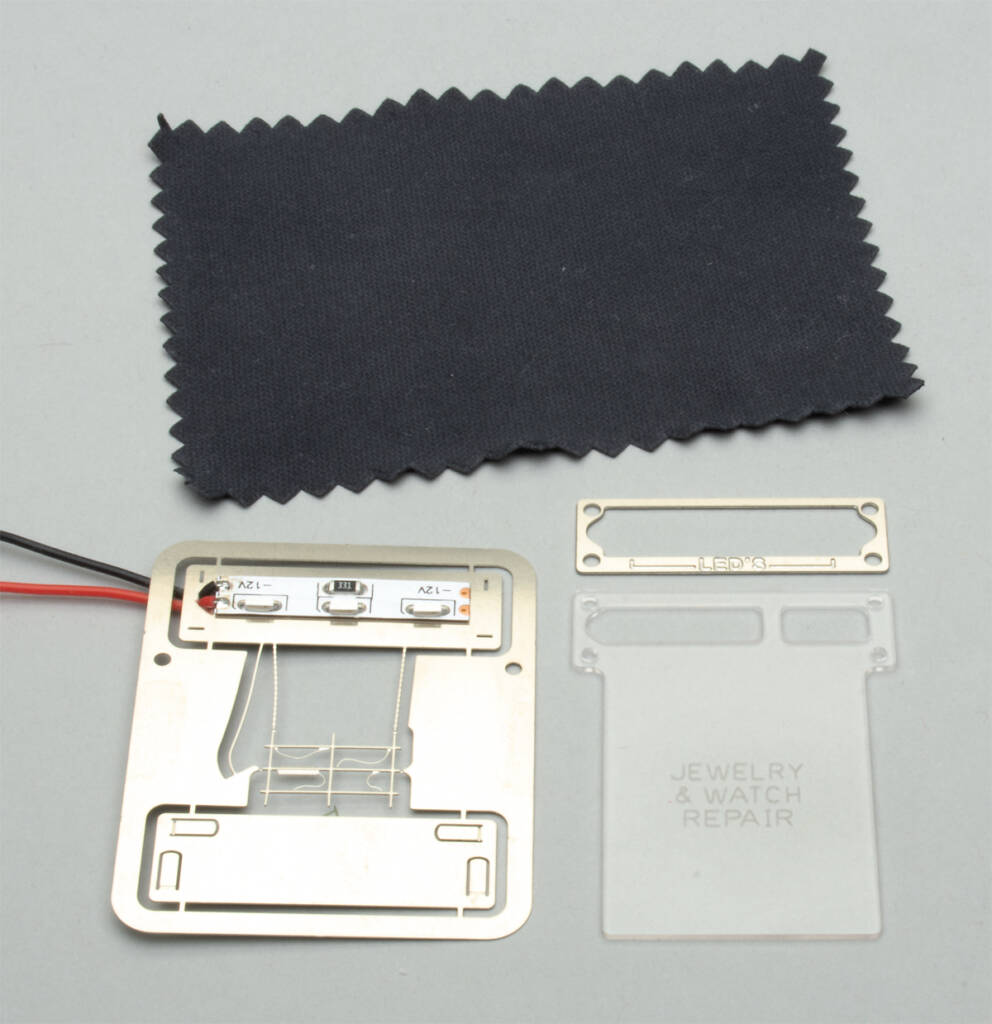
We received kit B402, Jewelry & Watch Repair, for our review. The kit contents are carefully packed in a hinged plastic trading card-style box lined with two pieces of foam. Inside is a fret (think sprue, but for etched-metal parts) with the sign frame assembly and an assembly clip. The sign frame assembly contains the LEDs and 7-1/2″ lengths of red and black wire (28AWG). Also inside is a metal spacer, an etched acrylic panel, and a microfiber cloth for cleaning the acrylic. Our sample features frame B21 and a 1″-wide acrylic panel.
Since I’d never built a kit like this before, I read through the written, illustrated 5-page instruction booklet a few times to familiarize myself with the assembly process, handling instructions, and required tools. The manufacturer recommends a No. 16 scoring or No. 17 chisel blade, fine flush side cutters, a hard work surface (glass, plastic sheet, or metal), and a straightedge.
I started working through the 11-step assembly process by using fine flush side cutters to remove the assembly clip from the fret. Then, using the etch mark at the base, I bent the four tabs to a 90-degree angle on the side opposite the logo.
The sign frame assembly has power cord, chain, and sign frame detail. I painted the power cord with flat black enamel paint. The manufacturer notes that painting and weathering the chain and frame is optional.
Next, I placed the sign frame assembly on a piece of plate glass, allowing the wires to hang over the edge. Then I used a No. 17 chisel blade in a hobby knife to cut the power cord and sign frame from the fret.
After positioning the power cord behind the frame with tweezers, I used fine flush cutters to remove the upper (LED) section of the sign frame from the fret. Step 7 walks through the process of using the straightedge to slightly adjust the sign frame and power cord.

Steps 8 through 11 cover the final assembly process. These steps are where the clear acrylic panel is introduced, so I made sure the work surface was clean and I only handled the etched part by the edges.
After I’d placed the acrylic panel, spacer, and sign frame assembly on the assembly clip, I stripped a bit more insulation off the wires and inserted them in a 5.5mm x 2.1mm screw terminal female power connector (sold separately on the DVL Design LLC website). Then I plugged the connector into a 7.5VDC, 1A regulated power supply, also available through the manufacturer’s website. Recommended DC power supplies are as follows: 7.5V (red, amber, and green), 9V (blue and white), and 12V (yellow). Once I’d confirmed the LEDs worked and the acrylic was free of dust, I bent the sign clips down to hold everything together.
The final page of the instruction booklet covers installation. Templates for “A” and “B” size neon signs can be found on the DVL Design LLC website. The manufacturer recommends using 5-Minute Epoxy to attach the signs. The adhesive provides sufficient working time for final positioning. Black or silver paint can be applied to the edges of etched acrylic panel to reduce edge glow.
Assembling the sign kit was an enjoyable 30-minute project. Though the signs are marketed for HO scale, they could easily be used in S and O scale buildings.
Facts & features
Price: $35.95 each
Manufacturer
DVL Design LLC
10943 Nighthawk Circle
Fountain Valley, CA 92708
dvldesign.com
Features
• More than 200 sign designs
• Six light-emitting-diode colors
• Three detailed etched-metal frame styles