


Turn signals and taillights on model trucks and cars are easily applied using simple hobby chemicals and even a touch of food coloring.
Painting turn signals and taillights
The number of vehicle models available today is greater than ever. Though the selection of makes and models is large, it’s the small things that make or break scale models of cars and trucks. Take for example, this custom-decorated HO scale Burlington Northern pickup. The model is painted green; has the BN herald, name, and vehicle number on the door; and the vehicle weight is shown on the box. But upon closer examination, you’ll notice the taillights, turn signals, and Chevy Bowtie are unpainted. But with Microscale Kristal Klear and food coloring, I made translucent turn signals and an authentic looking grill ornament.
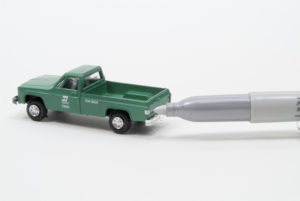
I started by working on the taillights. I used a silver paint marker to color the taillights silver, 1. This is the key to making the taillights translucent. The paint is fast drying, but I let it set for 30 minutes before proceeding.
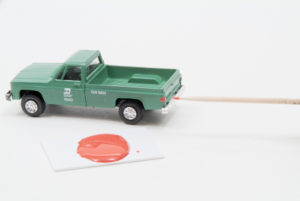
Next, I poured a small puddle of Microscale Kristal Klear onto a scrap piece of styrene. Don’t work on paper as the Kristal Klear and food coloring will soak through it. Then I added one drop of red food coloring and mixed it into the Kristal Klear with a toothpick. It takes about 30 seconds to get the food coloring stirred in evenly.
Then I used a round-head toothpick to apply the red-tinted Kristal Klear, 2. If you don’t like how an application looks, simply wipe it off. Kristal Klear is water soluble.
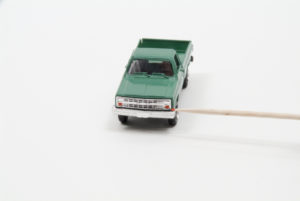
To make the orange for the front turn signals, I added two drops of yellow food coloring into the red-tinted Kristal Klear (as we learned in grade school, red and yellow makes orange). Since the front grill is plated plastic designed to simulate chrome, I didn’t have to paint the turn signals silver beforehand. I used another toothpick to apply the orange-tinted Kristal Klear, 3.
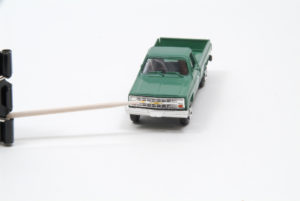
Finally, I poured a pushpin-head size puddle of Kristal Klear onto the styrene and tinted it with yellow food coloring. I also used this to color the Chevy Bowtie, 4.
Enhancing the realism of a vehicle model is quick and easy with this technique. Just check with your wife first before you raid her stash of food coloring!


