How To N Scale Insight Disassembling N scale diesel locomotives

Disassembling N scale diesel locomotives

By Jim Kelly | September 28, 2023

I never disassemble a locomotive unless I have to, and then I go only as far as I must

Email Newsletter

Get the newest photos, videos, stories, and more from Trains.com brands. Sign-up for email today!

Disassembling N scale diesel locomotives: In the 1990s, Kato pioneered its classic, vertically split-frame design. Since then, probably more than 80% of the N scale locomotives made, regardless of manufacturer, have followed (in fact, downright copied) that approach, meaning that if you’ve learned how to work on one of them, you can work on nearly all.

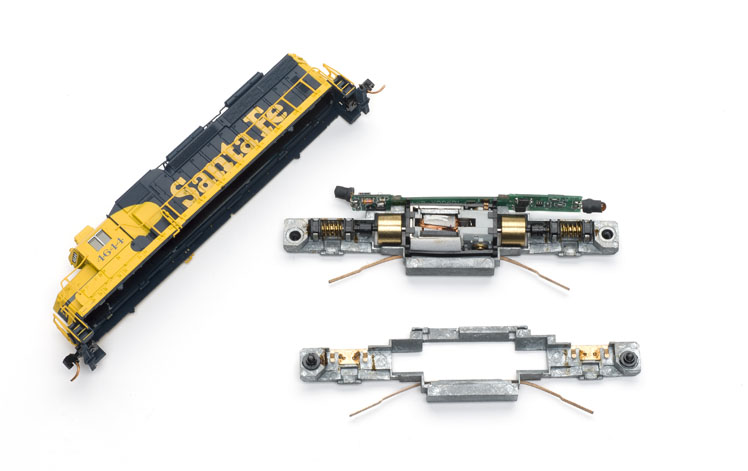
Disassembling N scale diesels: An image of a disassembled model locomotive with it shell removed
Jim Kelly took apart this Atlas N scale SD26. Two plastic bushings separate the halves electrically. Metal screws pass through these bushings and engage plastic nuts on the other side to hold the halves together. Bill Zuback photo

Why take an engine apart?

I never disassemble a locomotive unless I have to, and then I go only as far as I must. The first step is removing the body shell, and sometimes this is a considerable challenge. On most, perhaps all, N scale engines, you remove the shell by spreading the sides to disengage them from the nubs on the frame that secure them.

I usually lay the model on its back on a piece of foam or a foam cradle and pull the sides apart with my thumbnails while lifting one truck with my fingers. (This is one of those rather simple things that can’t help but sound difficult when you try to explain it.)

If that doesn’t work, then I’ll usually insert round wooden toothpicks to hold the sides apart while I try prying at one end of the frame with a small screwdriver. That works most of the time. While I’m at it, I usually file those aforementioned nubs about halfway down so the job will be easier the next time.

Motor contacts

Usually, when an engine won’t go, it’s due to poor electrical contact between the light board or Digital Command Control (DCC) decoder and the motor. One dead giveaway is that the lights work but the motor doesn’t. To fix it, you’ll need to take the board out and clean the contact pads. I do this with the eraser on a common, ordinary pencil.

If the motor still won’t go, you may have to bend the motor leads a bit to get sufficient pressure for good contact. Some decoders have arms on the sides that reach down and embrace the motor contacts from each side. You need to be certain that both motor contacts are under the arms. I’ve found it’s not uncommon for the contact extending up from the bottom of the motor to be tucked in improperly.

Next would be to take the motor out and test it using DC power and test leads. (Actually, I’ve never had a motor fail, although I’ve burned out several via short circuits that were entirely my fault.) To pull the motor, you’ll have to push in the tabs that interlock the plastic motor saddle from one side. You should be able to test the motor without removing it from the saddle.

Should you remove a motor from its saddle, say to replace brushes or solder DCC leads to the brush caps, study carefully how the motor fits in. Trying to get it back together correctly can lead to madness.

Cleaning trucks

I’ve ranted in this column before about how important it is to keep an N scale layout clean, especially in construction zones. When a truck starts thumping, it’s almost always because a tiny bit of grit or other foreign material has gotten into the gears and has to be cleared out.

To remove the trucks, carefully loosen the screws that hold the frame halves together until the trucks come out. It doesn’t take much, and you don’t want to pull the frame halves completely apart. The first thing I do is push the trucks back and forth on the track to see if they turn freely. If one doesn’t roll, I disassemble the truck.

To do this I insert a small screwdriver in the slot at the end of the gearbox. Work it in gently as far as it wants to go, then carefully pry the gear box cover off. Remove the metal clips that retain the axle ends (they’ve probably already fallen off) and pull out the drivers.

A few words of caution. Don’t even think about disassembling the trucks on newer version Kato SD40-2s. The axle retainers are a unique design that’s nearly impossible to get back together.

I wash all the truck parts in warm water flavored with liquid dishwashing detergent. I swish them around briskly and then begin brushing with a soft-bristle toothbrush, getting to the visible gear surfaces as best I can, turning the gears with a fingertip, and brushing some more.

Finally, I rinse the gearboxes under running water and blast them with my airbrush to dry them out and hopefully knock out any debris that might still be in there. I’ve never actually seen the culprit that caused the thumping, but usually it’s been dislodged by this stage.

To reassemble the trucks, place the drivers back in their slots, position the axle retainers, and hold them together with your fingers while inserting them into the truck frame. It’s easiest to insert one end, then work your way to the other.

Another word of caution: Don’t assume these axle retainers are symmetrical when it comes to six-axle trucks. On InterMountain SD40T-2 tunnel motors, I made that assumption, but I was wrong. I learned I need to measure.

Good luck, and keep ’em running!

This article originally appeared in the September 2019 issue of Model Railroader – Ed.

4 thoughts on “Disassembling N scale diesel locomotives

  1. The Atlas GP39-2 have frame wires attached to the truck wheel wipers and are a bear to take apart without breaking the very tiny connecting wires. I’m not sure what to say about cleaning them other than have some spare wheel wipers on hand when things go south.

  2. I’ve been taking apart Kato & Atlas engines forever. Mostly for converting them to DCC. I have no issue taking them apart. I agree it it is not easy. But 35 engines so far, are still running well.

  3. Good article Jim .
    One other point you did not mention , if you ever have to remove the motor from the saddle be sure to put a dot with a marker on top of the motor . That way you will be sure to put the motor the same way it came out .
    If you reverse it it will go backward . In DCC you can reverse the polarity of the motor by changing setting but in DC you will have to dissemble and turn the motor upside down .

You must login to submit a comment