Modeling crop fields on an N scale model railroad

Modeling crop fields on an N scale model railroad

By Angela Cotey | August 30, 2012

| Last updated on November 3, 2020


Weather sealer as corn? Yes. Chenille as soybeans? You bet. A veteran N scale model railroader shows you how it’s done.

The oat harvest is in full swing on Pat Lanas N scale Cedar River Iowa Central
The oat harvest is in full swing on Pat Lana’s N scale Cedar River & Iowa Central. Corn and soybean fields are also visible in the photo. Pat shares techniques for modeling crops using items from craft and home supply stores.
Mike Danneman
My freelanced N scale Cedar River & Iowa Central Ry. is set in rural Missouri and Iowa in 1968, so it shouldn’t come as a surprise that much of the scenery is farm fields. Though some 1:160-proportion crops are available commercially, the quantity I needed made this approach cost and time prohibitive. But after looking around, I found items at hardware and craft stores that make great starting points for fields.

Pat Lana’s N scale Cedar River & Iowa Central (Crandic) N scale model train layout is also featured in Great Model Railroads 2013.

Understanding the basics
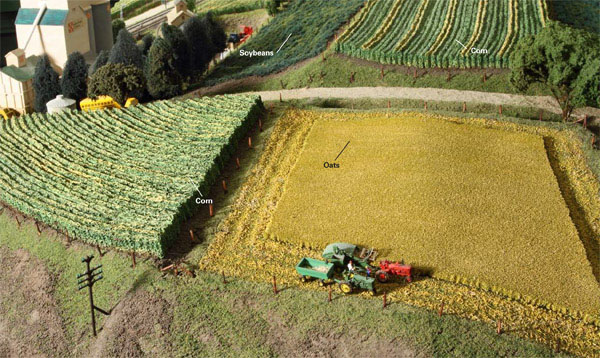
In the Midwest, most areas are plotted on a grid, so farm fields are typically big rectangles. When I started work on my N scale model railroad, I made the fields 42″ long, which looked too big. I now make the fields between 30″ and 36″.

I found that my fields look best with the long side running parallel to the contours of the hillside. Having the short side of the field run up the hill and away from the viewer adds depth to the layout.

A rule of thumb when laying out fields is to always have the rows follow the contour of the hills. I set the rows across the slope, or parallel, with the hillside rather than running perpendicular (up and down) the hill. On full-size farms, this is done to control topsoil erosion.

Planting corn
I wanted my N scale corn to have evenly formed rows, the yellow of the tassels showing, and some (but not too much) leaf texture. Using a cornfield photo as my guide, I first looked at commercial products available. Commercial corn stalks look good when painted correctly and bunched close together. According to my research, about 35 percent of the typical Iowa farm in 1961 was planted in corn. I translated this to my layout, and approximately 75 square feet of my model railroad would require cornfields. A stalk every ¼” on center equaled more than 172,800 cornstalks! I needed a quicker and easier method to represent cornfields.

Fig. 1 Cornfield supplies
Fig. 1. Cornfield supplies. Sill sealer, scissors, hot glue, and craft paint are all Pat used to model cornfields on his layout. He made the individual rows of corn by cutting the sealer into 5⁄8″-wide strips.
Travis Searls
I started by cutting a field base from a paper bag. This gave me the flexibility to build the cornfield on the layout or at the workbench. Then I used foam sill sealer for the rows of corn. Sill sealer is a ¼” thick plastic foam sheet made to keep air and moisture from infiltrating between a home’s foundation and the exterior wood wall above. I purchased mine at The Home Depot, but most home supply stores carry it. The sealer comes in various sizes. I used the 51⁄2″ x 50-foot roll, as seen in fig. 1. Look for the flat-on-both-sides style, as it’s easier to work with than the corrugated style.
Fig. 2 Making the cuts
Fig. 2. Making the cuts. After removing the sealer’s plastic skin, Pat carefully makes vertical cuts with a pair of sharp scissors on the exterior row to represent individual corn stalks. The inset photo shows a strip of sealer with the top cut in a pyramid shape to represent the tassel.
Travis Searls
First, I cut the sealer into 5/8″-wide strips using scissors (a rotary fabric cutter will also work). This is about 8 scale feet high in N scale. Then I used scissors to make two 45-degree cuts on the top of each strip, forming a small pyramid, as shown in fig. 2. This serves two purposes. It suggests the tassels on the top of the cornstalk, and it removes the plastic skin to reveal the air pockets inside. The pockets give the foam a leafy look.

Once all of the foam strips were cut, I attached them to the paper bag with hot glue. I aligned the tops of the rows horizontally, as the bottoms will not be seen.

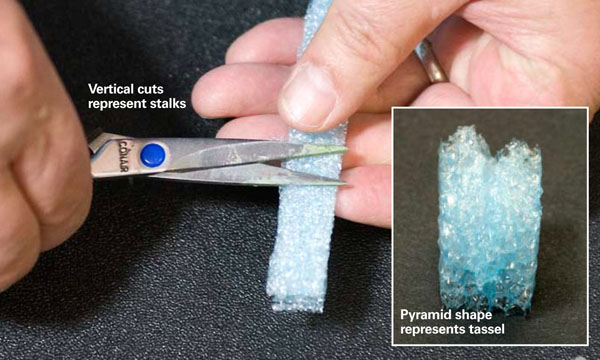
Before attaching the outside row, I removed the plastic skin on the foam with scissors to reveal the air pockets. I made vertical cuts across the foam to suggest individual cornstalks.

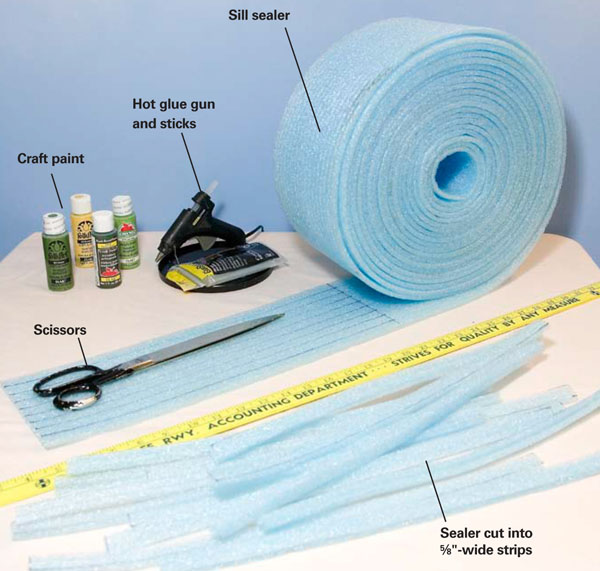
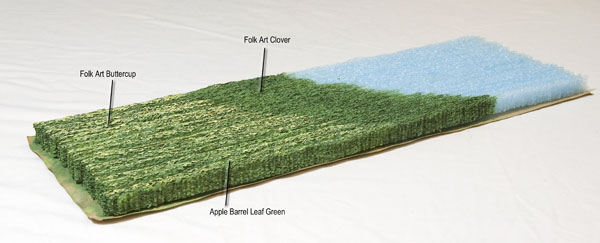
With the rows glued together, I mounted the field on the layout for painting (you can paint prior to installation if you prefer). I used Apple Barrel Leaf and Forest Green and Folk Art Clover acrylic craft paints. I used this color as a base coat, and it revealed any plastic skin that hadn’t been removed. The smooth skin ruins the field’s appearance, so make sure it’s removed.

Next, I painted the entire field with diluted Forest Green, flowing the paint into the air pockets. I made sure the paint was thin enough that it didn’t completely cover the Clover.

Fig. 3 From foam to field
Fig. 3. From foam to field. Pat painted this field at the workbench. After applying a base coat of Folk Art Clover acrylic craft paint, he brushed on a diluted wash of Apple Barrel Forest Green. Then he drybrushed the raised edges with Apple Barrel Leaf Green. Pat used Folk Art Buttercup to represent the tassels.
Travis Searls
I then drybrushed the exposed edges of the foam Leaf Green to accentuate the texture. Once all of the green was dry, I painted the top of the foam with Folk Art Buttercup acrylic craft paint to represent tassels. I also diluted this color and applied it to the base of the rows so it appeared the corn was turning yellow and maturing. The painting process is shown in fig. 3.

After painting, I used real Iowa dirt to cover the edge of the base and hide any gaps between the rows. The corn should look as though it’s growing from the dirt. I secured the dirt with a mixture of white glue, water, and liquid dish detergent.
 
To complete the cornfield, I added fence posts made from switchgrass stems. I then added some Woodland Scenics ground cover to the scenery around the field. I left some distance between the field and the fence line bare dirt. In the period I model, farmers applied herbicide between the edge of the field and the fence to control weeds.

Switching to soybeans
The second most prominent crop in the Midwest is soybeans. My goal was to capture the round form, leafy texture, and dark green color of soybeans.

Fig. 4 A corrugated base
Fig. 4. A corrugated base. After spraying the cardboard with water, Pat peels back the top layer to expose the corrugations. He’ll use this is as the base for his soybean field.
Travis Searls
I used a piece of corrugated cardboard as the base for the field. I soaked one face of the cardboard and peeled it back to reveal the corrugations. See fig. 4. For N scale, cardboard with corrugations 1⁄4″ on center works best. Full-size soybean rows are between 30″ and 36″ on center.
Fig. 5 Planting soybeans
Fig. 5. Planting soybeans. After running a bead of carpenter’s glue down the corrugation, Pat lays in a piece of chenille. To keep the yarn round he doesn’t press the chenille into the corrugations.
Travis Searls
Using the corrugations as guides, I installed lengths of Forest Green chenille yarn with carpenter’s glue, as shown in fig. 5. Don’t pull the yarn too tight or you’ll lose the round, leafy appearance. I prefer carpenter’s glue, as it doesn’t come loose when sprayed with water-based scenery adhesive.
Fig. 6 Adding foam
Fig. 6. Adding foam. Once the glue had dried, Pat applied a light layer of Woodland Scenics grass fine turf on top of the chenille. The turf provides the leafy look of the soybean plants.
Travis Searls
To get the right leaf texture and final color, I applied a light coating of Woodland Scenics’ green grass fine turf over the yarn and secured it with hair spray. See fig. 6. As with the cornfield, I sprinkled real dirt along the edges and between the rows to cover the cardboard.

Baling time
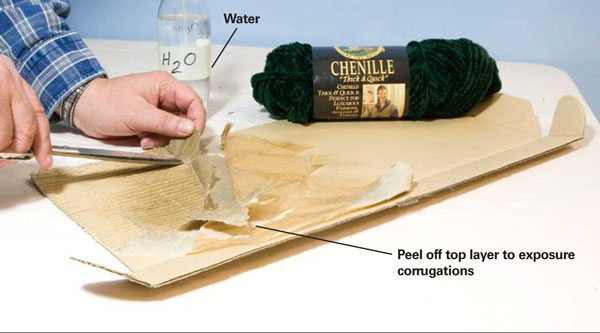
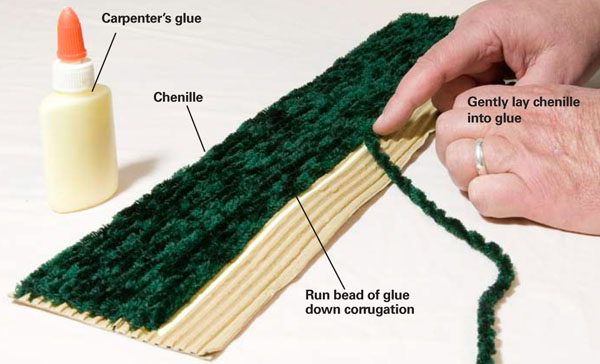
Since my first paying job was baling hay, I had to model a windrowed (row of cut hay or small grain) field of alfalfa. To get the right form I again used the corrugated cardboard as a base. However, this time I put a windrow down every fourth corrugation with chenille yarn.

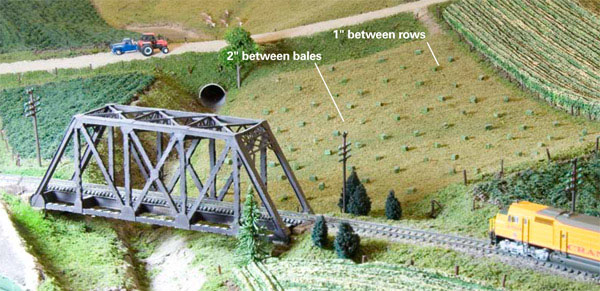
After the glue had dried, I applied real dirt and Woodland Scenics blended yellow grass between the windrows to cover the cardboard. I then put a fine layer of the same firm’s weeds over the windrows. I also added yellow grass to represent the windrow trail that indicates the baler has already picked up the hay.

Fig. 7 Baled hay
Fig. 7. Baled hay. Pat used Morse Productions plaster hay bale castings in this scene. The trick to making the field look realistic was to have the bales dropped in rows and at a fairly even distance apart. Pat used a windrow spacing of one inch and a bale separation of two inches.
Travis Searls
In addition, I modeled a hayfield in which the hay was baled, dropped, and is ready for pickup. See fig. 7.

An oat field from foam
Real oats are about 3 feet tall. Once I determined the shape of my field, I cut a piece of 1⁄4″ thick packing foam from a computer keyboard carton to fit the space.

At the workbench, I painted the base a flat earth-toned brown. Then I drew dark guidelines around the perimeter to indicate where the combine drove while making each cutting pass.

In the middle of the field I added another layer of 1⁄4″-thick foam on top of the base layer. This represents the oats. I then made vertical cuts along the outside edge of the foam to suggest vertical oat stems. I painted the foam a straw color, moving the brush in one direction to get a realistic color pattern.

I drybrushed the mowed areas (where the combine has gone) a grass green color, not completely covering the ground color. Then I applied dried yellow chamomile tea grounds to simulate chaff dropped by the combine.

I attached the field to the layout with full-strength white glue and used weights to hold it down. I filled in gaps around the field with patching plaster.

Get farming
If you model the Midwest, crops are a great way to add scenic interest to your layout. The techniques shown here make it possible to cover large areas in a short amount of time.


Pat Lana lives in Lakewood, Colo., with his wife, Annette. He is a life member of the National Model Railroad Association.

Share this article