How To Model Train Layouts Mountains to seaside on a triple deck model railroad

Mountains to seaside on a triple deck model railroad

By Angela Cotey | May 22, 2018

| Last updated on July 9, 2021

The HO scale Paquettin Division features a partial mushroom design and two busy ports in a 16'-6" square space

Email Newsletter

Get the newest photos, videos, stories, and more from Trains.com brands. Sign-up for email today!

MRRA0613_01
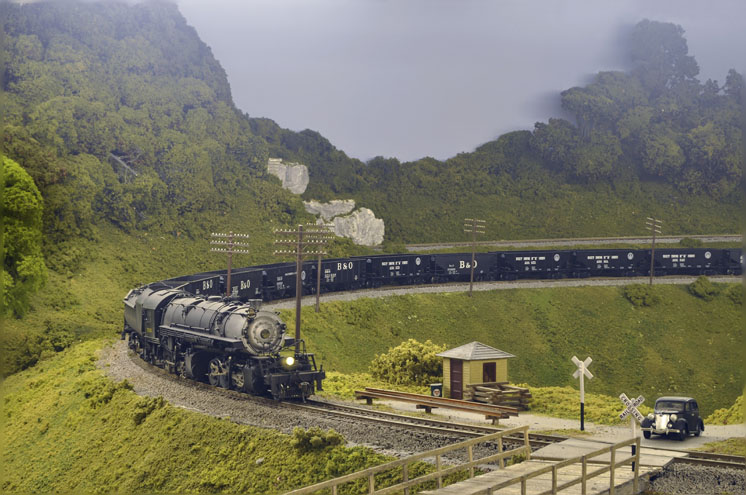
Baltimore & Ohio EL-e articulated 2-8-8-0 locomotive climbs the 2 percent grade around Martin’s Bend with a train of empty hoppers in tow. Mike Tricker’s HO scale Paquettin Division models the B&O in the Appalachians and on the waterfront. (Mike Tricker)

Note: This article originally appeared in the June 2013 Model Railroader. Mike updated his plan and wrote a followup story in the July 2018 issue.

Ever since receiving my first Hornby train set as a child in 1954, my modeling interests were focused on the railways of my home country, Great Britain. About 10 years ago that all changed when I walked into my local hobby shop and saw a pair of Proto 2000 E6 diesel-electric locomotives in Baltimore & Ohio livery. Impressed by the models, I purchased both the A and B units. Hooked on American railroads, I sold my British locomotives and rolling stock. I began planning my dream North American layout – the HO scale Baltimore & Ohio Paquettin Division.

MRRA0613_03
Mike has a collection of brass steam locomotives, including this United States Railroad Administration (USRA) light Pacific (class P-5 on the B&O) that’s leading a local passenger train out of Port Trenton. Mike’s friend installed a Digital Command Control (DCC) sound decoder into the locomotive.
PortTrentonBaltimoreOhioPaquettinDivision
Click on the image to view the triple-deck track plan

Research and planning

Since my intended train room was being used to store furniture, and would continue to do so for about a year, I had plenty of time for research and planning. During this time I also learned about techniques unfamiliar to many British modelers, such as L-girder construction, and read articles by some well-known American model railroaders. I was especially inspired by John Armstrong’s numerous realistic track plans and Allen McClelland’s practical approach to model railroad operation.

I decided that I’d model the B&O RR in the 1950s, so I could realistically run both steam and diesel locomotives. My freelanced track plan doesn’t follow a prototype B&O route. The name Paquettin Division refers to an imaginary river I came up with that flows from the mines of the Appalachian Mountains down to the New Jersey waterfront.

My new layout also had to meet the following requirements:

• A walk-in multilevel design where trains traveled for an operational purpose from point A to point B.
• 30″ minimum aisle width for operator comfort.
• No length restrictions on the main line for either locomotives or rolling stock, which meant a 30″ minimum curve radius and no. 6 turnouts.
• A main that could handle scale 85-foot close-coupled passenger cars, so there could be no S curves.
• An urban scene with a classification yard, a port, a car float, street running, and industrial scenes.
• An interchange at grade with another railroad.
• Maximum grade of 2 percent.
• Appalachian Mountain scenes, including a large coal mine and mining town.
• A horseshoe curve and a scene where the line follows a river under a limestone cliff.
• Separation between scenes so that the urban and mountain scenes aren’t visible at the same time.
• A large locomotive roundhouse.

A partial mushroom design

Somehow I had to fit a layout with all of my requirements into a 16′-6″ square garage. Fortunately I’d read the article “Investigating the mushroom” in the January 1997 Model Railroader, where the authors describe a double-deck layout design with a twist. [A mushroom design is a multilevel layout where the levels face opposite directions so that the upper and lower scenes can’t be viewed at the same time. – Ed.] Using a 14 x 18-foot room in their examples, the article’s authors concluded that a partial mushroom design used 95 percent of a layout room’s floor area, while a single-deck walk-in layout used only 59 percent of the available area.

Using 3rd PlanIt layout-planning software and the partial-mushroomconcept, I designed a track plan that incorporated all the items on my list except the roundhouse. I also had to accept a narrower aisle next to the staging tracks.

The middle level of the layout depicts urban scenery, including a large classification yard at Port Trenton. There’s also a car float and an interchange between the B&O and Pennsylvania RR. A helix leads to the upper level, which features a coal mine and the mining town of Harmond. The upper level also required that I build a raised floor for access.

I recently added a lower-level branch line connected by a second helix to the middle level. Called the Bay End Subdivision, this deck features PRR trains running on trackage rights in addition to B&O traffic. There’s also an interchange track that serves the B&O, PRR, and the Reading Co., as well as a busy wharf to switch at Petersport.

MRRA0613_02
A Fairbanks-Morse H-16-44 diesel shoves a cut of cars across the float bridge and onto the car float. The two empty flatcars are “idlers” that allow the diesel to switch the car float without putting its weight onto the float bridge.
MRRA0613_04
The New River Mining Co. is the largest industry at Harmond on the layout’s upper level. The B&O light Mikado will leave the string of empty hoppers on the loading track to receive coal from the mine.

Benchwork, track, and wiring

Using L-girders for most of the benchwork allowed it to span long distances with relatively few legs. The upper level benchwork is supported from the roof rafters.

I originally planned to have a 60″ track height on the middle level. However, cars at Port Trenton would prove too hard to reach at this height, so I settled on a track height of 54″ for the middle level. The track height of the upper level is 60″ when measured from the top of the raised floor.

Standing on the raised floor, completely surrounded by the Appalachian scenery, makes me feel like I’m in a layout within a layout. It really helps isolate the mountains from the urban scenes below. I especially like the depth of the broad curve at Martin’s Bend when viewed from this height.

I built the new lower level at a minimum 36″ track height. At this height I can switch cars comfortably from a rolling swivel office chair.

I used a combination of 18mm (11⁄16″) medium-density fiberboard (MDF) and Woodland Scenics Track-Bed for roadbed. Most of the track on the layout is Peco code 83 flextrack.

The middle level is linked to the upper level via a 30″-radius helix laid with Peco code 75 track that I had left over from a previous layout. The uppermost turn of the helix is offset to allow more space for the upper level scenery.

A second helix connects the middle level to the lower level branch line, but I laid this helix with Hornby 20″ radius set track. This isn’t a problem since I run only 40-foot freight cars led by diesels or small steam locomotives between the middle level and the lower level branch.

I built this helix using 6″ wide strips of 3⁄8″ MDF, which saved time and material. I cut the ends of these strips at an angle so that eight strips form an octagon. I also used 23⁄4″ wood blocks as spacers between each turn of the helix to maintain a consistent height.

All the backdrops on the layout are 1⁄8″ MDF that I painted sky blue. This looks fine to the eye, but because the train room is lit by fluorescent lights, the backdrop looks gray or gray-green in photos. To compensate for this I used photo-editing software to add images of a real sky to some of the layout photos featured in this article.

With the benchwork, track, and backdrops complete, I installed a Digitrax Digital Command Control (DCC) system and divided the layout electrically into four power districts. The turnouts are controlled by either Peco switch motors or manual throws made from double-throw double-pole slide switches. The turnouts in the yard at Port Trenton are connected to stationary DCC decoders so train crews can set routes when classifying cars on the ladder tracks
MRRA0613_05
A pair of SD7 diesels pulls a local past a row of company houses built on the wooded hillside near Harmond. Mike modeled the forest canopy with clump foliage. The foreground trees are made of dried sedum from his garden.
MRRA0613_08
Led by a class K4s 4-6-2, a Pennsylvania RR passenger train crosses the swing bridge at Haven Inlet. The buoys and highway bridge along the backdrop are N scale to force perspective and add the illusion of depth to the scene.

Mountain and harbor scenes

To make the mountains on the upper level I wove cardboard strips together into a web that I covered with plaster cloth. Once the plaster dried, I covered it with earth-tone paint.

Since the Appalachians are densely wooded, I needed a lot of trees. Many of these trees are made of dried sedum from my garden and Woodland Scenics foliage. I filled in the gaps between the trees with poly fiber and Woodland Scenics clump foliage.

As work progressed I realized that only the forest canopy would be visible, so my work plastering and painting the scenery base was wasted. For the remaining mountain scenery I simply glued the tree canopy directly to the cardboard web and blended the scenery around the track as needed. For the exposed limestone bluffs along Paquettin River I used Cripplebush Valley Models rubber rocks. I further weathered the rocks using artist’s pastels. Smaller rock outcroppings are cast Hydrocal.

I used household texture paint to model water following a technique described by Ken Patterson in the October 2002 issue of Mainline Modeler. I used a sponge to create waves on the surface. It took a couple of attempts to realistically paint the water. An artist friend helped me get the colors to look right.

For the lower level harbor scene, I used forced perspective to add the illusion of depth. The railroad swing bridge and other models close to the fascia are HO scale. The highway swing bridge and vehicles toward the backdrop are N scale. I placed HO buoys in the water toward the front and N scale buoys near the backdrop. This scene includes an HO scale laser-cut wood model of the historic Chesapeake Bay Thomas Point lighthouse. This kit is made by Bollinger Edgerly Scale Trains (B.E.S.T).

I also built laser-cut structures at Harmond, including a B&O depot and freight house. Most of the structures at Port Trenton are kitbashed from plastic kits or scratchbuilt from Design Preservation Models and Walthers Cornerstone modular parts.

All the structures are weathered with paint washes and weathering powders. I prefer to get all the structures and scenery in place and then come back later to add extra details and weathering.

MRRA0613_06
A class Q-4b heavy Mikado 2-8-2 eases its eastbound train to a stop at Port Trenton. For the remainder of the train’s run, its locomotive will be replaced by a USRA light Mikado better suited for the gentler grades ahead.
MRRA0613_07
The yard switcher at Port Trenton prepares to add a caboose to a westbound nearby. The tenements in the background are Walthers Cornerstone kits.

Locomotives and rolling stock

Most of my steam and diesel locomotives are sound-equipped. I have a friend who installed SoundTraxx decoders in my brass steam locomotives. For each locomotive he also added a cam to one driver axle so that the sound of the exhaust chuffs is synchronized to the motion of the drivers. The sound effects add lot of realism.

A focus on operation has kept me disciplined in my new locomotive purchases. I now only buy a locomotive if
I know there’s an operational requirement for it. For example, my most recent purchase was a Reading 0-6-0 Camelback, which I needed to switch the Reading/B&O interchange on the new Bay End Subdivision. The cars on the layout are a variety of kitbuilt and ready-to-run models. Most of my equipment has been weathered to some degree.

Operation

The layout’s operating scheme centers around the classification yard at Port Trenton, where traffic flows to and from Eckingham Yard (staging), the car float, the PRR and Reading interchanges, Petersport, and Bay End. Motive power is changed out to suit the route ahead – mountain grades to the west or coastal flats to the east.

I use waybills and 4-location car cards to route traffic. Trains run insequence, whether I operate alone or with friends. If there is more than one operator during a session, some moves in the sequence are performed at the same time. The operating sequence is below. I plan to eventually add a dispatcher, fast clock, and timetable to the operating scheme.

I’ve had a lot of fun building and operating the layout. I still have a lot of work to do, especially finishing up the scenery on the lower level. All the time spent planning my dream layout certainly paid off, as I’m looking forward to running trains on the Paquettin Division for years to come.

Operating sequence

Below is a typical operating sequence on the Paquettin Division. I use this sequence whether I run trains alone or with additional operators. If there is more than one operator, some steps occur simultaneously, such as steps 1 and 2. – Mike Tricker

1. A freight train arrives at Port Trenton from Eckingham Yard (staging). The locomotive and caboose are removed from the train. The yard switcher classifies the incoming cars.
2. A freight train departs from Bay End, switches Petersport and the Reading interchange, then continues to Port Trenton. The locomotive and caboose are uncoupled, and the yard switcher classifies the cars.
3. A Pennsylvania freight train departs from PRR east staging, switches the B&O interchange, then proceeds to PRR west staging.
4. Cars are transferred from PRR interchange and the car float to Port Trenton for classification.
5. A freight departs B&O east staging and proceeds to Port Trenton. The crew picks up and sets out cars as required. Motive power is exchanged for a more powerful locomotive suited to the mountain grades ahead. The train proceeds west to Harmond. After switching Harmond, the train proceeds to B&O west staging.
6. A train departs B&O west staging, switches Harmond, and continues
to Port Trenton. The yard switcher classifies the cars. An eastbound train from Port Trenton is led by a less powerful locomotive suited to easy grades.
7. A transfer job runs from Port Trenton yard to the car float.
8. Another transfer job runs from Port Trenton yard to the PRR interchange.
9. A Pennsy freight departs from PRR west staging and switches the interchange, then departs for PRR east staging.
10. A freight leaves Port Trenton and proceeds to Eckingham Yard (staging).
11. The Port Trenton yard switcher makes up the Bay End freight train. This train then departs Port Trenton and switches the Reading interchange and Petersport before continuing to Bay End (staging).
12. The Reading local switches the interchange.
13. The layout is restaged for the next operating session.

MRRA0613_09
Meet Mike Tricker

Mike Tricker is a lifelong model railroader. Based on British prototypes, his previous layouts have been in OO scale and Gauge 1 (large scale). Now retired, Mike worked as a chemist and research manager in universities, industry, and government service. He lives just west of London, England, with his wife, Gill.

You must login to submit a comment