How To Model Train Layouts Built by Others: Grant Graeber’s MT&W layout

Built by Others: Grant Graeber’s MT&W layout

By Mitch Horner | September 28, 2023

A self-described “armchair” model railroader puts his rolling stock to work and resurrects dormant skills

Email Newsletter

Get the newest photos, videos, stories, and more from Trains.com brands. Sign-up for email today!

Built by Others is an article series showcasing layouts constructed by modelers using plans and projects from the pages of Model Railroader and its associated products. The Black River Junction originally appeared in the pages of Model Railroader in 2007. Grant Graeber converted the layout to the space he had available and made adjustments according to his interests as a model railroader.

Built by Others: Grant Graeber’s MT&W layout

By Grant L. Graeber – photos by the author

I was an armchair model railroader for nearly sixty years. Shortly before the COVID-19 pandemic began, I decided it was time to quit limiting myself to building rolling stock, displays and dioramas, and get my hands dirty building an operating layout. I tried drawing track plans to fit into my walk-out basement rec room while still portraying the real Marinette, Tomahawk & Western (MT&W) and Milwaukee Road in my hometown of Tomahawk, Wis. None of the plans would work; space in the rec room is limited by the stairway and several doors to the surrounding rooms and patio.

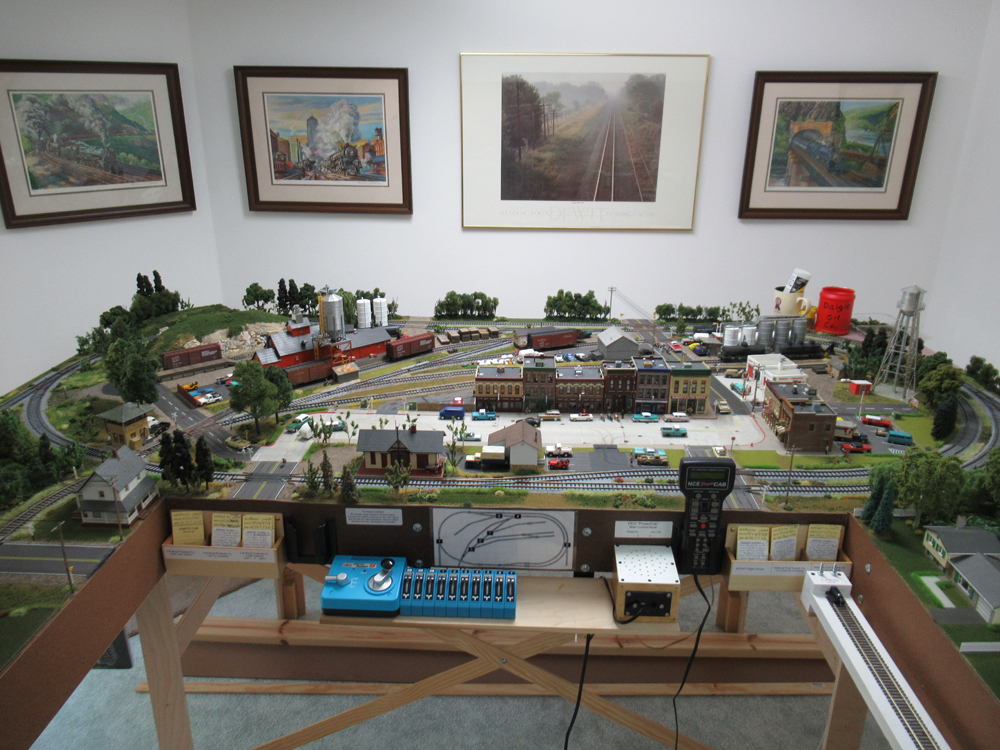
Grant Graeber’s MT&W layout: A model railroad layout

So, I turned to the Trains.com archives and searched for a track plan that would fit, even with alterations, into the irregular-shaped area that I had to work within. I found the Black River Junction project in the January 2007 Model Railroader. Besides having a workable size and a track plan that could be adapted, it utilized the Kato Unitrack system, which appealed to me. After all, I was 72 years old, and had reservations about my ability to build a good quality layout using flextrack. After doing more research on Unitrack, I decided to build the Black River Junction, relocating it from Ohio to Wisconsin and modifying it to suit my operating scheme; the Milwaukee Road and Soo Line both serving the town and interchanging with the MT&W. I modified the track plan using AnyRail software, incorporating some changes to the main 4 x 8 layout and expanding the original staging yard with a 2 x 8 foot extension that includes two yards and the MT&W engine house and facilities. I added another 2 x 8 extension on the right side, which also includes two staging yards and some industries, to fully utilize the available space in the room.

A model railroad trackplan

Since this would not be my Marinette, Tomahawk & Western dream layout, I decided to name it the Miserable, Tired & Weary. The MT&W does local customer switching and services several pulp and paper mills, off-layout, connecting them to the Soo Line and Milwaukee Road.

Construction started in August of 2021, and the main layout was operating by November. By February of 2022 the left extension was operating. Finally, construction of the right extension started in May and it was operational by August. I followed the construction plans and methods in the 2007 Project Layout articles, with a couple of obvious differences. Since I was enlarging the left-side extension and adding another of the same size on the right side, I used the same construction techniques as seen on the main table and applied four legs to each of the extensions. The extensions are bolted to the main table and the connecting track pieces are not glued down. The layout can be carefully disassembled, but if the rail joiners are damaged, there are two sets of spare connecting track pieces and a bag of spare rail joiners.

Grant Graeber’s MT&W layout: A model railroad trackplan for the MT&W layout

Track power and turnout control wiring are also different. Instead of attaching the Kato feeder tracks and terminal UniJoiners to a bus with suitcase connecters, I used Kato wiring components, three-way extensions, DC extension wires, and terminal adapters in a branch-feeder arrangement. Power from my NCE PowerCab panel runs through a series of feeders that branch out to the main layout table and each extension table. The plug connectors on the components make it possible to easily disassemble the wiring if necessary. The final element for comfortable operation was to install two NCE UTP Panels, one on each extension. This allows auxiliary cabs to be plugged in when two, or even three operators are working; engineers can keep track of their train’s operation without getting cords wrapped around each other. The wiring for track power, turnout control and cab connections is routed through holes bored through the frame crosspieces and are labelled and secured to the bottoms of the tables using Woodland Scenics Tidy Wire kits.

Grant Graeber’s MT&W layout: A model railroad layout with a model train control system

Although I’m using DCC, I purchased a Kato power pack, which provides power to the switch machines through a DC converter and turnout control switches attached to the converter. Kato turnout extension wires are used to connect turnouts on the main layout to control switches on the main control panel. The left and right extensions presented a problem, as I didn’t want to attach all turnout switch machine controls directly to the power pack on the main control panel. Operators running trains on the extensions would have to look away from the trains they needed to control in order to throw a switch. The extensions each needed their own control panel, and the SX power pack provided the solution. I connected the track power output to a pair of DC converters, one for each extension. Turnout control switches for turnouts on each extension were then connected to the DC converters and the turnout switch machines, using turnout extension wires where needed.

Grant Graeber’s MT&W layout: A the downtown section of a model railroad layout

I didn’t apply large grass mats to entirely cover the layout sections. Instead, I first installed strips of Woodland Scenics foam modelling sheet alongside and between sections of Unitrack, 1/8” in most places and 1/4” at grade crossings. Because the layout represents a time period when the real local railroads didn’t have the clean, well-manicured, two-foot-deep crushed rock ballast that Unitrack portrays, ballast had to be barely above the surrounding ground, and bringing the ground level up, even with the Unitrack ballast in certain places, also made installing grade crossings easier. Grass mats went on top of the foam, different colors and additional ground cover textures gave some variety to the basic scenery.

The uniform texture and color of the Unitrack ballast also had to be changed. Milwaukee Road tracks remained mostly untouched, with added Kato ballast to blend into the surrounding ground cover. To differentiate MT&W and Soo Line tracks from Milwaukee Road, I brush painted the ballast using two different “wash” colors. The process may be tedious, but it makes a difference: a viewer can easily identify whose tracks are whose, and it helps to develop a real sense of place for the layout.

Grant Graeber’s MT&W layout: A model railroad layout with scenery and structures

Scenery is a mix of Walthers SceneMaster and Woodland Scenics materials; mats, turf, gravel, ballast, bushes, briars, and grass/weed tufts, along with JTT Scenery Products trees and flowering botanicals. Larger trees are mostly Woodland Scenics and were attached to the grass mats by scraping off the “grass” to expose the vinyl and gluing the base of the tree in place with CA. The bases were then covered with scenic cement and dusted with blended turf to hide the plastic and blend the area around the tree trunk into the surrounding ground cover; then the tree was reattached. For other trees, they were glued with CA after being inserted into holes hand-drilled through the mat and into the underlying foam. Shrubs were formed by mixing three shades of Woodland Scenics bushes. Most trees and clumps of bushes were lightly sprayed with Woodland Scenics spray-tac and dusted with different shades of fine turf to accent the foliage. Scenery was basically completed as each section of the layout became operational, but adding details is still ongoing.

An image of a model railroad layout with a town

The buildings are an eclectic mix of old Atlas and Revell structures, sentimental favorites salvaged years ago from one of my early diorama layouts, and present-day products from Walthers, Pikestuff, and Woodland Scenics. All have added details; some have been kitbashed or otherwise modified. Main Street is a combination of Cornerstone Concrete and Asphalt Street Systems with curbs and sidewalks. The other roadways and parking lots are SceneMaster self-adhesive flex pavement, placed on strips of Woodland Scenics foam modelling sheet, 1/16” or 1/8” as is necessary to bring the pavement up above ground level and form a shoulder where needed. Pavement markings on Main Street were applied with Woodland Scenics road striping pens. Main Street was also weathered with tire marks and potholes, using black wash and flat grimy black paint.

The vehicles are also an eclectic collection from a large variety of manufacturers, with a wide spread of model years from the late 1940s to the early 1970s. While this may be unrealistic for the mid-50s to mid-60s era that the rest of the layout represents, but I’m a huge fan of the Wisconsin Central and occasionally I remove most of the 40-foot rolling stock and the Milwaukee Road and Soo Line locomotives and replace them with WC locomotives and 50’-60’ rolling stock, as well as updating the MT&W loco roster to use their last switcher, SW1500 No. 83.

A model railroad layout with model trains passing on another in opposite directions

Operating procedures are based on Tony Koester’s book Realistic Model Railroad Operation using the Micro-Mark Car Routing System. A typical session starts with the Milwaukee Road North End Patrol (a patrol was Milwaukee Road’s terminology for a local) arriving in the morning from the right staging yard, dropping inbound cars on the interchange siding and continuing on to the left staging yard, where it is reconfigured for the return trip south. The MT&W comes into town from their yard on the left extension, switches those cars to consignees, places interchange cars for the Soo Line on the siding and takes cars for the off-layout pulp and paper mills back to their yard. A Soo Line eastbound freight then arrives from the left staging yard, drops off inbound cars, picks up outbound cars and continues on to the right staging yard, where it’ll be reconfigured into a westbound train for the next session. The MT&W returns to switch those inbound cars to consignees, places interchange cars for the southbound North End Patrol on the siding and again takes cars for the off-layout pulp and paper mills back to their yard.

Next, the North End Patrol returns from the left staging yard, picks up the outbound cars and departs for the right staging yard, where it will be reconfigured for the next session. Then, a westbound Soo Line freight arrives from the right staging yard, drops off inbound cars, picks up outbound cars and continues on to the left staging yard, where it’ll be reconfigured into the eastbound train for the next session.

Finally, the MT&W returns, switches those cars to consignees and takes cars for the off-layout pulp and paper mills back to their yard. Between sessions, the MT&W works their yard, moving cars into and out of the off-layout pulp and paper mills, while the Milwaukee Road and Soo Line switch the industries in the staging yards on the right extension. My 0-5-0 switcher also works between sessions to set-up trains for the next session.

Finding the Black River Junction in the pages of Model Railroader and discovering Unitrack gave me the opportunity to get out of the armchair and put my rolling stock collection to work. It has been an enjoyable experience: I rediscovered skills that I thought were lost and was happy to introduce some neighbors to the model railroading hobby as well.

The process behind the construction of the Black River Junction  is available on Trains.com as a four-part series of articles, from first design to finishing details and everything in between. Part one is available here. – Ed

4 thoughts on “Built by Others: Grant Graeber’s MT&W layout

  1. What a fantastic layout, and it’s nice to see someone else using Kato Unitrack. I’ve found it extremely reliable and easy to use.

  2. It looks to me that those 60 years spent armchair railroading paid off big time. A very nicely done layout in all respects – Congratulations!

You must login to submit a comment