Nothing says “impressive” quite like a rugged mountain range full of jagged rock faces. Though mountains appear solid to us, many are just individual layers of rocks, stacked one on top of another. If you keep this idea in mind, then adding impressive rock features to your layout isn’t a difficult task.
Whether you need a whole mountainside or just one or two outcroppings along a cut or low hill, making rock features is actually quite easy. Thanks to readily available materials such as Hydrocal plaster and rubber rock molds, you can cast your own highly detailed rocks. Follow along as I show you how to use these products, available at any hobby shop, to add a little “mountain majesty” to your layout.
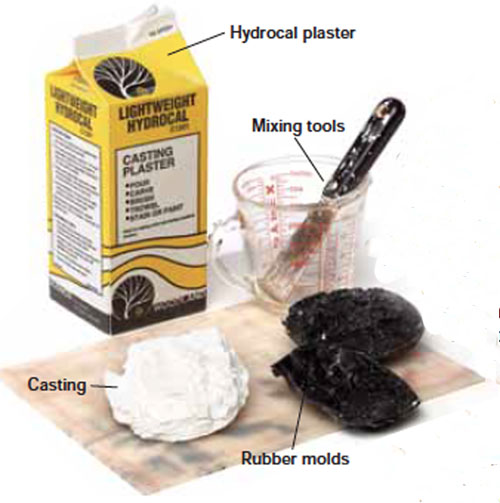
One of the easiest ways to create realistic rocks for your layout is to cast your own formations out of Hydrocal. This is a fine type of plaster that’s easy use, becomes ightweight when dry, and reproduces sharp details well. These properties, along with the fact that it’s easy to color, make Hydrocal an ideal choice for molding projects.
To form the rocks themselves, you can use rubber molds. A number of manufacturers offer molds in a variety of sizes and shapes. Some examples from Woodland Scenics are shown in the photo. These molds produce realistic results because they are usually made from actual rocks. They are also inexpensive and can be used repeatedly with proper care –
some of my molds are more than 15 years old and are still going strong.
You can also make your own molds from latex rubber or other materials. Casting rocks is a relatively fast project and a lot of fun.
There are two common methods – straight casting and casting in place – and each has its own advantages. Straight casting is a little easier than casting in place and simply means that you cast the rock, let the plaster harden, and remove it from the mold to use later.
Casting in place requires a little more finesse. In this case as the plaster starts to set, you press the mold onto the layout while the rock casting is still soft. This allows you to wrap the rock around unusual shapes. Once the plaster sets (about 30 minutes) you can remove the mold.
For this project, we’ll use the straight casting method. First, mix a small amount of Hydrocal with water in a container until the plaster has a soupy (not runny) consistency. Be careful you don’t add too much water, or the plaster won’t set properly.
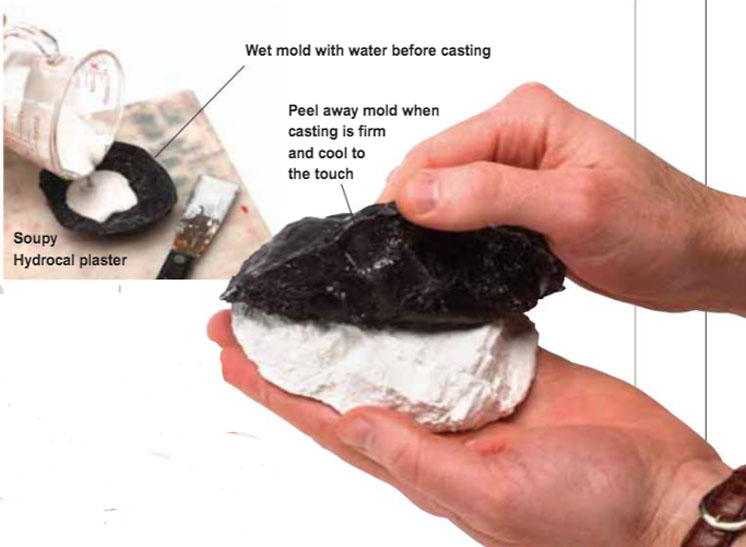
Next, wet the rubber mold with water to help the plaster work its way into the mold’s details. You can use a misting bottle or simply run the mold briefly under the tap and shake off the excess liquid. You want the mold to be damp, but not wet enough to have water pooled in the bottom. Set the wet rubber mold on a level surface and fill it with Hydrocal.
You don’t get a lot of working time with casting plaster. I used Woodland Scenics’ Lightweight Hydrocal (no. C1201), and it has a working time of about five minutes. The material sets up in 30 to 40 minutes. Once the Hydrocal is cool to the touch, remove it from the mold by peeling it away from the plaster. Leave the casting to cure overnight.
Throw any excess plaster in the trash, and wash your tools normally. You can clean excess plaster from the rubber mold by flexing it.
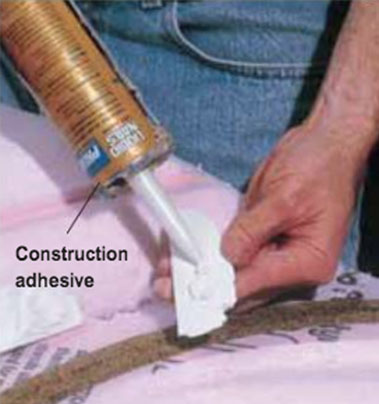

Installing the castings on the layout is simply a matter of gluing them to the scenery with a latex construction adhesive (I use latex Liquid Nails). For making larger rock formations, cut and piece together two or more castings.
As shown in the photos, Hydrocal is easy to cut with a razor saw or utility knife, and you can score and snap the pieces apart if you’re making straight cuts. I made the rock outcropping shown in the first photo by cutting one casting in half.
If you don’t have a lot of rock molds and need to make a bigger outcropping, you can use the same castings over and over. To make them look different, turn one or two castings upside down or stagger their positions on the hillside. Because many geological features have repeating patterns, this simple trick will give your rock formation a family appearance without looking out of place.
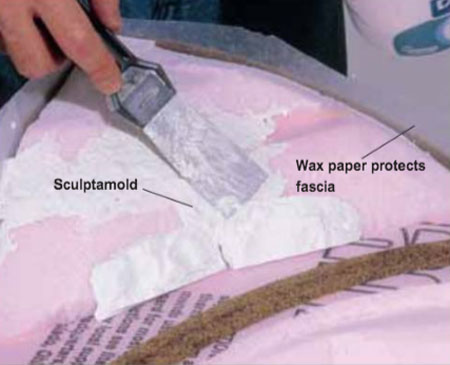
Once you’ve glued the castings in place, fill in any gaps with Sculptamold or more Hydrocal, as shown in the photo.
There are a lot of different ways to paint rocks, and working from photos of real rocks is a great help when choosing colors. I prefer staining the Hydrocal castings with thinned washes of acrylic paint. To stain the rocks, start with lighter colors, adding darker colors as each layer dries. For this project I used Polly Scale no. 414314 Mud as a base coat, but you may want to pick colors that match those in the region you’re modeling.
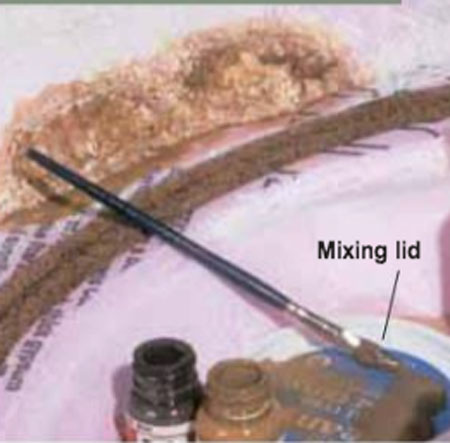
Using a large artist’s paintbrush, daub some of your base-coat paint onto a mixing palette, such as the lid to a cottage-cheese container. Next, add water to the paint until you’ve thinned the color substantially, making a runny stain. Liberally apply the stain to the rocks and let it dry. If the color is too dark and you want to lighten it, dab the surface with a paper towel while the stain is still wet. This will pull some of the pigment off the casting.
To add shadows that accent the cracks and crevices, apply a separate wash of darker stain. In this case, I used no. 414275 Roof Brown. Mix a stain from the acrylic paint as you did the lighter base coat, and then apply it to the rock surface. Instead of using a lot of stain, however, this time you just want to dribble a little in the recesses of the rock or apply a light wash over larger surfaces. Again, if you think the color is too dark, dab the area with a paper towel to draw off the pigment.