How To Build a Model Railroad Tracklaying: adhesives, nails, or spikes?

Tracklaying: adhesives, nails, or spikes?

By Angela Cotey | October 21, 2019

| Last updated on November 3, 2020

Check out the different options for laying track on your model train layout

Email Newsletter

Get the newest photos, videos, stories, and more from Trains.com brands. Sign-up for email today!

Trackandroadbedcanbefastenedtofoaminsulationboardwithconstructionadhesivesmadeforusewiththefoamboard
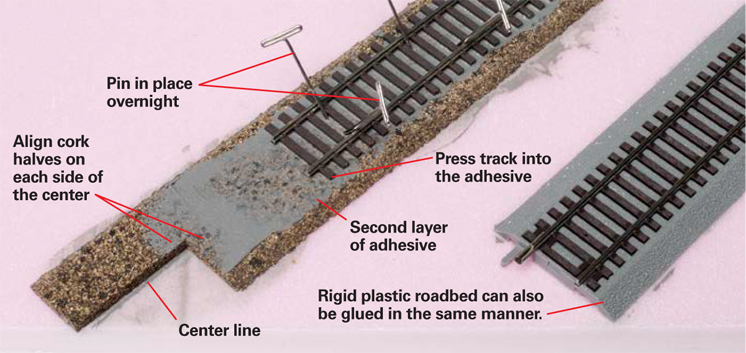
Track and roadbed can be fastened to foam insulation board with construction adhesives made for use with the foamboard. Apply a ¼” bead along the center line, use a putty knife to spread it in a thin layer, and press the roadbed down into place. Add weights to hold it while the adhesive sets. Then the next day, the same procedure can be used to secure the track to the roadbed.
Good tracklaying has a direct bearing on your railroad’s performance, so take the time to do a good job and it’ll pay off in a smooth-operating layout.

Roadbed is used under model track to simulate the layer of crushed rock that supports prototype track. Shaped cork or flexible plastic foam roadbed bends easily so it works well under curves.

A track center line is needed to install the roadbed. Cork roadbed comes in two pieces so the tapered edges go to the outside. Apply a bead of construction adhesive along the center line, spread it evenly with a putty knife, and then press each half of the cork roadbed into the adhesive as you follow the center line.

If the layout is made of foam insulation board, we use Locktite’s PL300 Foam Board Construction Adhesive (www.loctiteproducts.com), or Liquid Nails Project & Foamboard Adhesive no. LN-604 (www.liquidnails.com). This method requires weighting or pinning the roadbed down overnight to allow the adhesive to set.

Woodland Scenics makes Track-Bed, a foam plastic roadbed for N, HO, and O scales, and Foam Tack Glue and Foam Nails for use in installing the Track-Bed.

On a wood surface, flexible roadbed can be nailed down with ½” flat head wire nails instead of using adhesive.
After the cork roadbed is secure, I use a Stanley Surform block plane to smooth and level the top surface and gently round off the top corners for ballasting.

Anailsetallowsyoutodrivethinnailsthroughtheholesinthehardplasticroadbedwithoutdamagingtherails
A nailset allows you to drive thin nails through the holes in the hard plastic roadbed without damaging the rails.
Laying the track is mostly a matter of starting at one point and then carefully fitting the rail joints into the joiners as you work your way around the track plan. I usually start at a complicated junction so I can carefully align all of its components. Then I sight along the rails to make sure everything is straight.

Some brands of sectional track have rigid, molded plastic sectional roadbed with a rock ballast texture. Most of these sectional pieces include small mounting holes so the roadbed can be nailed to the benchtop. Others have drill starting points underneath so you can drill the holes as needed.

Atlas sells no. 2540 thin black track nails, and Peco offers no. SL-14 pins that are perfect for this job. Slip the rail joiners together, and drive the nails just tight enough to secure the rigid, plastic roadbed without distorting its shape. A nail set is handy for this job so you don’t hit and damage the rails or roadbed.

The cast sectional roadbed can also be secured with construction adhesive. Just spread the adhesive a little wider so the plastic edges are secured. Then add a few nails to hold the roadbed sections down while the adhesive sets.

Construction adhesive can also be used to secure the track. I dry-fit the track components before removing them while I apply a thin layer of adhesive on top of the roadbed. I’m careful to avoid applying adhesive under the switch rod or the points to keep the adhesive from oozing up between the ties where it may produce potential problems with the free motion of the switch points.

Track can also be spiked or nailed down using the small holes molded into the ties for this purpose. Nail holes run along the track center line and may need to be opened up with a small drill. I drive the nails about 4″ to 5″ apart so they’re snug without distorting the ties.

Spike holes are molded close to the rails on both sides. Use a pair of long-nose pliers, or Micro-Mark’s no. 82839 spiking pliers, to insert and drive the spikes. Grip the top half of the spike in the pliers so its offset head faces the rail with the main body of the spike sticking out below. Insert the spike in the hole at a slight angle and press it down until the pliers reach the tie. Release the spike, close the pliers, and use the flat end of the tip to gently press the spike home.

18 thoughts on “Tracklaying: adhesives, nails, or spikes?

  1. You know those fake credit cards we receive in the junk mail? Well, I started opening those letters, just to get those fake credit cards. They make great shims, but I get the most use from them as cheap, plastic putty knives to spread acrylic latex caulk that I use to hold my roadbed and track in place. Some of them are now made of heavy cardstock, in which case, I glue them back to back with cyanoacrylates, better known as Super Glue.

  2. One other option is Homasote roadbed. Hold spikes or nails securely, is very quieting , much more dense than cork.I use it to handlay track, but flex works very well.

  3. OK, so I get how to fasten the track to the layout. Now can someone tell me how to allow for expansion and contraction to accommodate drastic changes in temperature? I will be building a layout in the garage which will be hoisted up to the ceiling when not in use. Yeah, not even a good idea but it’s the only place I can build a layout. So in the summer when we travel in our motorhome to get away from the heat, the track will experience something like 120 degrees F. And in the winter when we are home the track could experience 35 degrees F. I’m guessing I will need at least 1/8″ gap at each joint. Larry.

  4. It is important to consider the possibility of having to reposition the track after attachment to the layout for a variety of reasons: realignment of a main line or an adjustment to a rail yard, changes in scenery, etc.
    If you have to take up the track, having glued down the roadbed can be problematic. My N scale club prefers to use only nails to attach the roadbed to the layout surface. Track pins are used to temporarily attach the track to the roadbed until ballasting is completed. We don’t use a hammer. We press the pins in place until they are just touching the ties. This avoids forcing the rails out of gauge. When the ballast glue has dried, it does a very good job of keeping the track securely in place and the pins are removed from the ties with a nail-pulling tool. If we have to take up track, it’s far easier to do so with less collateral damage to surrounding scenery.

  5. I used 19 guage nails 1″ long to nail down (no glue or chalk) all the flex track which turned out to be a blessing after I found out nearly 100′ of it was out of gauge and had to be taken back up. Good lesson, always check even factory new flex track for gauge before putting it down. Might have been a more difficult process if it had been glued down. Don’t solder the rail jointers either but do put a electric connection to each 3′ track section. Makes replacement a lot easier to change switches too.

  6. OK here is a question. I can use construction adhesive as noted or nail it down, also as noted. But I have 2 inches of foamboard under the Bachmann EZ Track. The only nails I have found are way to wide but are lond enough. Any thoughts?

  7. I have used screws from http://www.Trainaidsa.com for Kato N-scale track. The screw is a K or KA and the cost is $6.00 for 250 of them. You can also order a 1 mm drill to use. These screws also work on Caboose switches.

  8. I've used yellow wood glue for gluing down cork roadbed for about 30 years and it has worked great. I first draw the center line for the track then glue down half of the cork roadbed on one side of the center-line and then the other side while making sure that the ends are slightly offset by a couple of inches. I use push pins (colored tops) to hold the roadbed down for about 30-45 minutes while it dries. Drying time usually depends on the humidity.

  9. You mention carefully aligning components and sighting along the rails to make sure everything is straight. I find that a frame-less mirror is extremely useful to sight along the rails, especially in hard-to-reach areas. (I have a broken piece of mirror which I use.)

  10. I use a line that marks the inner side of a curve rather than centerlines. I also don't glue the track to the roadbed. I use pins to hold it in place until it is ballasted. The ballast/white glue is sufficient to hold the track in place, and only requires water to remove it.

  11. I have had excellent track-laying results using DAP Kwik-seal clear adhesive caulk. It does dry clear and shiny, but ballast covers that. This adhesive works so well that I routinely use it for joining dissimilar materials, even on model buildings.

  12. Using nails and wire loops would be good if you don't plan to ballast the track, but if you do then the ballast cement will make it difficult to remove or reposition the track once it dries. I have been using Liquid Nails for Projects LN-704 and find it does a great job of holding the track in place but doesn't have the offensive odor or the exterior adhesive. It holds well even on extruded insulation board to the extent that when I recently had to lift a section of track it pulled up a thin layer of the foam. I just apply a tin bead on my centerline, then smooth it with a plastic putty knife and finally secure it in place with T-pins until it dries. BTW you can get T-pins a lot cheaper at office supply stores than at a hobby shop!

  13. The PL products always perform well. I've never had any luck with the LN products; they're cheaper, but as the old saying goes, "you get what you pay for".

  14. I am at this point and really don't know what is better to use. I am leaning towards using PL-300 adhesive on my cork roadbed.

  15. I have used thin wire looped around the ties and tighten under the layout. I have a video at YouTube at mike937739 that shows how it's done. Great for removing or relocating track with no glue or nails to cleanup after.

You must login to submit a comment