


A lot of model railroads – and model railroaders – start out with that old standby, the 4 x 8-foot train table. The main reason is convenience; 4 x 8 feet is the size of a standard sheet of plywood. Extruded-foam insulation board, a popular train layout scenic foundation material, also comes in that size. So why should you think about cutting up a 4×8?
While that size of rectangular table might fit an HO scale train set’s oval of sectional track, most model railroaders quickly outgrow that starter set. You might not have the money or space to build a huge rail empire, but that doesn’t mean you’re stuck with that oval. If you’re going to expand your miniature railroad’s horizons, you’re going to have to think outside the box (figuratively and literally). Let’s look at what you can do with one sheet of plywood and a few judicious saw cuts.
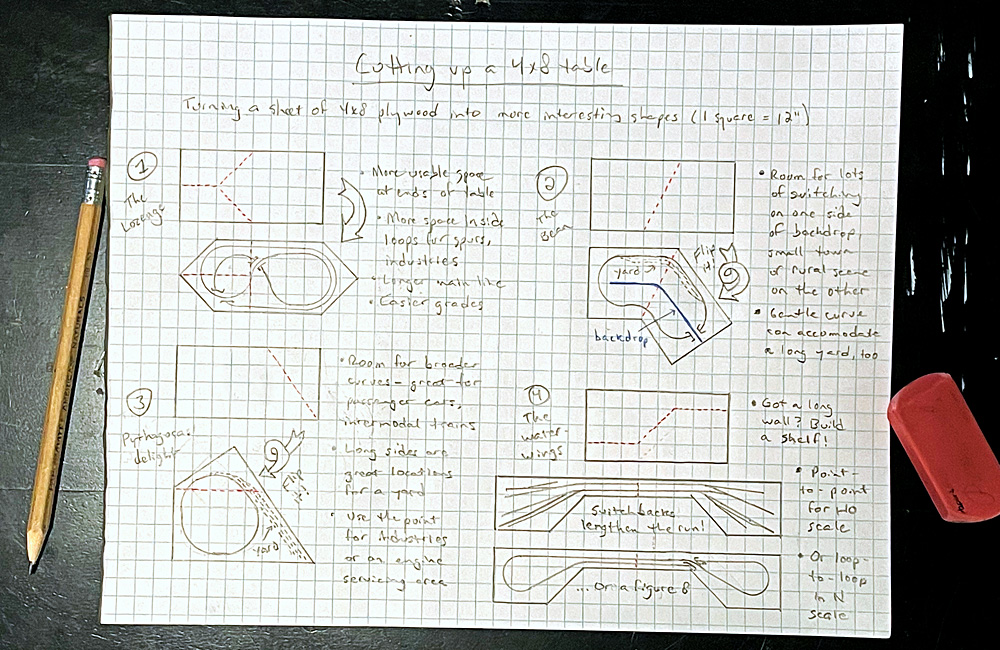
Shape 1: The Lozenge
This simple idea comes from none other than the dean of track planning himself, John Armstrong. In his book Track Planning for Realistic Operation, Armstrong offers this shape as a suggestion to expand on the standard 4 x 8. As with all of these plans, the surface area is the same – only the configuration has changed. But since the corners outside the standard oval aren’t that useful in a rectangle, using that area to extend the table to 10 feet long gives the layout room to breathe. The end curves can nestle deeper into those points, lengthening the run and increasing the space inside the main line. Longer straightaways gives you more options to attach turnouts for spurs and sidings. If you design an up-and-over folded dogbone, as I’ve drawn in my sketch, the grades are slightly easier than in a 4 x 8. Pick almost any 4 x 8 plan from your favorite track plan book (mine is 101 Track Plans for Model Railroaders), stretch it out a bit into the points, and see where it takes you.
Shape 2: The Bean
Make a diagonal cut across the middle of a sheet of plywood, flip one side over, and put the cut ends back together, and you have this shape, reminiscent of a kidney bean. Depending on the angle of your cut, you could get an L shape or a more gentle bend. I like the idea of dividing the bent oval the long way with a double-sided backdrop. Because of the bend, one side of the table is longer than the other. The long side is perfect for an urban or industrial switching area, with lots of room for industrial sidings and a yard paralleling the main line. Landscape the short side as a rural area, either with a small town or perhaps a rugged mountain canyon scene.
Shape 3: Pythagoras’ Delight, aka the Kite
Remember the Pythagorean Theorem from geometry class? The length of the hypotenuse of a right triangle is equal to the square root of the sum of the squares of the other two sides. So if you cut a 3-foot-high triangle off the end of a 4-foot-wide piece of plywood, the long side of that triangle will be 5 feet long – the same length as the short parallel side of the remaining sheet. Flip the triangle over, attach it there, and you’ve got a shape something like a kite. With the wider span, this table has room for broader curves, good for long-wheelbase steam locomotives, six-axle diesels, passenger cars, and multi-unit intermodal well cars. The 8-foot long side is a great place for a yard, and the space between the end of that yard and the curve of the main line is tailor-made for a turntable and locomotive servicing area.
Shape 4: Water Wings
Who says these track plans all have to have return loops? There’s nothing wrong with a point-to-point. Follow the sinuous cut marked on this sheet, and you get two long sections with a lobe on the end. Attach them at the narrow end and you have two areas for towns and industries, connected by a foot-wide shelf. I sketched in a switchback scheme that doubles your fun. Put a logging camp at the top of the switchback, a sawmill at the midpoint, and a port town at the low end. Or a coal mine, a marshaling yard, and a river port where coal barges are loaded.
Though the 3-foot-wide lobes are too small for an HO scale turnback, in N scale that’s plenty of room for a broad 15” radius curve. If you have a long wall to put a shelf on, this might be the configuration for you.
These are only four ideas for cutting up a 4×8; I came up with others for my article “Three track plans for one sheet of plywood” in our August 2008 issue. Get some graph paper and a pair of scissors and see what interesting train table shapes you can come up with by cutting up a 4×8.


