How To Roadbeds made easy with foam

Roadbeds made easy with foam

By Lance Mindheim | August 1, 2023

| Last updated on December 14, 2023

For model train layouts, extruded-foam insulation board is more than just a scenery material

Email Newsletter

Get the newest photos, videos, stories, and more from Trains.com brands. Sign-up for email today!

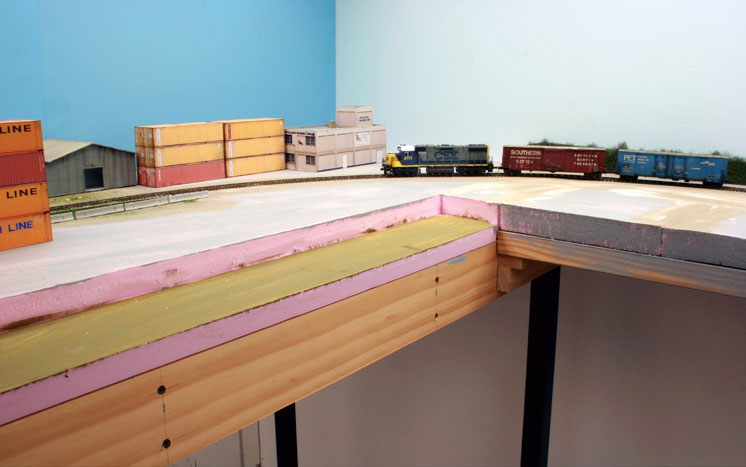
Roadbeds made easy with foam: Plywood has been the primary material for model railroad bench tops for many years. In many situations, though, I’ve found that extruded-foam insulation board is a viable alternative for bench tops built on either flat surfaces or open grids. With proper support, the rigid foam can easily hold anything a modeler may want on a layout.


An image of foam roadbed panels.
Lance Mindheim has found that extruded foam roadbed panels can easily be glued to traditional open grid benchwork. The foam board can also be laminated to a wide flat surface like a hollow-core door.

Bill Darnaby presented his ideas for using foam board in layout construction in the June 1994, March ’95, and September ’96 issues of Model Railroader. He also demonstrated how layers of foam could both replace the traditional plywood base and serve as the roadbed under the track. Most new ideas take time to catch on, but now we’re seeing a steady increase in layouts built using foam construction methods.


Extruded foam board

The Styrofoam brand of light blue extruded polystyrene insulation is made by Dow Chemical Co., but it has many competitors that market similar products in other colors. Extruded-foam board is made in rigid 2 x 8 or 4 x 8-foot panels for use in the construction industry. (In warm southern states, finding a retail source of the extruded-foam board can be difficult, but most local dealers can special order it.)

Foam board is sold in building supply stores in standard thicknesses of ¾”, 1″, 1½”, 2″, 2½”, and 3″. This product is inexpensive, lightweight, easy to cut and shape with ordinary woodworking tools, and it’s strong enough in compression strength to be suitable for many model railroad purposes.

Don’t confuse the stiff extruded foam board with the white bead board type of molded Styrofoam used to make ice chests and many types of common packaging materials. This bead board is much softer, has little strength, and has limited uses for model railroad applications.

Selecting the right material for the application is the key to success in building a layout. For all of its advantages, extruded foam board isn’t suitable in every instance, and it does have some disadvantages. It’s best suited for model railroads where the track is relatively flat. While it can be used in layouts that have grades, the construction of grades using foam board is much more involved. For short grades, you may wish to use Woodland Scenics foam riser incline sections. However, for major grades on a layout, plywood is a better alternative.

Since foam has little shear strength, extra steps must be taken if you want to attach operating accessories, like switch motors or gate mechanisms, to it. The most common complaint is some applications of foam board transmit more sound than plywood. While this may be true, I’ve found things quiet down once the scenery and ballast are in place.


Safety first

Common sense dictates that reasonable personal safety precautions should be taken when working with foam. Whenever cutting or shaping tasks create foam dust, wear a dust mask or respirator and eye protection. If you use a hot wire foam cutter, wear a respirator to protect against the fumes from the melted foam. And it’s always best to work in an open area that has good ventilation.


An illustration of open grid benchwork

Typical open grid benchwork is made of 1 x 4 lumber with cross members spaced on 16″ (or closer) centers.

An illustration showing shelf bracket benchwork
Shelf-style benchwork built on hollow core doors is becoming increasingly common. Since the shelf provides the support, thinner foam can be laminated on top.
An illustration showing L girder benchworkWith L-girder benchwork, the joists across the girders should also be spaced on 16″ (or narrower) centers.

1. Consider thickness

Foam roadbed can be used on top of most common types of model railroad benchwork, such as open grid, L girder, or shelf systems. The choice of the foam board’s thickness is determined by the supporting structure underneath and how much scenery is desired below track level.

If the only support is an open grid structure, I recommend using a minimum of 2″ thick foam. If the foam is laminated on top of a board, the wood provides the primary support, so thinner (¾”, 1″, or 1½”) foam may be used. Even if the thicker foam isn’t needed for strength on top of the wood, you may still want to use it to provide enough depth to carve out streams and scenery effects below track level.


2. Working with foam board

There are a variety of ways to cut the foam depending on its thickness. For the thicker panels (1½” or 2″), I prefer a saber saw with a fine tooth blade. If you use the saw, wear eye protection and a dust mask to avoid inhaling the fine foam dust.

The trick to sawing the thicker panels is to go slowly and let the blade do the cutting. Avoid pushing the saw. If the blade overheats it will melt the edges of the foam, making a mess of the blade and producing a rough cut.

An image of a jig saw on a piece of pink foam board.

The thinner (¾” or 1″) panels can also be cut with the saber saw or by using a sharp utility knife and a metal straight edge to deeply score the panel. (A dull knife chews up the edges of the cut.) I align the cut line in the foam over a straight edge, or a 2 x 4 standing on edge, and bend the foam down to snap it off in a clean straight line.


3. Foam board adhesive

An image of foam board adhesive

For the best results, use the proper foam board adhesive to attach the panels to the benchwork. Most home centers sell a number of brands, but be careful to look for the foam board adhesive labeling on each tube. There are a lot of different types of adhesives in similar looking tubes, so it’s easy for browsing customers to mix them up in the bins. Checking the label will ensure that the adhesive you get is compatible with the foam board (solvent-based adhesives dissolve the foam).


4. Open grid benchwork

For open grid applications (above), I glue the foam board in place by running a ¼” bead of adhesive along the top edges of the grid.

An image of open grid benchwork mid-construction.

Next, I carefully align the foam board as I gently set it in place and press the foam into the adhesive (below, left), making sure there aren’t any gaps.

An image of the underside of foam board benchwork with wiring.

Finally, I clamp and weigh the foam down (above) to obtain a tight joint and let the adhesive cure undisturbed overnight.

An image of foam board being adhered to bench work.


5. Shelf application

Attaching foam to a shelf is easy. I apply ¼” beads of adhesive in a grid spaced 2″-3″ apart across the wood shelf.

An image of foam glue applied to shelf benchwork.

Then I seat the foam into the adhesive, clamp or weight the foam to secure it, and allow the adhesive to cure overnight.

An image of foam board being adhered to shelf benchwork.


6. Adding cork roadbed

Gluing cork roadbed to the foam is easy. I spread the adhesive caulk (above) into a thin layer along the track’s center line, press the cork into the caulk, and allow it to cure. I also use the caulk to secure the roadbed and track.

An image of cork roadbed adhered to foam board.

Some situations, such as lightly used branches and industrial spurs, don’t have much ballast, so I model this trackage by gluing the track directly to the foam with ordinary white glue.

An image of Elmers glue next to track applied to foam board.

White glue is stronger than most people think, so a thin bead is all that’s needed to secure the track. Just be aware that white glue will reactivate with the use of water when ballast is applied, so it may temporarily release its hold on the track.


7. Shaping land contours

Prototype track may be level, but the ground around it includes shallow undulations and depressions. Although anything that will cut the foam will work, my tool of choice is a small belt sander and coarse sandpaper.

An image of a sander held onto foam board.

By holding most of the sander’s weight in my hand I can gently work it over the foam with a lot of control and leave a smooth finished surface. Be sure to wear a dust mask or respirator during this step. Extending scenery upward from a foam base is a matter of cutting and shaping chunks of foam and gluing them to the base.

An image of foam board after being shaped by a sander.

A modeler may either glue rough blocks to the surface and shape them later on, or carve a block to shape first and then glue the sloping block in place (right).


8. Finishing the surface

Fitting the various panels together or adding elevation with blocks of foam normally leaves some open gaps between the pieces. Filling these 1⁄8″ to ¼” gaps (above) is relatively easy using joint compound (drywall mud) smoothed with a wet paintbrush. After the mud dries, the top layers of scenery will completely conceal these joints.

An image of joint compound applied to the seam of two pieces of foamboard.

Once I’m satisfied with the contours and have the gaps filled, I paint the foam prior to applying my final layer of scenery. I’ve found this base color isn’t critical, but I do try to match the basic scenery color that will follow. I use either acrylic craft paint (left) or household latex paint for this step.

An image of green paint being applied onto foamboard.


9. Installing accessories

Mounting hardware on the foam requires a little planning, as foam board won’t hold screws. Some other provision must be made to mount switch motors and other devices under the layout. My solution is to glue small pads of wood to the bottom of the foam at the locations where I plan to mount the accessories. I use ¼” thick untempered hardboard or medium-density fiberboard (MDF) for the pads. Larger pads help spread out the pressures and their larger gluing surface means they’re less likely to pull loose.

An image of the underside of a foam board layout.

I spread a liberal amount of foam board adhesive on a pad, push it into place against the foam and tape it securely until the adhesive dries (usually overnight). Once the adhesive hardens, the pad is ready for any mounting screws that may be needed.

An image of a switch motor on the underside of a foamboard layout.

The switch motor shown was installed on a 3″ x 4″ rectangle of ¼” hardboard that I drilled with mounting holes for the screws. Once the pad was installed, I used four mounting screws to attach the Tortoise switch motor.

Foam board Q&A

Here are a few answers to the most common questions I get about using extruded foam bench tops:
Q: Is foam board construction a viable method to use for bench tops?
A: Yes. It’s seeing more widespread use and is an excellent substitute for plywood in the right situations.
Q: What thickness should I use?
A: If the only support is one of the open grid styles of benchwork shown on page 57, the 2″ thickness should be used. If the underlying support is a shelf (such as hollow core door or a 1 x 12 plank) any thickness can be used.
Q: If I place the foam board over open grid or L-girder benchwork, what spacing should I use for the joists?
A: Use 16″ (or less) centers.
Q: How do I cut the foam?
A: Thicker (1½” or 2″ thick) panels can be cut using a saber saw with a fine tooth blade. Thinner foam can be cut with a utility knife.

Looking for more information about foam layouts? Read Steven Otte’s Ask MR: How can I make a foam tabletop more realistic?.

Lance Mindheim is a frequent contributor to Model Railroader and our annual magazines. He lives in Silver Spring, Md., with his wife, Cathy, and son, Zachary. He owns the Shelf Layouts Co., Inc. (www.shelflayouts.com), a custom layout building and design firm.

25 thoughts on “Roadbeds made easy with foam

  1. Here is a link to a Jigsaw Knife Blade. You can also find Youtube videos on the subject of using a Jigsaw Knife Blade for cutting Extruded Foam.

  2. I have used both Blue and Pink 2″ foam. My layout table top is made of 2″ foam glued to 3/16″ plywood has been in place for about 6 years in a temperature and humidity control room. The pink foam has so far held with no noticeable shrinkage, however I have serious shrinkage of the blue foam. in a length of 8″ it shrunk about 3/16″ causing track gaps at the joints. It seems that shrinking takes time but it happens. Manufacturer predicts a 1.9% shrinkage I could send pictures if any one is interested.

  3. Don- I don’t know where you got the term “jigsaw knife blade”. Lance recommends a “saber saw with a fine tooth blade”. I’ve cut foam with a snap-blade or a fine tooth jigsaw blade on a slow speed. Look for a blade for aluminum or steel rather than wood as they usually have finer teeth

  4. I’ve been to Home Depot, Lowe’s & Harbor Freight. No one has heard of a jigsaw knife blade. Can you kijdly share where you got yours and maybe provide a photo even?

    Thanks

  5. Excellent article which just happened to appear when I needed it. Great job Model RR mag ! The new format of the newsletter is stupendous. Thank you for keeping it fresh !

  6. I would like to use a plywood base below the foam so that I can carve it down for river bottoms. is 1/4″ plywood OK, or will it warp between the joists of my grid benchwork?

  7. Perfecting time as I just started a new layout.
    I got some unused Woodlawn Scenic benchwork from an estate. These were sold a while ago. These kits make 3×1.5ft sections with NO cross beams. The instructions show the foam just siting on the frame. Has anyone done it like this? Based other comments I saw I am thinking of putting a piece of Luan down first and then glue the foam to the luan. Supposedly doing this eliminates noise issues.

  8. Helpful article, Bill. I also appreciated your comments and encouragement two years ago when considering foam board for my Progressive Rail layout–it worked quite well, and now it’s replaced the Lakeville modules on my reincarnation of the Twin Cities and Western Railroad.

  9. I’ve used extruded foam board for years.. Great tip to place a backing board in places that need to hold electronics via screws.. I have always used 3M 5300 Fast Cure. It works well on foam and wood. Two pieces of wood can be bonded, and when torn apart.. the wood will actually tare away.

  10. I’ve used foam for most of my mountains and it is so easy to slice through with a thin bladed, sharp knife. There are several videos on you tube for shaping foam panels into mountain scenery and painting the finished surface. Easy to work with, cuts easily and takes paint well. Great article, thanks

  11. Our Railroad Museum here in Sioux City has a 15' x 80' layout that was built in 1990. The entire thing is built with pink or blue foam. The only thing is if you have to get on top. Make sure you have a piece of plywood to kneel on otherwise it will dent.

    Dick

  12. I love using foam board, it makes changing terrain height so easy. Couple notes that I haven't noticed if you get the board with the thin skin on it make sure you peel it off first and also I use the Locktite brand multi purpose caulk adhesive instead of the PL300 foam adhesive as it sets much faster and I think it is a better hold and it doesn't eat into the foam.

  13. I want to second Brian Backner's comments about the flammability issue with foam board. When isolated behind sheetrock the stuff is pretty safe or I doubt it would be allowed by the national building code. However on our layouts only the top side is covered with plaster, Sculptamold, and other materials. However most of our wiring is below the foam and that is where a fire is most likely to occur so safe wiring practices are important, especially with large DCC boosters. Also don't forget things like taillight bulbs used as circuit breakers. I recently set up a RRampmeter on an unsceniced section of track, with a 12 volt bulb attached as a load. After taking the photograph for my DCC Corner column I removed the taillight bulb and noticed it had gotten so hot it melted a hole in the foam board it was laying on. Flammable products require special attention when not being used in the specific application they were designed for.

  14. A thoroughly interesting and informative article. Thanks Lance. Here in E. Texas the only foam board available is the 2" thick white foam board that is granular when you look at it closely. I pealed the reflective foil off one side and the clear covering off the other side. I have used Tacky Glue (available in craft stores to bond it together). On the surface I have simply used white glue which seems to work fine. It cuts easily with a very sharp fish-filleting knife. I have it on 16" centers on my 5'X6.5' O scale layout and it has held up very well. I'm looking forward to building a much larger O scale layout using foam board, when I have the space.

  15. For years, I've used "blueboard" foam panels for scenery, and find that the best method of shaping is
    with a serrated bread knife, before "finishing up" with a Surform file. Great stuff, that foamboard!

  16. there are "knife blades" without teeth available for jig saws that I find work well, and leave a minimum of debris floating around the room for days and days

  17. Great article, Lance. I gave a pretty extensive clinic on building several types of modules with extruded foam at the PSX 2004 NMRA Convention in Seattle, Washington. If you have a copy of that clinic book, my written article is in there. One of the modules I showed how to build was/is a box module built entirely out of extruded foam. On my personal layout, I used these to hide the 2% grade that I used to ascend/descend to/from the upper level of my two levels. It is actually relatively easy to create grades in foam, but Lance's article is correct if you want to create a helix or any other rapid increase in grade. Incidentally, I am now between layouts, but my new on will be built with foam modules.

  18. I have used the pink Owens Corning product on my current HO and On30 shelf layouts – I wanted something that would be portable since we plan on relocating soon. It worked GREAT! Used two layers on the HO so I could carve out a harbor area and one layer on the On30 – on that one I did use the Woodland Scenics riser set for a up-grade track location. I did discover the hard way that the board out-gases so you need to cover any water areas with spackling compound or something similar as a base before pouring any water. I didn't do that in my one water area and bubbles keep forming over about a year so far – I just use an awl to punch them out but the bubble texture doesn't look to bad at a distance. I may some day fix these water areas.

  19. I have 5 card table sized N gauge layouts using this technique. Only 1/2 inch insulation board is available in Statesboro, GA. Two laminated pieces of board are adequate. I use back-band molding to make a frame around the layout. It not only looks nice, but reinforces the insulation board.

  20. Nice article; I am considering using foam for my layout expansion. However, by far the easiest way to cut the foam (in straight lines, that is) is with a table or radial arm saw. It cuts through the foam like it isn't even there, and a leaves a beautifully smooth edge.

You must login to submit a comment