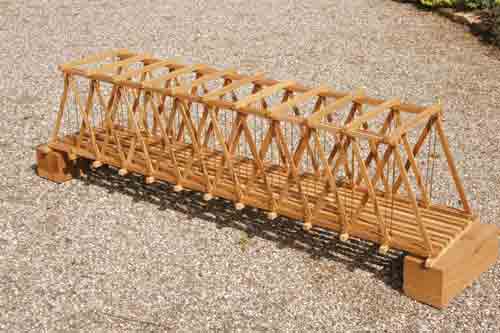
1:24-scale Howe truss bridge kit with extension
Smith Pond Junction Railroad Products
2245 141st Avenue NW
Andover MN 55304
Prices: 24″ bridge kit, $79.99; 12″ expansion kit, $41.99; 24″ expansion kit, $75.99
Web site: www.spjrr.com
Cedar-and-brass kit for Howe truss bridge; all parts included; instructions with web link for online tips provided. Dimensions as built: length, 49″; width, 101/2″; height, 11″. Inside dimensions: height (without track installed), 91/2″; width, 7″
Pros: Well designed kit; accurately cut and drilled components; straightforward assembly; attractive and authentic finished product
Cons: Instructions could be a little clearer
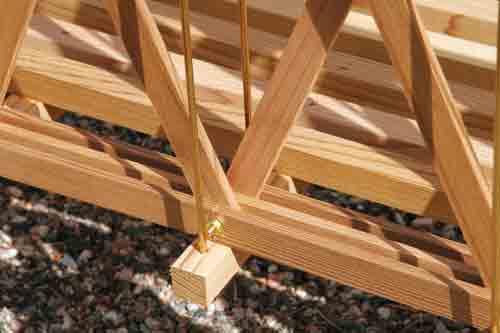
Smith Pond Junction’s bridge follows typical Howe-truss construction. Top and bottom beams are each made of three parallel beams, with the diagonal members sandwiched between. The entire structure is held together with threaded brass rods.
The basic kit will construct a bridge that is nominally two feet long. The company also offers a 12″ and 24″ extension kit. These extension kits can be used to build bridges of virtually any length, in 4″ increments. For review, we were supplied with a basic kit and a 24″ extension kit.
The kit arrived well packed, with all components-both metal and wood-individually packaged according to size. Instructions consisted of three written 11″ x 17″ sheets, along with full-size drawings of the model to be used in construction. All wooden parts are of Western red cedar and all metal parts are of brass. The instructions recommend this kit for the experienced modeler and I would concur with this recommendation.
The instructions start by suggesting that you read and understand all of the instructions before you start. Yes, indeed! I read them, but did not clearly understand them, even after a second reading. However, a link to a tips page on the company’s web site was provided, so I availed myself of that information. I suggest that you do the same. Online are step-by-step photos of the bridge being constructed. This, along with the written instructions, cleared the way.
Once I understood the way the bridge goes together, and the designer’s intent with the modular beam pieces, construction was straightforward and followed a logical sequence. Top and bottom beams are laid out on the full-size drawing while they are being assembled with the pre-threaded brass rods supplied. All nuts and washers (also brass) are supplied, too. You’ll need a 3/16″ nut driver to tighten the multitude of nuts that hold this structure together. Bridge sides are made in half-side modules. If you are using an extension kit, this must be assembled simultaneously with the main bridge, and goes together in the same way. When all halves and extensions are finished, they are carefully brought together to form the finished sides. At this point, all nuts can be tightened. All connectors are just short brass rods, threaded on both ends, and secured with nuts and washers. No glue.
The beams are ingeniously designed to be used in a modular way. Each bridge module is 4″ long. The beam components supplied are one, two, three, or four modules long. They are assembled in such a way that joints are paired with solid beams in adjacent beam members, so that the structural integrity of the bridge is not compromised. Also, using this system (once you understand how the thing goes together), you can build a bridge of any length divisible by 4″.
Once the sides are finished, the base comes next. This is a simple matter of laying stringers and cross members over the drawing and gluing and nailing them together. The stringers are a little long and require trimming, which you can do before or after the base is assembled. I did it afterwards, which worked fine.
With the base finished, the entire bridge is assembled. This is done by threading the long brass rods through pre-drilled holes in the base’s cross members, laying the sides in position, and putting the top cross members in place, then tightening the nuts when everything is assembled. The light and fragile-seeming components combine to form a surprisingly strong and rigid structure. It is possible to tighten the nuts too tight, causing the diagonals to bend. Also, you may find yourself spending some time tuning the bridge, to alleviate any twists that you may have inadvertently put into it by uneven nut tightening.
The manufacturer does not recommend gluing the truss sides in place. You may want to rethink this. I left the bridge out in the weather (40° temperature spreads, sun, and rain) for around 10 days. During that time, all of the previously tight joints loosened up due to the wood changing. I tightened them up again okay, but you’ll need to keep an eye on things until the bridge finally settles.
Although nominally 1:24 scale, the internal dimensions of the finished structure are large enough for just about any train in the common garden scales. While not a finescale model, Smith Pond Junction’s kits make up into a handsome, structurally authentic bridge that should provide years of service if properly cared for.