Robo3D
4902 Morena Blvd, Suite 812
San Diego CA 92117
Price: $799.99 new, $499.99 refurbished
Website: https://robo3d.com
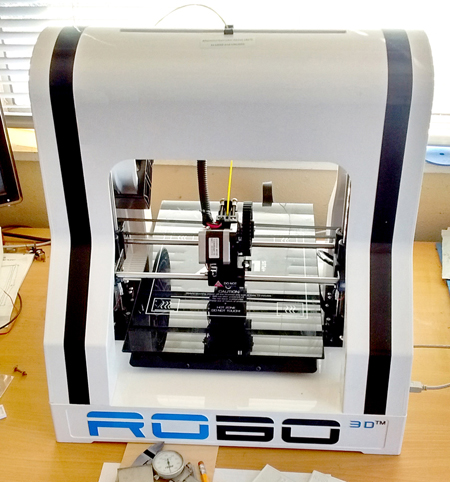
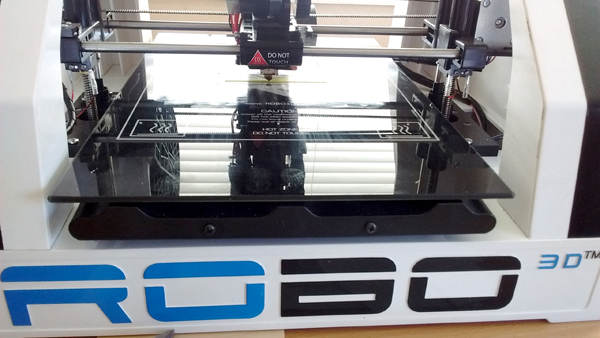
R1 +Plus 3D printer; self-leveling print bed; PLA, ABS, and other specialty filaments accepted; 8″ x 10″ x 9″ build area
Pros: Large build area; self-leveling print bed; PLA, ABS, and some more exotic printing material can be used; easy-to-use interface software; supplied video assists in setup and use
Cons: Prints are hard to remove from the build platform; unit is noisy; sometimes it’s hard to install filament
Included in the package is the printer, a spool of PLA filament, printed instructions, a power cord (not included with mine), spool support, and a USB cable. In a separate plastic box are a small screwdriver, lubricant, washable glue for the print bed, tweezers, a wrench, an SD card containing software and a video, a hex key, and a putty knife for removing the print from the bed.
The R1 +Plus is easy to set up by following the video-assist movie, the included printed instructions, or the company’s web-based instructions (http://download.robo3d.com/docs/R1/GETTING_STARTED_GUIDE9-10.pdf). The printer can use 115VAC or 220VAC, so you must be sure to use the correct setting in the back of the printer before you turn it on. Attach the USB cable, turn it on, run the video on the included SD card, and follow the web or printed instructions.
The user-interface software will run on Windows or Mac personal computers. At the moment it is not available for Linux operating systems but that is changing. In Beta release is an app for your phone (I don’t recommend this unless you are ready to spend some time figuring out why things are not working). The phone must be an Apple iPhone with iOS 9 or 10 and you must load Octoprint onto your printer. I don’t recommend this route unless you are really good with computers.
After you unpack the unit and set it up close to your computer, you will need to load the operating software onto your computer. Insert the SD card into the SD-card slot (or use an SD-to-USB adapter, not included) and look at the files on the card. You will find the Getting Started Video (ROBO3D_July2015.mp4), Mac-compatible software (MatterControlSetup-1.3.0.pkg) or Windows-compatible software (MatterControlSetup-1.3.0.exe) on the card. Select the software that matches your operating system and follow the simple onscreen prompts for installation on your computer.
Make sure the printer is connected to your computer via the supplied USB cable. Click the MatterControl icon on your desktop. With the MatterControl software running, click the “Add printer” button at the top of the screen. A new window will pop up at which time you will be able to set up the 3D printer. Find the “Select make” drop-down list and choose ROBO 3D; select “R1” from the model list. Save the settings by clicking the “Save & continue” button.
You must install a communication driver for the printer next. A new set of windows will open and prompt you to “Install communication driver.” Do this by clicking “Install driver” in the bottom left corner of the screen. Once the driver is installed, a “3D printer setup” window will appear. Follow the instructions on this screen to disconnect the printer and press “Continue.”
Now you must reconnect your ROBO 3D printer and press “Connect.” Once the printer connects (this can take up to a minute or so), you will see a “Connection succeeded!” message. Click “Done.” This is a lot of clicking, but it only took me about 10 minutes to complete it successfully and get the machine up and running.
The R1 +Plus uses an operating-software package called MatterControl. Load this software from the SD card or download it from the Robo3D website. If the supplied video is not as complete as you would like, visit www.mattercontrol.com and click on the “Learn more” text to learn some of the finer points of using this software.
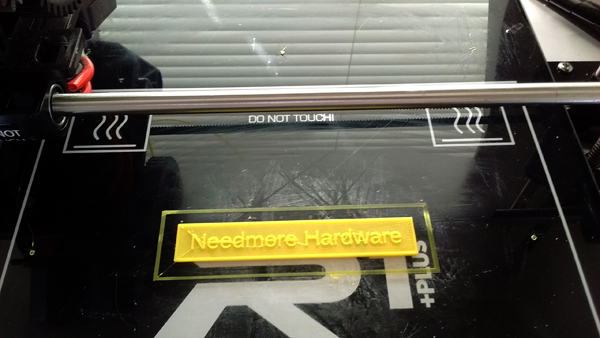
There are many options available for slicing your .stl model in a variety of ways. I tried them all and did not see much of a difference in the quality of the finished product. You can also watch the printer printing out your model by pressing the “layers” button in the upper middle of the screen.
No hobbyist machine comes with 3D modeling software, so you’ll have to provide your own. You can purchase a 3D modeling program or use one of the many, very good open-source 3D modeling software applications available for Windows, Mac, or Linux machines. My favorite is OpenSCAD, although applications like Sketchup, Blender, TinkerCAD, and many, many others, are available for free download. Pick one that you like or that has been recommended to you and stick with that one. You will find that most of these have excellent tutorials, examples, and videos.
When printing, I usually use the high- or medium-resolution setting under the “Quality” tab in “Settings.” Prints take a while longer but you will get better results. I have printed several dozen objects thus far, changing from PLA to ABS and back a couple of times. The filament is, at times, difficult to load. You should make sure the filament is straight for about 6″ at the point of entry into the extruder opening. Otherwise it will curl around and pop out where you least expect it.
Robo3D offers some exotic filament materials for separate purchase, including carbon-fiber PLA and wood PLA. The carbon-fiber PLA contains 15% carbon fiber by weight, while the wood PLA is infused with sawdust. Robo3D also offers filaments in neon colors, glow in the dark, and metallic gold and silver. I have not tried any of these because I do not have a project that would require such filaments. . .yet.
There are a couple of things that I do not like about the Robo3D R1 +Plus. First, it is really loud. The fan noise is much louder than my previous machine. Second, it takes a large footprint. Because of the larger footprint, I am investigating methods to remotely control the machine so that it can be permanently set up in a more convenient place away from my computer.
What I really like is the interface software. It’s versatile and has options that allow me to customize the printing process according to the print that I am doing. The self-leveling bed is also a great feature. This has saved me a lot of time and, especially, minimized my frustration. The quality of the prints is similar
to that of other hobbyist machines that I have used, including more expensive machines. Print times are about the same, also.
A new unit can be purchased for about $799.99. I chose to purchase a refurbished unit from Robo3d for $499.99. It worked great right out of the box.