


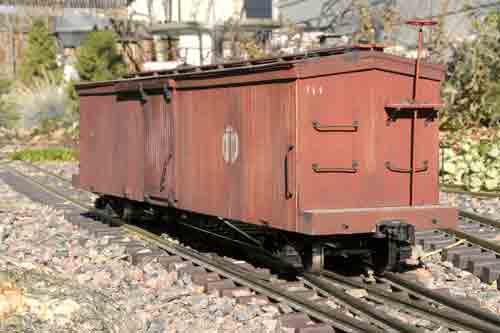
Troubleshooting problems with gauge-1 switches: If you were to ask any model railroader what the biggest headache on his or her railroad was, “switches” would rank in the top three every time. If we want our trains to do more than just run around in circles, however, they’re a necessary part of any model railroad. So, as in any successful relationship, we must learn to love them despite their faults. Fortunately, getting our switches to operate smoothly usually doesn’t involve too much work.
The first thing a switch needs for smooth operation is a firm, flat base. Even if your track floats in ballast, it’s advisable to mount your switches on some kind of sturdy base, such as length of 2 x 8 lumber. This keeps switches from twisting and the track leading into and out of them from dropping precipitously off the ends of the switch. All the rails going into and out of the switch need to be in one plane.
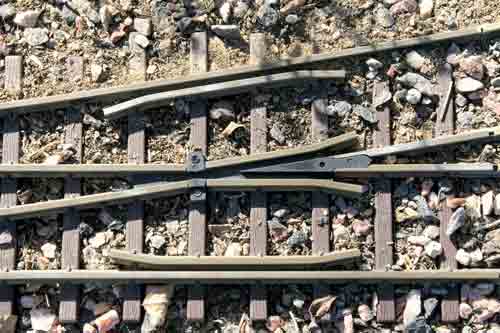
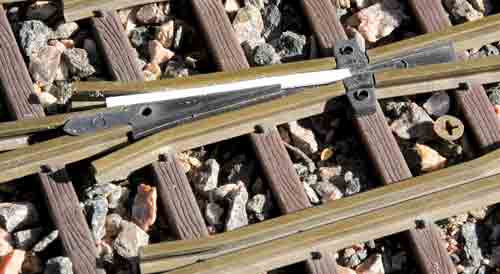
The next thing is to make sure the points can move back and forth easily, and close firmly against the stock rails. Cleaning the points is the most routine of any switch maintenance and really should be done before each operating session. I carry a small, stiff brush in my pocket when I’m running, as ballast likes to migrate and continually needs to be kept out of the works. If your switches are controlled remotely, it may be advisable to not ballast the points of the switch, to minimize the chances of debris working its way between the points. Murphy’s Law seems to apply itself readily to the most inaccessible switches on a railroad. The flangeways through the frog and guardrails need to be swept clean as well, though these areas are less prone to debris bouncing in during regular operations (photo above).
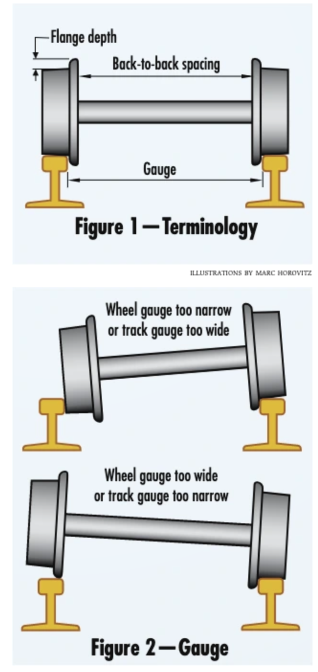
As important as it is to keep the points and flangeways clear, that’s not even half the battle in terms of proper operation. The biggest culprit in derailments over switches is actually not the switch itself, but the wheels that run over it. There are two aspects of the wheels that determine how well they’ll operate through as switch: gauge and flange depth (figure 1, above). Gauge is most commonly described as the distance between the rails, but it can also refer to the distance between the points where the flanges meet the wheel treads on a wheelset. This distance is important because it determines how well the wheels fit on the track (figure 2, above). A wheelset that’s gauged too narrow may fall between the rails, while one that’s too wide will tend to ride up and over the rails. From the illustration, one could draw the conclusion that there’s a bit of leeway in terms of gauge, as long as the outside edges of the treads are always greater than the gauge of the track.
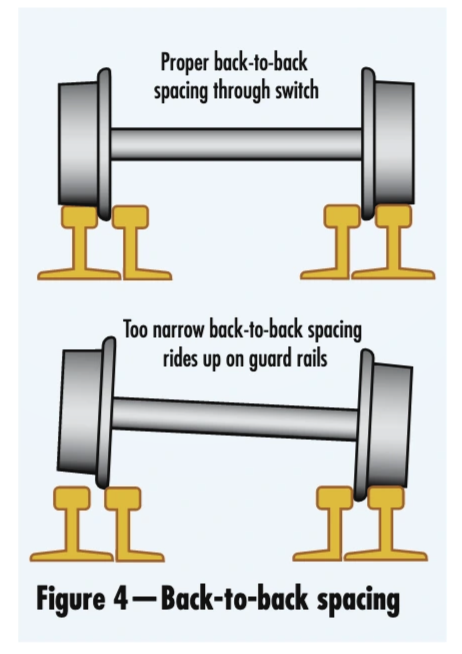
That might be true for any regular track, but when it comes to switches, there’s another aspect of the wheel gauge that needs to be taken into consideration, called back-to-back spacing. This is the distance between the back sides of each wheel. This measurement is critical because, when a wheel enters a switch, it runs through the points and over the frog, and has to navigate through the guard rails. When the back-to-back spacing is too narrow (figure 4 above), the wheel will ride up over the guard rail, possibly leading to a derailment. For gauge-1 track (45mm), the optimum back-to-back spacing is 1.575″.


Adjusting the gauge of the wheels may or may not be a simple task. In many cases, the wheels can be adjusted by removing the wheelset and adjusting the distance by tapping lightly either on the axle or the wheel, depending on which way the gauge adjustment needs to go (photos above). Adjusting the gauge on locomotive axles can be more problematic, so if it’s not causing a problem, don’t worry about it.
The second aspect of smooth operation through a switch is the depth of the wheel flanges. Flange depth is important because, on most switches, the frog’s flangeway is a certain depth below the railhead. Ideally, this flangeway should be the same depth as the flanges on the wheels, so that the wheel rolls smoothly through the switch. If the flangeway is too shallow, or the flanges too deep, the wheel will bump up while going through the switch. If the flangeway is too deep, or the flanges too shallow, the wheel may slip down at the throat of the frog (the point where the two flangeways converge). On many switches, it’s at this momentary point that the wheel is supported by the flange, not the tread. While flange depth through the frog will seldom cause a derailment, it can cause nerve-wracking bumps as the cars go through the switch.
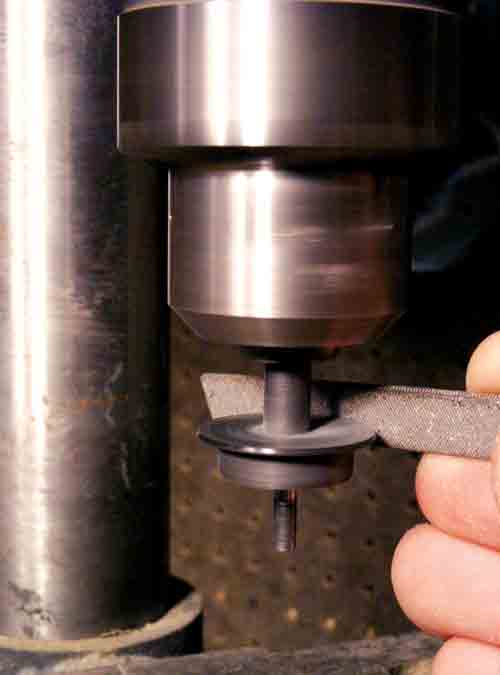
Curing this problem isn’t very cut-and-dried, though, primarily because each manufacturer seems to have its own preference when it comes to flange depth. The ideal solution is to standardize all your rolling stock by using a single brand of wheels. This way, you can adjust your flangways (if necessary) to accommodate the vast majority of the wheels on your line, and live with a small handful of pieces that go “bump.” Usually, these will be locomotives, which have more weight and are less likely to be affected by bumps. It’s also possible to file down large flanges by mounting the offending wheel in a drill press (photo above).
Adjusting the depth of the flangeway to match the flange is a little easier. If the flangeway is too deep, small strips of styrene can be glued in to raise the surface of the flangeway to the proper depth. If it’s too shallow, a bit of sandpaper or a file will quickly take away the excess material (photo above).
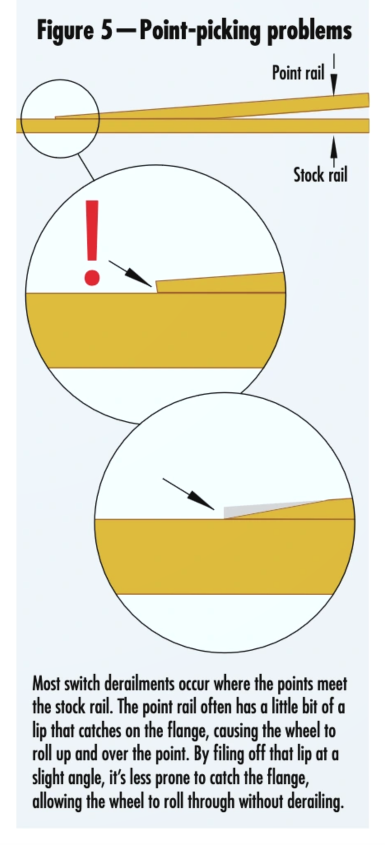
The most common cause of derailments at a switch comes from equipment “picking the point” of the switch. This occurs when a wheel hits the point and, instead of going the intended direction, decides that the path of least resistance is to either roll over the point or push it aside and roll through the wrong way instead. The cause of this lies at the place where the point meets the stock rail. In many cases, there’s a little bump where this occurs because the point rail doesn’t taper sufficiently (figure 5). The flange will catch on this and, instead of rolling to the side, will climb up. This problem can usually be eliminated by filing a small taper into the tip of the point so it joins the stock rail smoothly. This eliminates the bump that causes the flange to want to ride up.
I don’t think the terms “trouble-free” and “switch” can ever be considered remotely synonymous. These necessary pieces of trackwork will always find ways to confound and perplex the railroader, no matter what scale. However, with some proper care and routine maintenance, they can be made to be as reliable as Mr. Murphy will allow. And that’s about as much as we can ask.

Are the two illustrations for changing the wheel spacing turned around?
using a hammer on the end of the axle would move the wheel towards the end of the axle making wider wheel on the axle.
The first illustration shows how to widen the wheel on the axle but instead would narrow the wheels on the axle.