


Drawings showed locomotives billowing rich clouds of smoke. All that these kids had to do was drop a little white pill down the smokestack to bring forth the magic.
Reality was another matter. At best, the new Lionel smoker generated a wisp of smoke, hardly a billow. Still, young engineers were determined to make the locomotives smoke as much as the illustrations suggested. Ignoring the instruction book, which called for one pill at a time, they assumed that if one was good, two or more were even better.
Unfortunately, the smoke units didn’t work that way.
How it works (and why it stops)
Early Lionel smoke generators used wax-based pellets, which were melted and turned into vapor by a coil-heating element in a chamber under the smokestack. A piston connected to the locomotive’s drive train pumped air through a tiny hole in the chamber bottom, causing the puffing effect. The heater element was designed to handle only one smoke pellet at a time. Adding more overloaded the heater coil and kept it from attaining maximum temperature, thereby causing it to produce even less smoke than normal. When they cooled, the liquefied smoke pellets hardened in the bottom of the chamber, often clogging the air hole and disabling the puffing feature. Sometimes, the pellet residue dripped through the hole and froze the piston to the cylinder walls.
The more daring kids discovered that if they parked the locomotive in neutral and turned up the voltage for a few minutes, they could melt the hardened residue and get the train to puff again. This worked for a while, but it also drastically shortened the heater coil’s life. That is why so many postwar smoking locomotives are found with burned-out coils and hopelessly clogged chambers.
Repair and restoration
Trying to return an old pellet-type smoke generator to something approximating its original function and output can be a challenge. If the thing still works somewhat – in other words, the heater coil is intact – you have a fighting chance. If the coil is burned out, forget it.
Although the right Nichrome wire to rewind the element is available, it’s an exacting job. You must have the correct number of tight windings on the ceramic base, and you need a special crimping tool to secure the wire to the eyelets on the ends, without breaking the ceramic in the process. This was all originally done by machine. I’ve tried this a few times by hand, with mixed results.
Equally challenging is the task of removing the old pill residue. You can loosen the waxy residue with an external source of heat, but you’ll probably wind up scraping it anyway before you’re finished. The die-cast bottom of the chamber has to be cleaned out, the air hole must be opened all the way, and the piston has to move up and down freely – all of this without breaking the fragile wires on the heater element. If you are patient, and saving the original pellet unit is important, go to it.
Even if you do the job right, you’ve got another problem: the pills. Lionel smoke pellets still can be found on the collectors market, but they’re fairly expensive. Lionel hasn’t made any in 30 years.
Fluid conversion
If you enjoy operating your trains and want your locomotive to puff as it should, Lionel offers an alternative solution. You can buy a conversion kit (through a Lionel authorized service center) that will change your old pellet-type smoke generator to smoke-fluid operation at a cost of about $5.
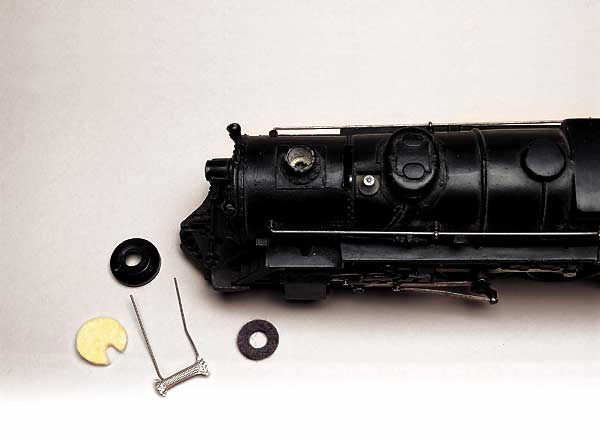
The conversion parts consist of a resistor in a sleeve that acts like a wick, a fiberglass liner for the smoke chamber, and a new plastic smoke unit cover. A new smokestack gasket, not included, should also be installed to ensure a good fit between the smoke generator and the locomotive body. It’s a simple job. If your piston and linkage aren’t covered with residue and still operate freely, you may not even have to remove the smoke unit from the chassis.
Start by removing the boiler shell. Then follow these steps (aided by the photos) in order:
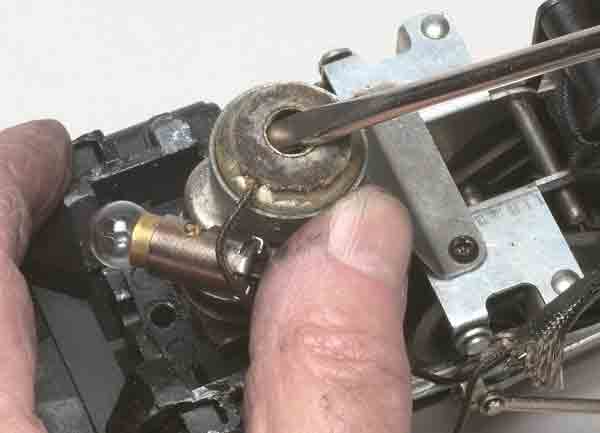
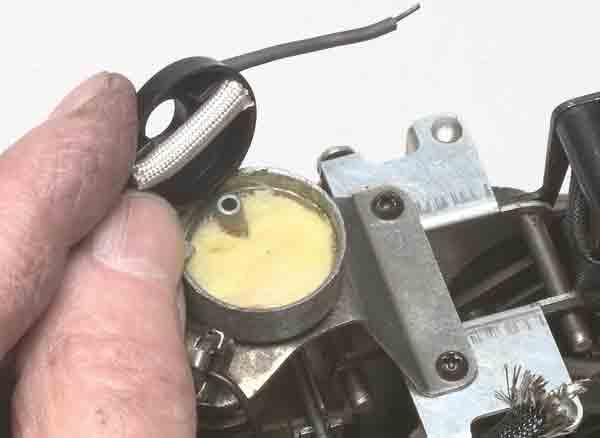
Remove the smoke unit cover. Break the old cement joint around the top edge of the unit by scribing it with an X-acto knife. Use a screwdriver to pry off the cover (fig. 1).
Remove the old heater-coil element as well as the smoke-unit lining (fig. 2). Both will be replaced.
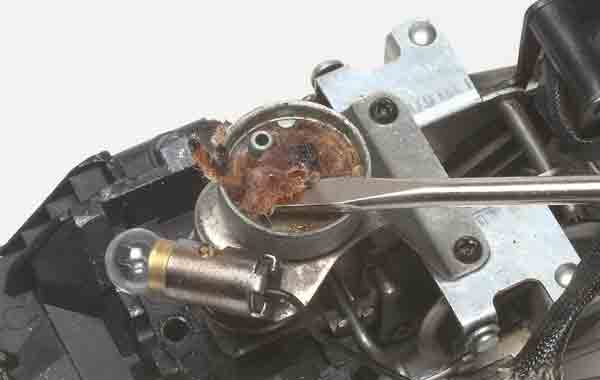
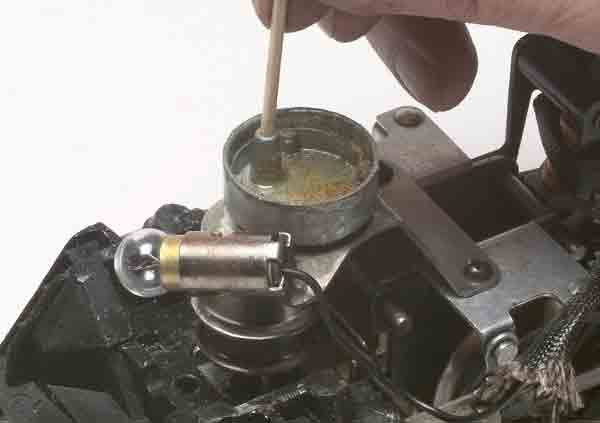
Clean out all pellet residue. Scrape it out with an X-acto knife or another sharp tool. In extreme cases, the unit can be heated and the liquefied residue removed with cotton swabs. Use a toothpick or a similar tool to make sure the air hole is unclogged (fig. 3).
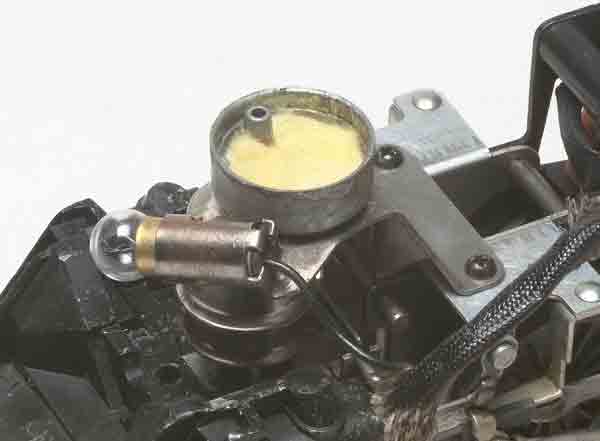
Insert the new lining on the bottom of the chamber casting (fig. 4). Make sure the air hole remains unobstructed.
Center the sleeved-resistor heater element (fig. 5). Some dealers offer kits with the elements already centered in the new plastic cover. If your element isn’t centered, do so now and bend the lead wires to keep it in position.
Install the new cover. Make sure the heater element is still centered and attached, and snap the cover into the chamber casting. It doesn’t matter how the cap is positioned. Just be sure the heater element doesn’t interfere with the air hole. (The cap is a press-fit, so don’t glue it into place.)
Insulate the new wires. Install heat-shrink tubing over the exposed wires and heat into place.
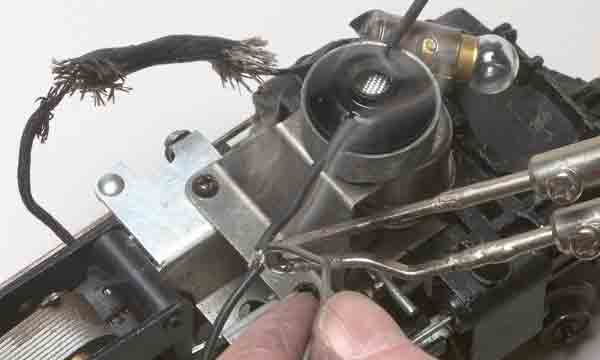
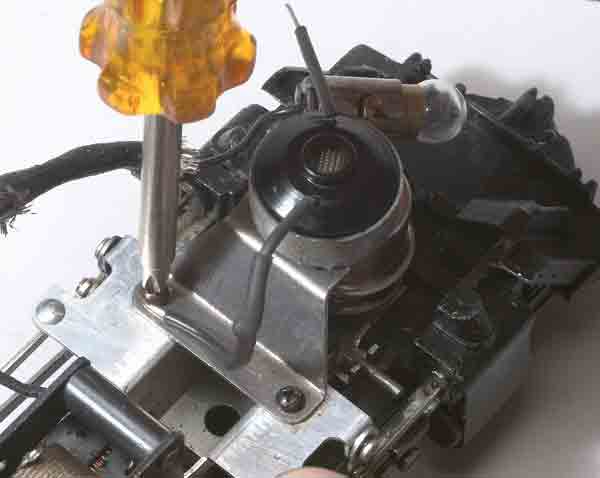
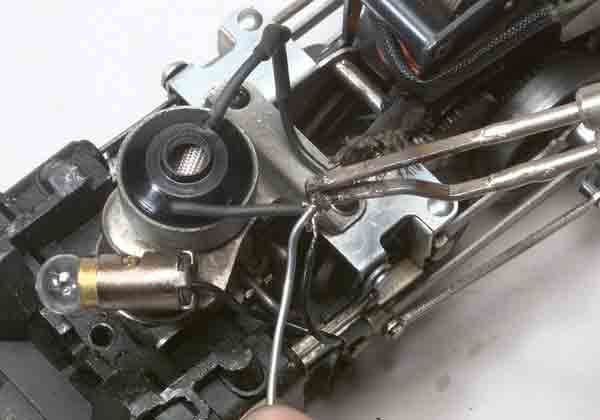
Attach the wires. You may need to extend the wires by soldering additional lengths of wire onto the ends to reach the necessary points on the frame (fig. 6). Ground one wire to a convenient screw on the locomotive’s frame (fig. 7). Attach the other wire to the E-unit lug where the old smoke unit wire had been connected (fig. 8).
Test the unit. Put two drops of smoke fluid directly on the heater element. Attach transformer leads to the locomotive and apply power. If you’ve done everything correctly, your converted smoke generator should work almost immediately.
Reassemble the locomotive (fig. 9). Install a new stack gasket over the cover hole, and reinsert the mechanism into the boiler casting. Make adjustments so that the smoke-unit hole and the smokestack hole in the casting line up before you complete the reassembly.
Because these conversion kits have been around for over a decade, they have now proved themselves reliable. But if they should ever quit working, replacement is easy.
Once converted, your locomotive will smoke better than it ever did with pellets, perhaps belatedly fulfilling a catalog image marketed a half-century earlier.


just read the article on converting a pellet unit to liquid unit Where can I buy a conversion kit.
thanks
Just what I was looking for. I'll give it a try on a test locomotive and see how it works. Thanks!
I have been repairing trains since early 70s. I have rewound probably close to 1000 smoke units as per original. Have always told customers to not use pills. They are absolutly not necessary. Just because it is a pill type unit does not mean you have to use a pill in it. Just put very few drops of any liquid smoke in and it will smoke. Cheap smoke fluid is lamp oil from the Dollar store. I have never used a pill in any of my personal locomotives and all are original Lionel smoke units because of the resolidification problem with the pills.
Very Good…..
I used this article to convert a 671 and a 2025 to fluid and I'm pleased with the results. Much better smoke output than with pellets. Great instructions and illustrations.
Well written article with clear supportive pictures.
Exactly the information that I needed. Thanks
Very complete article, but what I need is specific to an article published some years age in CTT reguarding factory mis-wiring of smoke units with small blower motors. My Century Club Berkshire never did produce smoke that "puffed" – only smoke that sort of found it's own way out of the smoke stack. I need to find that article to hopefully solve this problem.
Well written article with plenty of details.