


Do it yourself locomotive restoration Yes, you can do it yourself!
Restoring old tin trains is not as difficult as the popular folklore would have you believe. It doesn’t require any special skill or knowledge that you can’t master. Nor does it entail exotic or expensive equipment. Anyone can do it with simple household tools and products.
We will limit ourselves here to restoring the exterior of a piece – basic body and fender work; cleaning, straightening, and painting – not the mechanical or electrical parts. Tackling those could require special expertise and equipment. There are repair books, articles, and technical manuals available if you are so inclined.
All you really have to do is overcome the inertia and the fear, dig in and do it! If you botch the job, you can start over. Eventually you’ll get it right. That’s the beauty of working with metal trains. I did my first restoration, a Lionel No. 812 gondola, four times before I was satisfied.
Start with something cheap and simple, and gradually work your way up to that Blue Comet or Hudson; you’ll be there before you realize it. If you do enough easy jobs well, your confidence level will build along with your expertise. The important thing is to get started and keep at it, learning and developing your technique with each successful project. Here are some step-by-step suggestions to guide you:
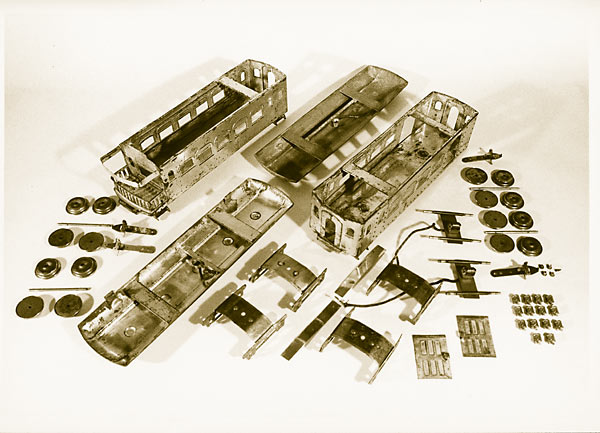
1. Take the piece apart completely
Yes, undo every bolt, tab, and rivet. Get down to basic component parts. There is no shortcut around total disassembly if you want the finished product to look right. If you think you’ll have trouble remembering how the thing fits together, make notes or drawings as you take it apart to aid reassembly.
Bolts and screws are usually no problem, unless they are badly rusted. A good soaking with penetrating oil, such as WD-40, and some gentle persuasion most often loosens them. In difficult cases, a file or a small hacksaw blade will have to be used and the bolt replaced.
Rivets are another matter. I have given up trying to save them. They usually break or come out so mangled after removal that they are unusable. Rivets can be replaced with new ones, if you have the tools to do it, or they can be “fudged” by using small bolts and nuts or split rivets instead, if you aren’t that fussy about it.
Be careful with the little metal tabs that hold most assemblies together. They were intended to speed construction with no thought beyond initial fabrication. They break off easily, but most will withstand one disassembly without serious damage. Bend them only as far as you absolutely have to. Then, during reassembly, try to stress them in a different way than they were originally. For example, if the tabs were twisted in the slots, bend them over instead. If they were originally bent over, twist them. Don’t try to bend them in a full 90 degrees or in the opposite direction.
Major bending and straightening operations can be performed at this point, with final smoothing and touching up left for later, after the pieces are stripped. While step-by-step instructions are impossible because each case is different, it is recommended that you start with your fingers. Do as much straightening as you can by hand before you reach for your tools. Work slowly, applying even pressure. Ease the metal back into its original shape. Keep your tools as “soft” as possible. Use wood blocks to minimize the impact of hammer blows. Line the jaws of your vise or pliers with cardboard. Realize that some dents and creases have stretched the metal too far and will just have to be filled in later.
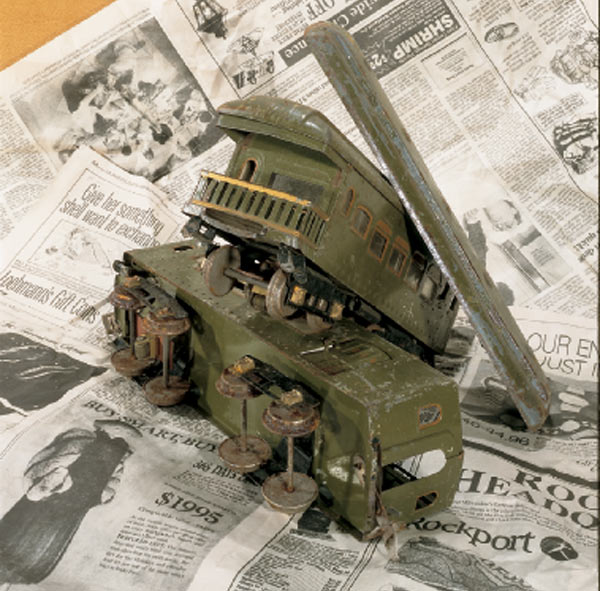
See a restoration of a Lionel No. 252 in this article.
2. Match the original color
Clean a section of the original paint and try to find a match for it. The inside of the piece usually works best. Check the paint chips for all of the commercial spray-can enamels. It is amazing how close some of the Krylon, Rust-Oleum, and other off-the-shelf colors can be. Don’t overlook the auto supply, chain, and hardware store house brands, such as Ace and True-Value. They are all slightly different, but equally easy to use. They dry quickly, before the dust has a chance to settle on your work. Shop around.
If you can’t find a satisfactory match in the spray-can enamels, try the specialty automotive paint stores. They have hundreds of color chips in their catalogs and will package the paint in aerosol cans if you request it. (However, many of those stores sell lacquers, which are harder to handle than enamels.)
As a last resort, you can have your color custom-mixed at a paint store. This is rather expensive, because most stores will not mix less than a quart, and you will need some sort of sprayer in order to apply it. If you have an airbrush, great. If not, the paint store will sell you a substitute, a Preval Sprayer. These things work well.
My first choice is to find the color you need locally, but there are mail-order suppliers of paint. You may wish to experiment with these sources until you find one with colors that come closest to matching what you need.
3. Strip the pieces
After you have matched your paint, the next step is getting down to bare metal. Any brand of household semi-paste paint remover will strip off old paint. I know; I’ve tried them all. These products will also attack your skin, so wear gloves, protective clothing, and goggle. Be careful that you don’t spill any on surfaces you don’t want to strip.
If often takes more than one application of paint remover to get rid of all traces of the old paint. Be patient and keep at it. Be sure to wash off every bit of the stripper before you start to repaint. You don’t want soft spots or blemishes in the new finish.
A good alternative to household paint removers is the “boiling cauldron” method. This is the most practical if you want to strip quite a few pieces at the same time and you have a large pot or kettle that you no longer need for cooking. Simply put all of the pieces in the pot, fill it with water, and dump in three or four cups of laundry detergent powder. Boil it on top of the stove for several hours. You’ll know you’re finished boiling when all of the pieces no longer have paint on them. Rinse thoroughly.
4. Clean rusty or discolored surfaces
You don’t need a sandblaster or tumbling machine, although they would be helpful. Steel wool, wire brushes, sandpaper, and elbow grease are all that’s required in most cases. Holes in car bodies can be plugged with automotive body putty or any of the commercial epoxy fillers available at hardware stores. I’ve had fine results with the gray epoxy in the double syringe dispenser and the stuff that comes in blue and yellow strips.
Automotive glazing and spot putty, a quick drying filler, can be used on a minor rough spot and as a finish over body putty repairs. It is important that the patch is sanded very smooth and dovetailed with the metal before painting.
Rusty wheels and other plated parts can often be brought back to life by rubbing them with automotive chrome polish. It has mild abrasives in it, along with the polishing agent.
If that doesn’t work, try using a wire brush (or a wire wheel if you have one for your electric drill), steel wool, or even medium grit sandpaper. Naval jelly is good for dissolving rust, but it tends to discolor whatever plating might be left on the piece. Always finish up with chrome polish and buff to a sheen.
Brass and copper parts can be cleaned with household brass and copper cleaners and shined with a buffing wheel or elbow grease and a soft cloth (old T-shirts are great for this).
Chemically blackened parts can be restored after cleaning with ordinary gun blue. Wipe off the bluing liquid completely and spray the piece with WD-40 to stop the oxidation and impart a protective finish coating.
When polishing the name and number plates, the paint in the engraved indentations sometimes comes off. Plates can be made to look like new by coating the entire plate with black paint and, when it is set up but not hard and dry, simply rubbing it off with a soft flat tool, such as a wooden tongue depressor. If you’re careful, the paint will remain in the indented lettering. When the paint is hard and dry, the plate may be lightly polished again.
Lithographed surfaces can’t be repainted, but they can be cleaned and coated with lacquer or polyurethane varnish to preserve them.
Wash lithography with mild soap and water first. A soft toothbrush can be helpful for getting at ground-in dirt, but scrub very lightly because the litho film is thin. Rinse well.
5. Apply the paint
To prime or not to prime? It’s up to you, and might depend on the color you’re using. Red, orange, yellow, and many of the lighter colors tend to be transparent and require multiple coats anyway. Primers usually make the finish coat adhere better. Some are sandable and allow for smoothing out fine blemishes. However, the train was probably not primed originally.
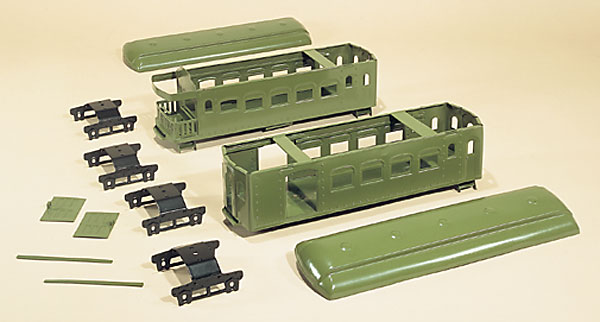
Practice on expendable metal surfaces to get the hang of spray painting. Work slowly. It isn’t hard, but it requires a little technique best gained from trial-and-error experimentation. To avoid runs and sags, apply two or three light, dusting coats instead of one heavy one. Be sure there is adequate ventilation because the fumes can pose a health hazard if inhaled, and wear PPE.
Read and follow the directions on the can carefully for best results. There are differences among the various paint brands, so don’t make any general assumptions. Being conservative and cautious usually pays off in the long run. Shake the can for at least as long as it says on the label. I usually give it some extra time. You can’t over-mix the paint in an aerosol can, but you can under-mix it. That could cause matching problems later on.
Most commercial spray enamels will be dry to the touch in half an hour and set up in a day or less. But it may take weeks for the paint to really harden. Baking hastens the setting up and hardening process, but it has its dangers. If the oven gets too hot, the paint may blister or sag, and any repairs made with epoxy resins may soften and fall out. A better way to dry is to place your newly painted item out in direct sunlight for a couple of hours. Be sure your paint is set up first, or you will find an assortment of airborne flora and fauna sticking to your work. Personally, I’d rather let time do the work for me at room temperature than risk ruining my efforts by being impatient.
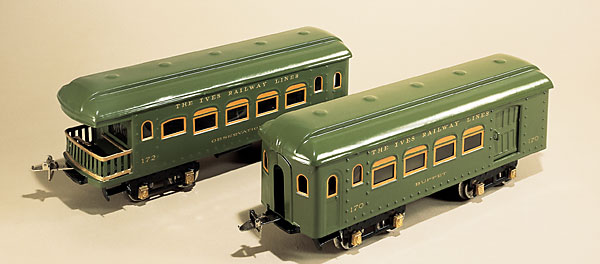
6. Reassembly
Don’t attempt this until the paint is fully hardened. Then work carefully, trying to touch the painted surfaces as little as possible. I wash my hands immediately before I begin to minimize oily fingers on the work. (Some people wear gloves.) As soon as I finish, I carefully wipe the prints off with a damp cloth. Working on a folded towel instead of a hard surface helps to avoid accidental nicks and scuffs.
Beyond this, there are no rules for reassembly, except to retrace the steps followed when the piece was taken apart. Screws and bolts should be firmly tightened, but not to the point where they crack the paint around them. Riveting must also be carefully done to avoid chipping the finish. Tabs should be stressed in their slots only enough to hold them in place. If you break one, a little dab of epoxy cement or gel-type CA cement can probably be used in its place.
7. Lettering

Most original lettering was applied by either rubber stamp or decal. Reproduction decals and dry transfers to replace the rubber-stamped lettering are available for many of the more popular models.
E.C. Kraemer, 105 Hollywood Ave., Fairfield, NJ 07006, specializes in decal reproductions. For $2 and a stamped envelope, they’ll send you their catalogs.
8. Clean locomotive mechanisms
While repairing these mechanisms is beyond the scope of this article, they should at least be cleaned and lubricated before being reinserted into a freshly painted locomotive body. Not only will they look better, but cleaning is actually the first step in the repair process, and sometimes enough to make cantankerous mechanisms behave.
Step one: Get all the old dirt, grease, cat hair, and rug fuzz out of the mechanism by dipping the whole thing into a container of mineral spirits. Dip it, don’t soak it. Take a paintbrush and work all the dust bunnies out of the innards. Dip again and brush some more, all over. Be sure you get at the commutator face. Dip again and spin the wheels a few times while it’s submerged. Use cotton swabs and pipe cleaners to get at the hard-to-reach places. Let it drip-dry for a few hours. The motor will not be harmed by the mineral spirits.
Step two: Lubricate all the bearings with light machine oil, then apply a few drops of WD-40 to the sides of the drive wheels and scrub them with an old toothbrush. Not only will this loosen the residual dirt between the spokes, when it dries, it will leave a pleasing luster. Whatever WD-40 splatters on the motor sideplates can be rubbed off with a cloth, and they too will shine.
That’s it! I hope I’ve been able to show you that restoring old metal trains doesn’t require special skill or equipment, only a little care and patience.


The best thing I’ve found to remove rust is vinegar. Apple cider works better than white but they both do ok. Been using it on motorcycles, cars, toy trains, gardening tools, everything—for years.
I love restoring prewar trains and have always used easy off oven cleaner. 2 hours after spraying, the paint falls off with just water and some lite brushing. then i go to the work bench and clean everything up with my wire wheel. It gives just enough texture to the metal so that the rustoleum paint that i use gets a good bite on the metal. As far as boiling my trains why would anyone want boil lead based paint and release it into the air. Bad stuff to inhale. Bad anywhere.
For paint striping on both metal, and plastic surfaces, I discovered this Dollar Store, house hold cleaner called "Awesome Cleaner" works great, and is safer to use with no harmful chemicals, or fumes. What I do is fill a container with half water, half Awesome Cleaner, and soak the part in it over night, and the paint come right off, with some slight scrubbing with a tooth brush.
If you care for your trains ,WD-40 is the worst to use on them .It is a dirt magnet. You can't paint over it without giveing the item a good soaking in
lacquer thinner or acidtone.
Paint stripping is easy if you think Green.It safe on the hands , and will strip
paint off plastic.No matter how long you leave it in.IT will not harm the plastic or even the finest detail.
Whats Green?I have been using it for 20 yrs.