


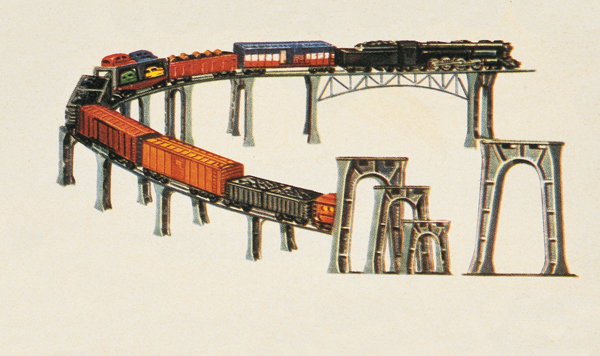
Historically, real railroads spent a large proportion of their engineering budgets planning the best routes through rugged terrain to minimize grades. By contrast, model railroaders look at vertical changes not as problems to be minimized, but as opportunities. Breath-taking mountains, valleys, rocky cliffs, and dramatic bridges all seem much more natural when the trains are also climbing and descending.
The ability to pull toy trains up and down grades took a giant leap forward when Lionel introduced Magne-Traction in 1950. An article in the September 2010 CTT (“Add elevation to a flat layout”) highlighted a number of ways to make use of the third dimension to add to the appeal of your layout.
Here are some useful ideas on how to plan grades for your O or S gauge railroad.
Steepness
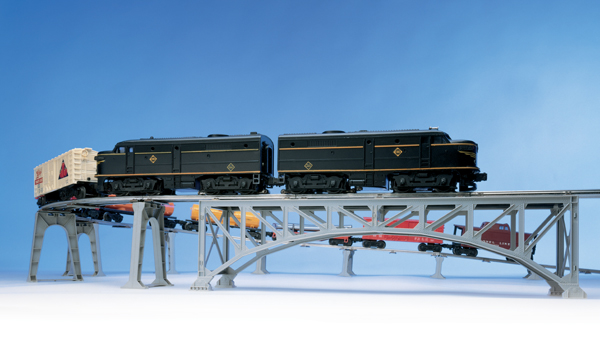
The standard method to measure the steepness of an incline is to divide the rise over the run. For example, a grade that rises ½ inch for each 10 inches of length is a 5 percent grade because ½ inch is 5 percent of 10 inches. For a real freight-hauling railroad a 5 percent grade would be prohibitively steep. Nonetheless, 5 percent is the grade we find midway up the ubiquitous Lionel no. 110 trestle set, and model locomotives have been negotiating it successfully for decades.
Length
Of course, other considerations affect both the prototype and the model. One is the length of the train: The weight of the railcars on the grade creates the downward pull. Thus, a standard prototype technique to get a long train up a steep grade is to break it into sections and haul one section up at a time. Another method is to add a helper locomotive that joins the train for the uphill trip and returns to the bottom of the hill to wait for the next train.
If you want to run trains up and down your grades without resorting to these time-intensive techniques, then you may have to experiment to find how long of a train is realistic and confine your longest trains to the level portion of the layout.
Curves
Another factor affecting the climbing ability of a train is the straightness of the track. Most of today’s toy train cars have needle bearings that provide little rolling friction, but that isn’t true of models from the postwar and prewar eras. Even on a level track, if the last car or cars of a train provide too much drag, the cars in the middle of the train tend to be pulled from the track when the train goes around a sharp corner. If the train is also climbing a grade, this tendency is magnified.
There are two ways to deal with this problem. The first is to put the cars that exhibit the most drag at the front of the train and the more free-rolling cars toward the back. The second technique is to minimize the sharpness of any curves that occur on grades.
Vertical easements
While we are familiar with sectional track in which a particular piece is either a curve or a straight, a more realistic design employs a transition so a straight track enters a wide-radius curve that gradually becomes sharper. This is called an “easement,” and railroads have mathematical formulas for calculating them. The use of an easement makes any curve less abrupt.
There is a similar situation in the vertical dimension, but it is more of an issue on a model railroad than the prototype. If you’re working with sectional track and have one section on the level and want the next to climb a 5 percent grade, you’ll experience a couple problems.
First, the track doesn’t want to bend that sharply. Whether you can force it to bend, it’s better not to. Second and more important, if you try to run many steam locomotives up to the base of such a grade, the pilot will reach the inclined track first and essentially plow straight ahead, shorting out against the inclined center rail. In some cases it may climb all right but have the problem when it comes down.
Another problem occurs at the top of a grade. If the elevated track is level and comes to a sudden 5 percent downgrade, many locomotives with long wheelbases will appear to be jumping off a cliff. In fact, if the first section of the grade is a curve, there’s a good chance the locomotive will miss the track and derail with potentially disastrous consequences.
Both of these problems are solved by using a vertical easement. This means the amount of change to the gradient at any point is limited. Let’s look once more at the 110 trestle set.
If we trace the tops of consecutive trestles, we see they form an S-curve. There’s a vertical easement at the bottom and at the top. Even though the grade at the middle is 5 percent, the grade of the lowest section (assuming 10-inch track sections) is only 1.7 percent. The grade of the next section is 3.4 percent, and it isn’t until we get to the third section that the grade becomes the full 5 percent.
At the upper end the easement is even more pronounced. Assuming the train is coming to a downgrade along a series of A trestles (the tallest size), the grade down to the B trestle is only 1.2 percent. The grade from B to C is 2.4 percent, and from C to D it’s 3.7 percent. Not until we get past D is the grade the full 5 percent.
In other words, between each pair of consecutive 10-inch sections the gradient changes by no more than 1.7 percent where the track is concave and no more than 1.3 percent where the track is convex. Although these dimensions are somewhat approximate, this is a good rule for calculating vertical easements.
Practical applications
If these calculations sound overly complex, do not despair. Many of us successfully built grades for years without doing any math. Instead, the rule of thumb my dad taught me was, “If the track doesn’t conform to what you want, don’t force it.”
Using O gauge tubular track in good condition, the most vertical deviation it allows between sections is less than 2 percent, so we just fudged the supports until everything seemed happy. The results were always good, though it seemed that grades required more length than I expected. Now we know why.
If you’re using GarGraves or another brand of flexible track, it’s easy to create a smooth bend/curve in the vertical dimension just as with the horizontal dimension (with the usual precautions about avoiding kinks). However with sectional track, particularly track with built-in roadbed, the changes in grade must occur at the section junctions. To maintain reliable electrical and mechanical connections, the vertical easements are essential.
Height
The 110 trestle set elevates the upper track by 4¾ inches. That’s the bare minimum and assumes there is nothing more than a thin sheet-metal bridge deck between the elevated track and a train passing underneath. It also assumes you’re attaching the lower track direct to the lower tabletop. If you want the upper level to be scenicked with structures and other trackage, or if you’re using a built-up roadbed, you’ll need more separation.
When designing a new layout, my rule of thumb is to separate multiple levels by at least six inches. That allows for a sturdy ½-inch plywood floor for each level and room to reach inside any tunnel entrances in case of emergencies. Depending on the type of roadbed being used, you may want to set up a trial with your tallest locomotives and rolling stock to make absolutely certain they will fit.
Summary
Grades are a wonderful idea for any O or S gauge layout, enhancing both the visual appeal and operating interest. As long as you observe the guidelines presented here, you should be able to enjoy them in a trouble-free manner on your own layout.


Regarding “banking” or “super-elevation”, I attempted to do that and all was well until I ran into MTH passenger cars with 3 axle trucks, all wheels having flanges and a center rail pick up for lighting. While I had no problem with engines and cars with 2 axle trucks those passenger car trucks are rigid and don’t “play well” on unlevel curved grades.
One small point to add on curves and elevation is banking or ‘superelevation’. This is the concept of creating a small (1-3%) increase in pitch on the outside of the track. This won’t mean much for trains going up but when your engine picks up too much speed going down hill it can keep you on the rails and avoid a nasty high flying crash.
Good Article. I just finished my layout that includes grades using Gargraves track and Ross Turn-outs.. I used a software (SCARM) that was a great help. I also used an electronic level from MicroMark to clearly indicate grade level at all points. . Some “lessons” I learned.. 1. All 3-rail track is very rigid and you should plan to change grade only at the track joints. 2. Using shorter sections of track gives more flexibility to change grade..3. If possible do not transition from level track to a grade on a curve. 4. Keep turn-outs (switches) on the level’ 5. While the vertical grade is changing pay attention to insure that the rails on the horizontal plane are level (no super elevation). 6.Get used to running slower shorter trains.
test
Interesting. I didn’t realize the transitions were very different from going up to leveling off at the top.