How To Build a Model Railroad Car Swap Project part 6: Seth’s techniques

Car Swap Project part 6: Seth’s techniques

By David Popp | February 25, 2023

Part 6 of a collaborative modeling effort between David Popp, Gerry Leone, and Seth Puffer

Email Newsletter

Get the newest photos, videos, stories, and more from Trains.com brands. Sign-up for email today!

Car Swap Project part 6: Seth’s techniques: With the decals finally printed and distributed, it’s time to start the actual work of completing the cars. Seth, Gerry, and David each have their own techniques for doing this kind of work, so parts 6-8 will cover each modeler’s efforts in detail. Seth kicks things off with work on the Puffer Bridge Lines cars for Gerry and David.

Car Swap Project part 6: Seth’s techniques for decals and weathering: Green box in white packing peanuts with smaller clear box containing a model train car
Once both boxcars finally arrived, Seth Puffer could begin the process of making custom models for David Popp’s and Gerry Leone’s layouts.

Seth: After a few weeks of design prep and waiting patiently for the cars from David and the decals from Gerry, I’d had some time to think about how I wanted to proceed.

Gerry: Man, that box took forever to get here. Seth got his car a week before I got mine.

David: That’s because you changed which car you wanted me to send. I had to dig the new one out of storage in my basement.

Gerry: And then it didn’t fit in the mailbox, so the postman left it in the snow…

Seth: Guys, this is my part of the project remember?

Gerry: Oh ya, sorry.

David: Please continue.

Seth: My main problem was this: I know how I like cars to look on my layout, but what will David and Gerry like? I’ve done a few cars for other friends over the years, but this seems like a step up.

Gerry: You’ve got a beautiful layout. You’ve got nothing to worry about.

David: And I was the guy who stripped both the lettering and the paint at the beginning. Remember?

Seth: As Gerry pointed out earlier, the car models were beautiful. David sent me a Bachmann Spectrum simulated wood side boxcar. Gerry gave me a Kadee 40-foot steel boxcar for his layout. Both cars need to be decaled. Gerry printed the decals for us in the last installment using his still functional ALPS printer. Back in the day, I really wanted one of those printers. I had never worked with a decal created on an ALPS and was very impressed with their quality. I took my time with them, applying them to the two cars over a three-day period.

Car Swap Project part 6: Seth’s techniques for decals and weathering: Red model boxcar with white letters sitting on workbench
The finish on the undecorated models was glossy enough to apply the decals without a clear coat. Seth has started the On30 car with the road name and reporting marks.

Seth: Once the decals had dried, I applied a coat of satin finish. I did this mostly to seal the decals on the model. I’d apply a flat finish at the end of the weathering phase.

Car Swap Project part 6: Seth’s techniques for decals and weathering: Brown model boxcar in dirty spray booth with sliver airbrush
After the decals dried, Seth sealed them to the car with by airbrushing them with a coat of clear satin.

David: What brand of clear coat products do you use?

Seth: MicroScale Satin (MI5). I prefer an airbrush because I have more control and a much finer spray than a can. I’ve had trouble in the past with can sprays, so I don’t like them much.

Gerry: I’m not overly fond of the heavier spray that comes out of the cans, either, but I guess I never thought about airbrushing the clear coat.

Seth: Next time try it! I decided to remove the trucks from both cars so I could paint the wheelsets. I used a microbrush for this because it applies the paint very evenly. I painted them Micro-Lux Rail Brown, as it gives them a realistic dirty brown appearance.

Car Swap Project part 6: Seth’s techniques for decals and weathering: Hand holding small green brush and sliver wheel while painting it brown
Seth painted the wheels for the cars using Micro-Lux Rail Brown acrylic paint.

David: I use the same technique for wheels, having stolen the idea from Cody.

Gerry: So do I! And I stole it from the same place!

Seth: The moment I saw the Bachmann On30 car, I knew I wanted it to have the look of old, faded wood. I thought the best way to accomplish the task was to drybrush aged white vertically with the wood sides. I followed that up with an application of Flory Wash. A friend from the UK pointed me toward this product a couple years ago and I really like it. I gave the entire car a coat of wash, and it settled into the crevices very nicely. I used a Q-tip to wipe it down the sides, but a trace of the “grime” stays on the model.

Car Swap Project part 6: Seth’s techniques for decals and weathering: Brown model boxcar on workbench with faded paint
After drybrushing the car sides with white paint, Seth applied a product called Flory Wash to bring out the details.

Gerry: The photo looks great! I’ll have to try Flory Wash.

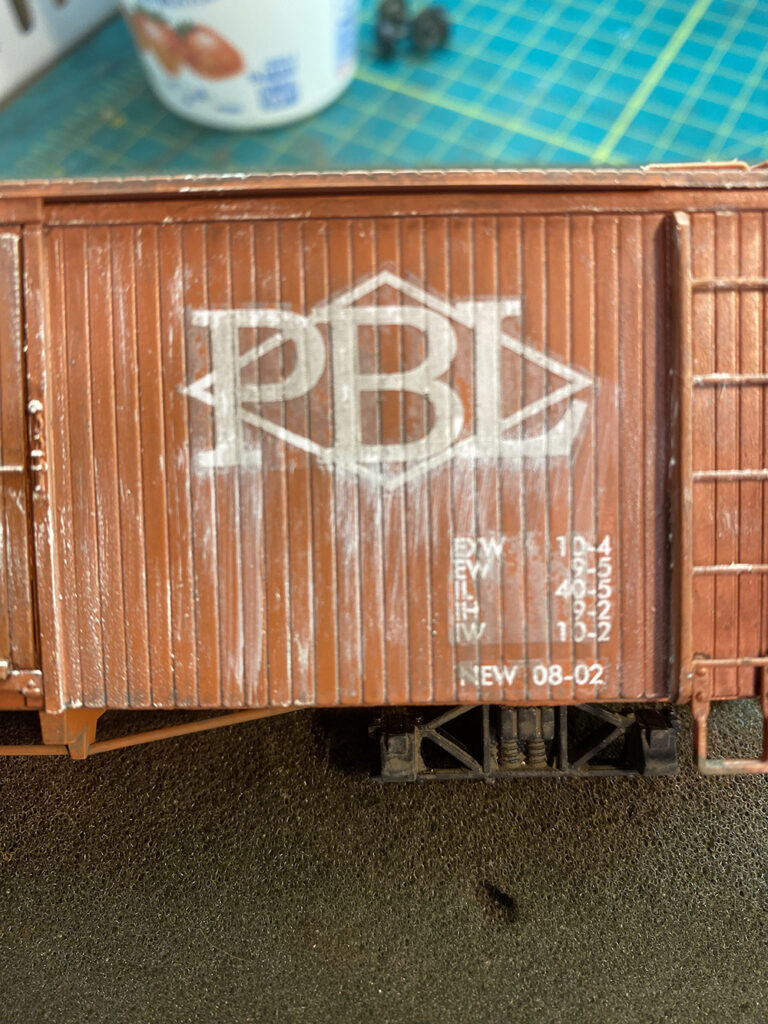
Seth: Yes. It does a great job! But use it carefully. I had a little trouble with the wash one evening because I forgot to wipe it down. It affected a couple of the decals, causing them to “silver,” which is a condition where you can see the decal film on the model.

Car Swap Project part 6: Seth’s techniques for decals and weathering: White letters on brown model boxcar with streaked white paint.
Seth forgot to wipe off the wash coat on this side of the car, and it caused the decals to “silver” making the decal film visible on the model.

Gerry: I remember your text about this. How did you fix it?

Seth: A couple more applications of MicroSet solved the problem and allowed the decals to reseat themselves. Next, I turned to oil paint washes. My two favorite colors are burnt umber and burnt sienna.

David: Oils do a great job, but they take forever to dry.

Gerry: I’ve tried them, but for some reason I can’t seem to control them as well as you do. I’ll have to keep practicing.

Seth: Still, they produce great results, and I like the how they make details stand out. I also used the oil wash on the underside of the car. Once everything had dried, I gave the car a coat of MicroScale Micro Flat (MI3).

Gerry: You use an oil wash on your figures, too, don’t you?

Seth: I do, and it really brings out the details better than an acrylic wash.

Plastic red boxcar on workbench surrounded by assorted paints and tools.
Seth applied a homemade wash of oil paints to the underside of the car. The oil paint settles in around the details easily, making them stand out.

Gerry: David’s car looks great! I can’t wait to see what you did to mine.

Seth: Wait no longer. I’ve seen many Kadee cars over the years, but I hadn’t purchased any because my railroad is just a little too modern for the 40-foot cars.

David: Wait, I got you a 40-foot car!

Seth: No worries, I’m good with one or two. Anyway, I was very impressed by the level of detail on Kadee cars. Since I’d already applied the decals and sealed them with a satin finish, I began the weathering process with a coat of flat finish. I’d planned on using weathering powders (Pan Pastels) for this car, so I started with that. The flat finish gives the car a little “tooth” to grab the powders. Once the powders were on, I used a Q-tip dipped in alcohol to “move around” the powder. I got a little too aggressive in one area and removed some of the flat finish.

David: That’s model railroading for you. It’s always something – particularly on long projects.

Brown model boxcar on workbench with faded paint and rust
Rubbing alcohol is a common solution used in weathering a model, however, as Seth learned, it can affect clear finishes, such as the MicroScale Flat on this car.

Seth: I wasn’t too concerned about that because subsequent weathering would cover that up. Once I was happy with the powders, I went back to oil paints like I did on David’s car. Here again, I used the oil paint mainly to highlight some of the model. It is a more subtle than the effects on David’s car, but mostly because of its boxcar brown color. I decided to add some pock marks of rust using technique I picked up from a Pelle Soeborg article. I took some of the Pan Pastel powder and the Micro Mark Flat and made “goop” of powder, then I applied some “dots” to the car. Once those had dried, I used a little powder rust trailing down from the dots. It makes a very convincing rust spot. I finished with a coat of Micro Mark Flat to seal all the weathering work to the car.

Gerry: Man, that looks great! I can’t wait to see the car on my layout.

David: Awesome work, Seth, I hope I can match your expectations when I get to my cars. But first, Gerry will share his modeling work in the next installment. See you there!

One thought on “Car Swap Project part 6: Seth’s techniques

  1. As an oil painter, I have found a way to speed up the drying of oil paint.
    I use mineral sprits thinner and add a drop or two on Japan dryer to the thinner. Apply with any color and in most cases it will dry overnight.
    Japan dryer is getting hard to find, I got mine at Home Depot but not all HD stores handle it. Some art supplies may carry it. Try Dick Blick too.

You must login to submit a comment